How to Create Image Slider in HTML and CSS

One of the few things that make a website attractive and appealing to the eyes is definitely the images, and an image slider takes it to a whole new level. Well, an image slider is capable of expressing a thousand words. If you want to create your own automatic image slider in HTML CSS JavaScript, then you are at right place.
An image slider basically shows an image at a time, also after a specific time usually in seconds, and then swaps it with the other one and this goes on until the first image comes on board again.
- Part 1. How to Create Image Slider in HTML and CSS
- Part 2. The Best Tool to Create Image Slider and Generate CSS Code
How to Create Image Slider in HTML and CSS
To create an automatic image slider in HTML, CSS, and JavaScript code, you need to know some of the basics and that's what we will be assuming in this part of the article.
After all you just need to copy and paste the HTML image slider code and CSS image slider code given below and swap the image links with your image links in it at the right place.
Now, if you are someone not so familiar with the coding languages then we got you covered too in the later part of this article.
Step 1: Create an HTML file named index.html
Step 2: Add styles using CSS
@keyframes fade {
0% {
opacity: 0;
}
100% {
opacity: 1;
}
}
* {
padding: 0;
border: 0;
box-sizing: border-box;
}
body {
height: 100%;
}
body h1 {
text-align: center;
}
.slide-container {
display: flex;
justify-content: center;
align-items: center;
max-width: 1000px;
margin: auto;
position: relative;
}
.slide-container .slide {
display: none;
width: 100%;
}
.slide-container .slide.fade {
animation: fade 0.5s cubic-bezier(0.55, 0.085, 0.68, 0.53) both;
}
.slide-container .slide img {
width: 100%;
}
As of now, the slide display property is set to none which makes them not visible. We will be adding the visibility in the JavaScript in the later part.
But for now, let's first add some styling to the previous buttons and the dots.
.slide-container .prev,
.slide-container .next {
cursor: pointer;
position: absolute;
top: 50%;
width: auto;
margin-top: -22px;
padding: 16px;
color: white;
font-weight: bold;
font-size: 20px;
transition: all 0.6s ease;
border-radius: 0 3px 3px 0;
user-select: none;
}
.slide-container .prev:hover,
.slide-container .next:hover {
background-color: rgba(0, 0, 0, 0.8);
color: white;
}
.slide-container .prev {
left: 2px;
}
.slide-container .next {
right: 2px;
}
.dots-container {
display: flex;
justify-content: center;
align-items: center;
padding: 10px;
}
.dots-container .dot {
cursor: pointer;
margin: 5px;
width: 20px;
height: 20px;
color: #333;
border-radius: 50%;
background-color: #dfd6ce;
}
.dots-container .dot.active {
border: 2px solid green;
}
Step 3: Adding functionality. Create a file named "index.js and add the code given below in it.
var currentSlide = 0;
const slides = document.querySelectorAll(".slide")
const dots = document.querySelectorAll('.dot')
const init = (n) => {
slides.forEach((slide) => {
slide.style.display = "none"
dots.forEach((dot) => {
dot.classList.remove("active")
})
})
slides[n].style.display = "block"
dots[n].classList.add("active")
}
document.addEventListener("DOMContentLoaded", init(currentSlide))
Step 4: The NEXT and PREVIOUS functionality. (Add this to index.js)
const next = () => {
currentSlide >= slides.length - 1 ? currentSlide = 0 : currentSlide++
init(currentSlide)
}
const prev = () => {
currentSlide <= 0 ? currentSlide = slides.length - 1 : currentSlide--
init(currentSlide)
}
document.querySelector(".next").addEventListener('click', next)
document.querySelector(".prev").addEventListener('click', prev)
Step 5: Making the slides change automatically. (Add this to index.js)
setInterval(() => {
next()
}, 5000);
Step 6: Adding dots which are clickable to advance or go-back between slides. (Add this to index.js)
dots.forEach((dot, index) => {
dot.addEventListener("click", () => {
init(index)
currentSlide = i
})
})
The Best Tool to Create Image Slider and Generate CSS Code
So far, above we saw the process of creating an image slider manually by coding but if you are not a coding person this part of the article is definitely for you. If you are looking for a reliable tool that can help you create an automatic image slider in HTML source code as well as in CSS then, you should consider Mockitt.
Wondershare Mockitt is a cloud-based Prototyping software. With an almost zero learning curve and easy to absorb interface the tool is here to help you simplify your designing jobs and boost your ideas by making the right tools available within clicks.

It also has a dedicated carousel widget which simplifies the job of the user and increases productivity. You can create an automatic image slider with minimum efforts and there is also a separate handoff feature that lets you generate the automatic image slider code of your image slider and use it elsewhere, which pretty clearly makes it a flexible option.
Tutorial on How to Create Carousel and Generate Code with Mockitt.
Step 1. Create a Project
Create an account and sign into Mockitt. On the dashboard, you need to click the "Create" > "Project" button to start a new project.

Step 2. Add a Carousel and Set the Properties
After you name the project and select the size of your design, an artboard like screen will open in front of you.
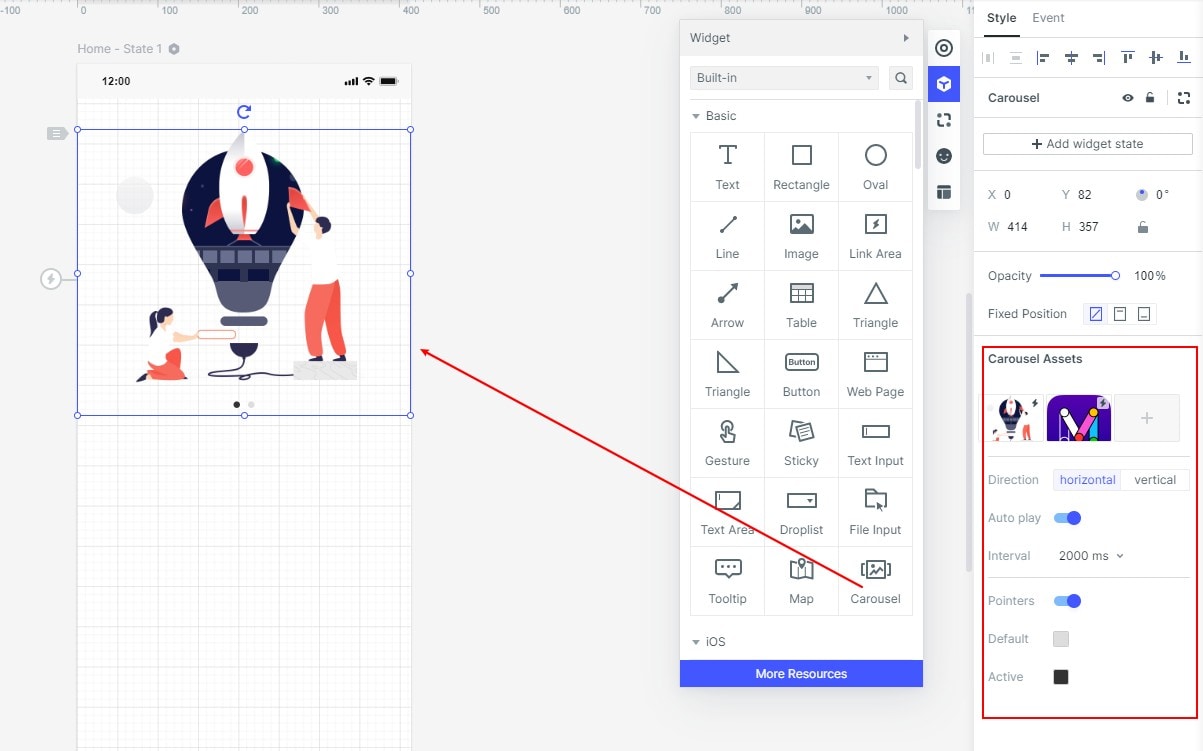
- Click on the cubical icon which says "Build-in" as you hover your pointer over it and select the "Carousel" option by double-tapping on it.
- A carousel widget will appear on your artboard. You can expand it in your desired direction by clicking on it and pulling the dots with your mouse pointer.
- Tap on it to select the carousel widget so that the image upload option comes up on the right-hand side of the screen.
- Now, you can upload the desired images by clicking on the three dots under the "Carousel Assets" on the right-hand side of the screen.
Step 3. Handover the Carousel Design to the Developer
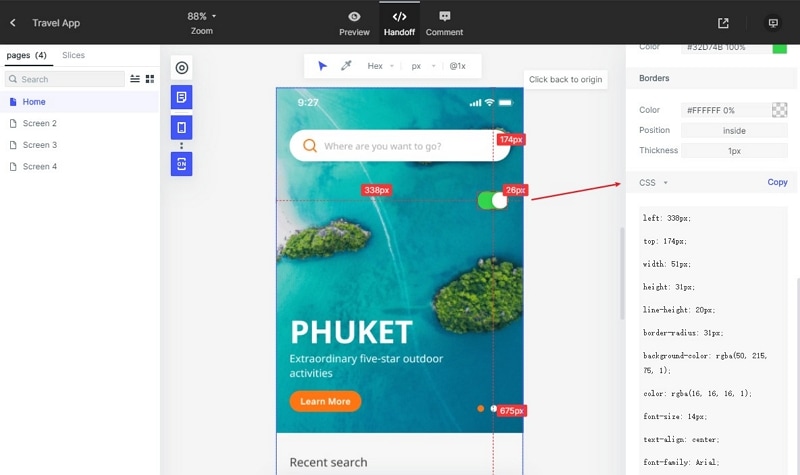
Now let's say you want to copy the CSS code. So, click on the "Preview" button on the top right corner of the screen and select the "Hand-off" option located in the top middle of the screen.
Select the image so that the code option pops up on the right-hand side of the screen. Select the desired code option and click on it. You can copy and paste the code where ever you want it in your blogs, presentations, etc.