What is Lightning Design System and How to Use It
With the growing need for flexible and scalable design systems, plenty of big open-source platform developers flex their muscles to live up to the current demands. The lightning design system is one of them and scores of companies and individual application developers leverage it. Although it is one of the best design systems, there is still a significant portion who don't really understand what a lightning design system is and how it works. If you are among them, don't worry because this article is here for you. In this article, we will give you a detailed guide on what the Salesforce Lightning design system is and how to use it.
- Part 1. What is Lightning Design System
- Part 2. Advantages of the Lightning Design System
- Part 3. How to Use the Lightning Design System
- Part 4. The Best Free UX Design Tool
What is Lightning Design System
The lightning design system is a CSS framework that lets you create appealing applications without even writing a single line of code. It has plenty of icons, colors, patterns, and fonts that help developers create lightning experience applications like never before. With the help of design guidelines and CSS framework, users can create amazing enterprise apps. Unlike several other design systems, the lightning design system is focused on business apps. In this regard, it provides specialized components besides traditional components for data manipulation. These include activity timeline, data tables, and record headers just to mention but a few. This system is run as an open-source project and is thus available to everyone. The lighting design system's best thing is that it provides a platform to unify user experiences across otherwise fragmented pieces of enterprise applications. There are various components and blueprints, such as ready-to-use HTML and CSS UI elements that help to provide a good foundation for salesforce experience development. With the design guidelines (principles and practices), users can develop magnificent, consistent, and user-friendly product experiences. Leverage the easy-to-use tools that assist all Trailblazers to optimize workflows and unlock salesforce ideas into practical designs.
Advantages of the Lightning Design System
The lightning design system is not just popular because it is developed by big-name companies but rather the beauty of what this platform offers to users. There are plenty of advantages o using the Lightning design system to create enterprise app experiences. They include:
1. Flexible
The lighting design system is very flexible. You don't have to worry about detailed specs because it is already catered for by elements like components and patterns. This leaves you with one assignment of focusing on the big picture of delivering the best user experience.
2. Scalable
One of the most important aspects of a good design system is scalability. The user needs and demands keep evolving, and systems must adjust to meet them. Fortunately, the Lightning design system is a living system. It keeps on evolving according to the changing needs. Irrespective of the system's growth pace, the lightning design system ensures that apps, interfaces, and tools are consistent.
3. Efficient
The Salesforce lightning design system is, no doubt an efficient platform. Remember, you can build tools without even writing codes. This saves much time and energy for the designers and developers because they don't have to focus on small things anymore. Instead, they are plunged into bigger issues such as usability and meaning. This is made possible by the availability of standardized and reusable components that make collaboration easier, reinforce branding, and fosters consistency in terms of look and user experience.
4. Accessible
Besides being flexible, the Salesforce lightning design system is available for all. This system is committed to fostering operable, robust, understandable, and perceivable products for all users' categories. As such, it comes with ARIA markup and guidelines that make it possible for people with disabilities to leverage and contribute to this amazing platform.
5. Living
As aforementioned, any design system needs to be open to changing needs and demands. This way, it can easily adjust to meet them. A system to be termed as living should constantly update its preexisting components and roll out new features that meet emerging needs. Fortunately, SLDS keeps updating existing applications and rolls out new updates for every release.
6. Platform Agnostic
Users can integrate the lightning design system with any tech stack to create amazing tools. They can make use of SLDS guidelines and technologies like Aura and Visualforce.
How to Use the Lightning Design System
-
Download Lightning design system
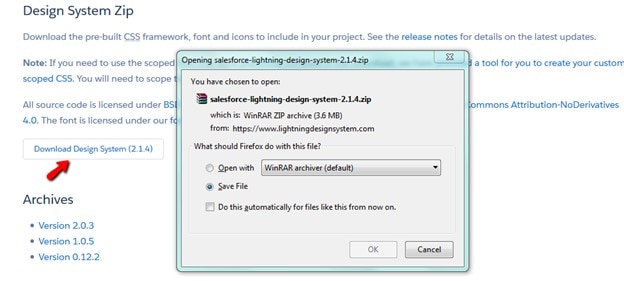
The first step is to download the Salesforce Lightning design system CSS framework. Just visit the lightning design download page and head to the Design System Zip section. Here, click the Download Design System (2.1.4) button. When the ZIP file downloads, save it on your computer. This zip file comes with a pre-built CSS framework, icons, and fonts.

-
Upload ZIP files as Static Resource
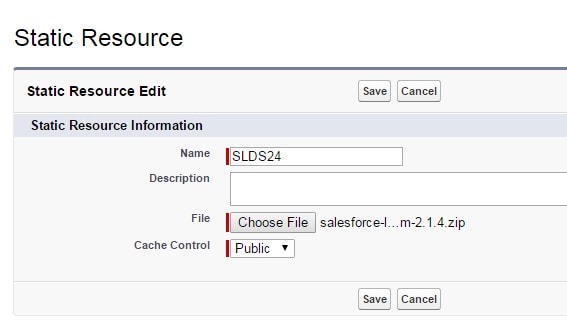
A static resource is a collection of files that are stored in Salesforce. When these files are added as a static resource, any lightning component can reference these files. Simply navigate to "Setup" and go to "Static Resources" within the Quick Find box. Now select "Static Resources" and hit "New." Provide a suitable name in the name field and then click "Choose File" or "Browse" to upload the zip file you just downloaded. Click the "Cache Control" drop-down list and choose "Public." Finally, click the "Save" button to upload your zip file as a static resource.

-
Use Lightning Design CSS framework on Lightning Component
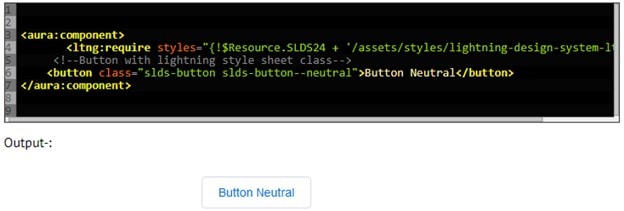
To load external JavaScript and CSS libraries, just add the ltng:require tag in the lightning component. Do this once you have uploaded them as a static resource.

In this code, the SLDS24 represents the name of the static resource source file you just uploaded. The $Resource stands for the global value provider. This allows you to reference images, style sheets, and the Javascript code you already uploaded as a static resource. Finally, the path /asset/styles/lightning-design-system-ltng.css is that of the CSS in the zip file.
-
Create Lightning Component tab
To begin with, go to the Setup tab and then type the word "Tabs" in the Quick Find box. Now go to the "Build-Create" section and choose the tabs. Once you click on the tabs, a "Custom Tab" page will be displayed.

Simply scroll down the page and head to the Lightning components tab section. Click the "New" button and then choose your "Lightning Component" from the drop-down menu. Enter the tab label, tab name, choose tab style and enter tab description in the respective fields. Now click "Next" and then "Save" to complete creating your lightning component tab.

-
Add Component Tab on Salesforce1 Navigation Menu
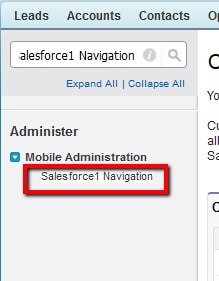
Now that you have completed creating the component tab. It is time to add it to the Salesforce1 navigation menu. Again go to the "Setup" tab and type the statement Salesforce1 Navigation in the Quick Find box. In the administer section, select the "Salesforce1 Navigation".

Now, the "Mobile Navigation" page is displayed. When you open your Salesforce1 mobile app, you should see your lightning component there.
The Best Tool for Prototyping
Wondershare Mockitt is the best tool for prototyping for all sizes and types of projects. This tool is leveraged by countless people and organizations owing to its immense combination of features. It is super-fast, easy to use, affordable, and compatible with a wide range of devices and operating systems. Being a cloud-based application, you can create prototypes without being worried by time and location. Simply log in to your account and start prototyping anywhere at any given time.

With Mockitt, there is no more struggle to impress your clients or customers. With a few clicks, you can turn your static prototypes into interactive prototypes. Use links and animation to make them not only interactive but also eye-catchy. There are tons of excellent UI assets and templates, widgets, icons, and components to choose from here. With templates, you save the time and energy needed to build prototypes from scratch. The widgets and icons will make your designs more appealing. It is just and matter of drag, drop and edit before you create stunning prototypes. It is also an excellent collaboration platform. Users can collaborate in real-time to accelerate the project's pace. They can comment and share feedback in real-time irrespective of their location. Once the prototype design is complete, you can test it directly and share it with target audiences.
Key Features
- It supports real-time collaboration and communication.
- With this program, users can create interactive and animated prototypes that easily impress the clients.
- It has several UI assets and templates that suit diverse fields and hence users don't have to build designs from scratch.
- It offers plenty of widgets and icons that help to make interfaces more beautiful. Also, the user can create their own libraries of reusable components.
- Wondershare Mockitt allows users to test their prototypes on the platform.
- It allows users to share and control the visibility of their prototypes via visibility settings.

