Low Fidelity vs High Fidelity Wireframes and Prototypes

Low fidelity vs high fidelity prototyping is still a very confusing topic to designers and relevant stakeholders' scores. A good understanding of the two enables designers to choose the right fidelity and realize successful app prototyping. If you are also stuck and can't figure out the differences and application of low and high-fidelity prototypes, then this article is here for you. In this article, you will receive a detailed guide on low fidelity vs high fidelity wireframes and prototypes.
- Part 1: Low Fidelity vs High Fidelity
- Part 2: Low Fidelity vs High Fidelity: When Should You Use Them
- Part 3: How to Create a High Fidelity Prototype
Part 1: Low Fidelity vs High Fidelity
Fidelity is a term that describes how close a prototype is to the actual product. This closeness is based on aspects like visual design, content, and interactivity. We can develop different fidelity levels based on these aspects, yet the standard types are high and low fidelity prototypes. While the difference may look crystal clear, scores of people still find the two terms quite confusing. This is not a surprise, especially given that the whole idea of prototyping is still a dark cloud to a diversity of people across the globe. To help settle this confusing, you need to get acquainted with some of the major differences between low fidelity and high fidelity prototypes, as broken down below.
1. Visual Design
In a low-fidelity prototype, only a few visual attributes of the actual/final product are included. These include the shapes of elements and the basic visual hierarchy. Since the low-fi prototype is meant to test the functionality and not the visual aspects, only the relevant shapes and visual elements are incorporated. On the other hand, a high-fidelity prototype is a more realistic and detailed design. All the elements that are present in the final product interface, graphics, and spacing are included. The visual look and feel resemble the final product.
2. Content
In a low-fidelity prototype, not every piece of content is featured. Here, only the key relevant contents of the real product are added. There is no room for detailed or specific content to certain processes. The intention is to capture those primary contents that cannot be excluded from the project's primary functionality. Unlike the low-fi prototype, high-fidelity prototypes use nearly all if not all contents in the real/actual product. Here, a large percentage of all the contents you see will appear on the final product.
3. Interactivity
A low-fidelity prototype has fewer interactive features. As aforementioned, only the relevant elements and contents are included. During the testing process, someone who understands that particular design has to take a computer and manually simulate the interaction in real-time. In other cases, low-fi interactivity can be created by connected wireframes. These wireframes are linked and simulated on PowerPoint or Keynote or dedicated prototyping tools like Wondershare Mockitt. On the other hand, high-fidelity prototypes are highly interactive because they contain nearly every visual and final design content.

4. Popularly Used Techniques
A low-fidelity is focused on creating faster ways to iterate designs. Thus they use simple and easy to alter techniques. The common low-fidelity techniques are paper prototyping and clickable wireframes. A high-fidelity prototype, as aforementioned, is akin to the final product. Here, there are two major techniques used: the digital prototype created from special prototyping tools like Wondershare Mockitt and the coded prototyping technique.
5. Cost
It is easy to design and iterate a low-fidelity prototype. Because of this, less time and money is used in low-fidelity prototyping. High-fidelity prototypes are expensive because you need a prototyping tool, more time, and thus higher cost.
6. Feedback
Since a low-fi prototype does not incorporate plenty of design visuals and contests, it is hard to get accurate test results. Users cannot actively interact with the prototype and get to the variety of interactions means feedback does not accurately depict the true interaction with the real product. On the other side, high-fidelity prototypes give highly-accurate feedback because users interact with lots of visuals and content. Since a high-fidelity prototype resembles the real product, the test results are a true reflection of the real product.
Low Fidelity vs High Fidelity: When Should You Use Them
One of the most important assignments for app designers is to decide the type of fidelity they are going to use. The choice of fidelity will more often be determined by constraints like time, cost, and quality. Remember, there is no one-fit-for-all type of fidelity because they have respective pros and cons. Therefore, you will choose a suitable fidelity depending on your needs.
When to use Low-Fidelity Prototype
Remember, low-fidelity prototypes are cheap, fast to iterate, and don't have lots of visuals and content. Therefore it is best in the following conditions. When:
- You want to scale and learn your project with speed.
- You want to test something new in the preexisting app.
- Testing of an idea before commencing the development process.
- You want to keep the idea just within the product team.
When to use High-Fidelity prototypes
Unlike the low-fidelity prototype, high-fidelity prototypes require time, cost, and lots of visuals and designs like the final product. It is, therefore, best suited for the following scenarios.
- When you want to begin developing even before you fully decide on the final design.
- When you already have a low-fi prototype that is tested and accepted.
- To transform your low-fidelity prototype to the next level.
- If you want to elaborate your idea to a non-tech audience.
- When you have much time and sufficient capital.
Even if you choose to go with low-fi prototypes, it is also good to know that the industry dynamics are rapidly changing. Competition is skyrocketing in the design world and therefore, low-fi prototypes might not be the ideal choice. The good thing is that there are good hi-fidelity prototyping tools like Wondershare Mockitt for frictionless hi-fi prototyping.
How to Create a High Fidelity Prototype
Wondershare Mockitt is a powerful tool to create high-fidelity prototypes owing to the collection of amazing features it offers. This program has an intuitive user-interface that makes user-navigation quite seamless. The speed, compatibility with an array of devices, and affordability make it a great prototyping platform. Sign up today and take your prototyping experience to a top-level.
Key features
- It allows users to co-edit, send and receive feedback in real-time.
- This program offers several design resources ranging from diverse templates to countless widgets and icons.
- It allows users to create interactive and animated prototypes.
- Mockitt allows users to preview and share their prototypes with friends/clients or relevant stakeholders.
- It has an elegant interface and thus a smooth learning curve for newbies.
How to create a Prototype with Mockitt
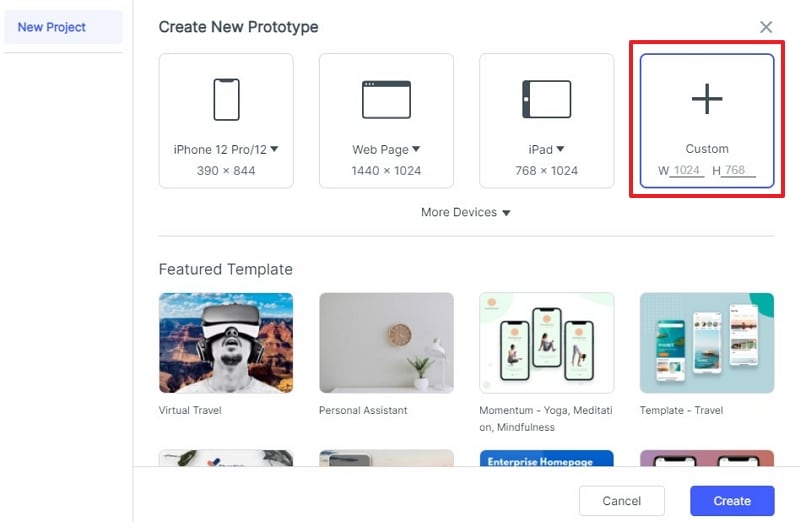
Step 1. Start New Project
Visit Mockitt and login to access your account. Navigate to the "Personal Space" or "Enterprise Space" tab, followed by the "Create> Prototype" options. In the subsequent "Create New Prototype" dialogue box, select screen size.
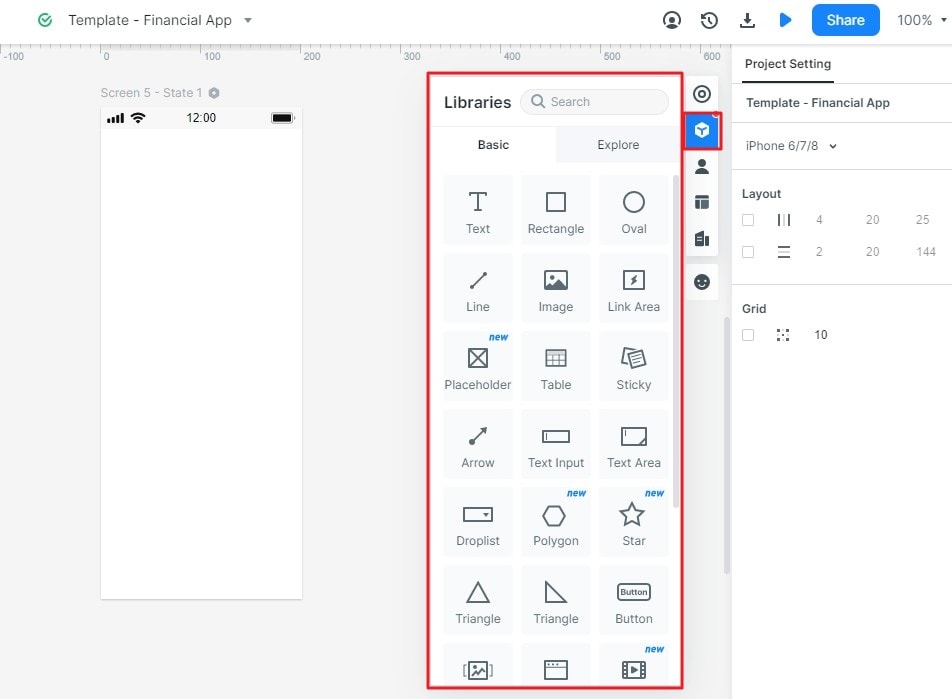
Step 2. Add Widgets
You should now enter the edit area. Go to the top-right and click the "Built-in Widget" icon. Now choose the desired type of widgets, drag them to the canvas, and edit to the desired size. You can add buttons, sticky notes, maps, text area, shapes, and images, among others. Click the "Add Screen" button to add more screens. Also, add widgets to these screens the same way you did here.
Step 3. Create Interactions
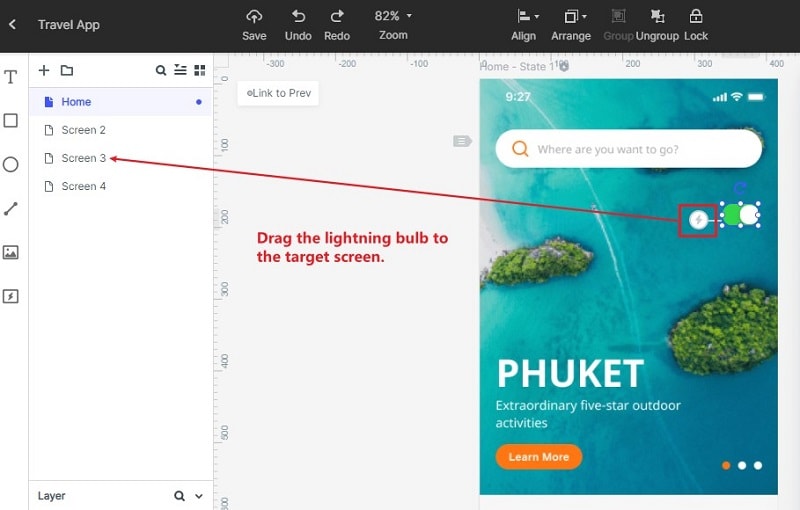
After adding relevant widgets, icons on the screens you have, you need to link them via interactions. Just click a widget/object that you want to connect to another screen. Drag the arrow that appears on the left and drop it on the destination screen. A connection is immediately established. Do this for all the other objects and screens that need to be linked. You can also go to "Event"> "Create Link" and choose the desired transition, action, and event.
Step 4. Preview
When you are done with the design and interactions, click the "Preview" tab to interact with your prototype.

