The In-Depth Guide to Low-Fidelity Prototype
Want to Prototype with Ease? Try This Out!
Wondershare Mockitt Prototype Designer realizes easy & rapid prototyping for iPhone, Android, Websites, and more. Drag and drop to create wireframes and prototypes. Give it a try!
How are design-led companies making themselves better with each day? A large part of it comes down to the user experience UX design. A quality design makes you stand out among others. For this, designers need to have a clear idea of prototyping.
Yet, it is equally vital to know which type of prototype works for each development stage. So, here is a quick in-depth guide to low-fidelity prototypes.
- What is a Low-Fidelity Prototype?
- Advantages and Disadvantages of Low-Fidelity Prototypes
- When to Use Low-Fidelity Prototype?
- Best Low-Fidelity Prototyping Tools
- Popular Low-Fidelity Prototype Examples
What is a Low-Fidelity Prototype?
Prototype
A prototype is a loose term to refer to a testing design. Simply put, it is a setup for designers to visualize their creations. It is a rough layout showing the design's content, visuals, and interaction. These drafts will answer questions like; What happens if you click a certain element? How can you go to another page with a link?
Fidelity of a Prototype
Fidelity is the detail of the prototype. It determines the similarity of the prototype with the final product. This includes the visuals and interaction of the design. Hence, fidelity tells you how the design feels and looks. It further broadens into a low and high-fidelity prototype. Here, we will discuss the lo-fi prototypes.
Low-Fidelity Prototypes
You can use a paper sheet or digital layouts to create one. These prototypes help you visualize the design. Designers use them to check the practicality of their creations. Because they don't need extra visuals and content, the creation process is relatively easy and quick.
- The visuals in these prototypes are essential elements.
- These only use essential content.
- The interaction is almost minimal in these drafts. For instance, most team members use a paper sheet and their cut-outs for visuals to interact with others. This is primarily to test the functionality of the design.
Advantages and Disadvantages of Low-Fidelity Prototypes
Wondering when to use these prototypes? How can you use them to their full potential? Well, here are some of the pros and cons every designer must consider:
Advantages
- Better for Evaluation: Users don't add vibrant colors and visual elements in these prototypes. So team members can better evaluate their functions.
- These are Inexpensive: You don't need extra money to design them. Most people like to create these drafts on paper sheets and basic drawing tools.
- Quick Process: There are not many details, so the creation process is quite fast.
- Offers Better Collaboration: The simple layout allows people to discuss how to improve it. Team members can discuss the practicality of the lo-fi designs. This is because it doesn't necessarily require a designer to pick out any mistake.
- Easy to Change: low fidelity designs have a basic outline. It means that you can easily modify them. This keeps the task stress-free in the later stages for designers.
Disadvantages
- It has High Uncertainty: The low-fidelity prototype has minimal content and visuals. So, figuring out its usability is quite minimal. A part of it is imagining its looks and feels.
- No Scope for Interaction: As the layout primarily has basic elements, the user finds it difficult to interact. Also, it is dull and has no animations. Hence, the experience is compromised.
Wondershare Mockitt
Prototype Creator >>
When to Use Low-Fidelity Prototype?
Wondering when the best time to use a low-fidelity prototype is? You need to have a clear idea of the developmental stages of a design. From the start, it is equally important to know what areas of the specific design you want feedback for. For this purpose, ask yourself these simple questions.
- Are you in the initial stages of designing?
- Do you need instant feedback on the structure and design?
- Are you confused about whether your idea is practical?
- Do you need to check the functionality of the layout?
Once you get answers to all the above questions, it's time to figure out what situations will work best for your specific task. Here are some cases that can guide you in deciding where to start your lo-fi prototype.
- Suppose you are to check the practicality of an idea. This is done before the development stage.
- It is best suited for the early stages of design development.
- If you need to figure out the structure, they might work well.
- To present your design on a cycle, do use the paper 2-D method of lo-fi prototypes. This will provide designers with instant feedback and modifications.
Best Low-Fidelity Prototyping Tools
Wondering how you can make the creation process easy? Before you go for one, it is ideal to do the research. It is possible with the right drawing tool. The right software is the one that has basic elements, visual aid, and supportive basic or complex interactions at least. Here, drawing tools with built-in templates and drawing components work best.
So, make sure to keep these in mind before choosing one.
- Ease of Learning: It all comes down to convenience. So, make sure to use a tool that has an easy interface. Some basic things to consider include basic symbols, an accessible toolbar, and multiple file formats.
- Fidelity Level: It must support both high and low levels of fidelity.
- Level of Interaction: Make sure to choose an option that supports multiple micro-level interactions. This will save you a lot of effort and time. Also, with this function, there will be no need to create an artboard from scratch each time.
- Scope for Collaboration: Tools allowing team members to give feedback on the design works remarkably. All they are to do is select a component and add their comment.
- Design Elements: The tool must have many symbols and other drawing components. This is because designing a prototype needs content and visual appeal.
Wondershare Mockitt – Best Software for Low-fidelity Prototypes
Wondershare Mockitt is certainly a leading drawing tool for creating your prototypes. This software supports complex interactions as well. It has a large library of symbols and interactive animations that helps you with low and high-fidelity prototypes. Users also get to utilize already existing templates and save time. Another good thing about this software is its communication feature. This gives you instant feedback and comments.
Features of Wondershare Mockitt Prototype
Wondershare Mockitt is the ultimate tool to create one, all thanks to its built-in prototype function. Here are some of the unique features that make it stand out among others:
- Offers Better Collaboration: This has an accessible feedback option. So, you can comment as well as receive messages from other members.
- Readymade Templates: It has an extensive library that supports already available templates. All of these are editable and specific to different tasks. So, whenever you are in a hurry, utilize these options and save time.
- Share Your Creations: The tool has a visibility setting. With this, users can allow other people to view and edit their prototypes.
- Supports Symbols and Animations: Even if you are to create one from scratch, it has a massive collection of symbols. This helps users pick prototype-specific shapes and animations.
Create Your Low-Fidelity Prototype with Mocckitt in 4 Simple Steps
Now that you know all about this tool, here are the simple steps to create one:
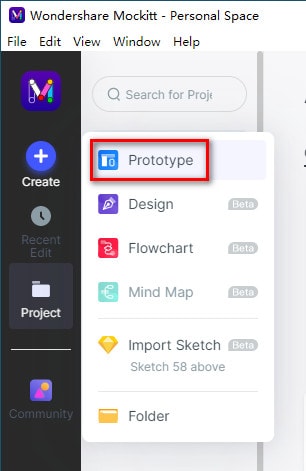
Step 1: First of all, log in to the software. Once logged in, click Personal Space > Create > prototype. Now, give this file a name, and you will see a blank screen.
Step 2: Drag and paste the symbols you need from the left corner. Keep adding them until you get a satisfying rough layout.
Step 3: Now, it is time to add interactions. For this, click any object of your choice and drag it to another page. Next, you can paste it to the correct position and call it a connection. Keep doing it for other objects.
Step 4: Finally, you have the prototype ready. To check whether it is according to your requirements, use the preview button to have a look at it. Also, you can share it with your friends to get their feedback.
Popular Low-Fidelity Prototype Examples
Here are some famous low-fidelity prototype examples you can check out and get help from.
Low-Fidelity Web-Page Outline
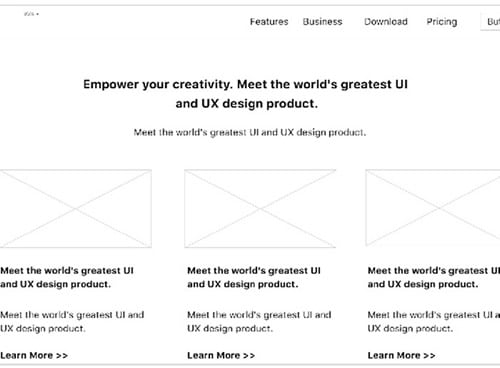
For web designs, these prototypes help you present the layout of the website to other people. This gives them a realistic picture of how the final product will look and feel.
Low-Fidelity Local Business Map Prototype
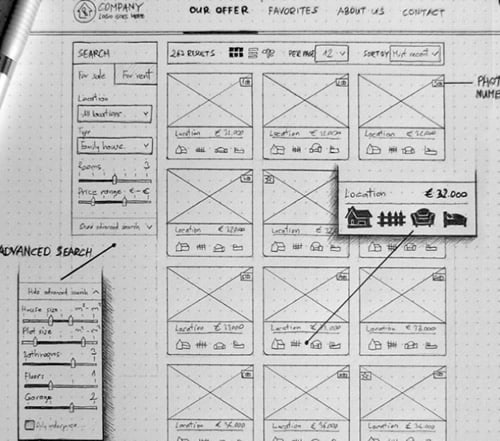
These prototypes are for designers to create their online strategy map. With these designs, users have a practical structure layout of the user interface. Overall, these are to visualize the entire working of any organization or business and get feedback on the idea.
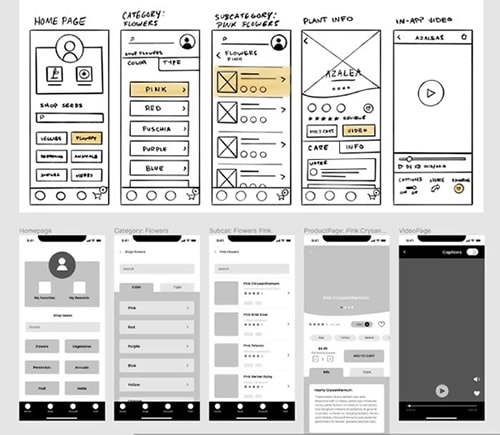
Low-Fidelity Prototype for a Mobile App
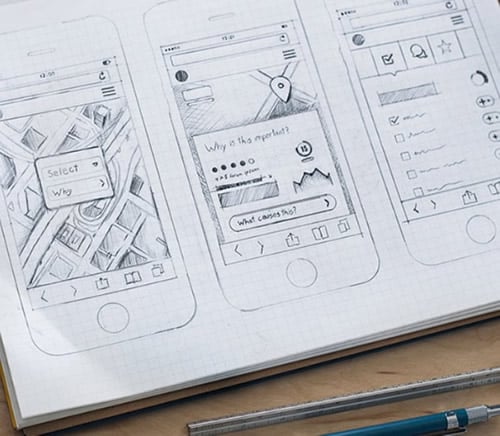
UX designers use wireframes to create lo-fi prototypes while developing any mobile app. To design them, you can start off with the paper technique. This helps figure out the information structure and layout. After achieving some results, turn to easy drawing tools like Mockitt.
Software Paper Prototype
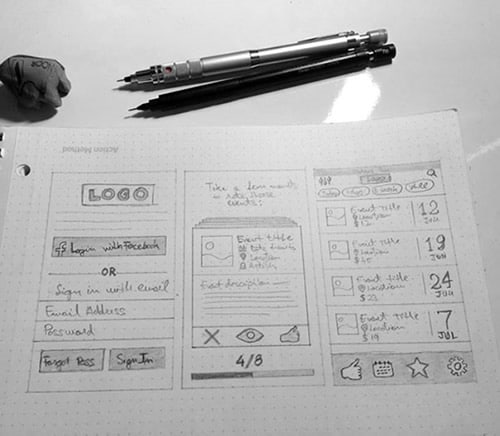
Wondering whether other people are able to understand the solution of your software design? Use the paper prototypes as they give a practical idea of how the interface works. These include animations of interactions. With these, users can better understand the connection between visual elements on the screen.
Conclusion
Undoubtedly, every UX designer makes a prototype at some point. But knowing the quickest and most effective way can save you so much time. Here come innovative tools like Wondershare Mockitt, with an extensive collection of symbols and readymade templates. Also, it supports complex interactions and visual animations, making it the best out there. Overall, It helps to make the prototypes super easy to create.
