How to Make Glass morphism with Adobe XD

Glass morphism is no longer an idea but rather a practical idea now unleashed in plenty of modern UI interfaces. It is more often used in mobile or web designs, and its popularity has skyrocketed. Scores of designers leverage glass morphism design to create eye-catchy and impressive designs for their clients/customers. Although glass morphism is growing in popularity, several people are still unaware of what glass morphism is all about and how to create glass morphism styles for their designs. Fortunately, this article gives you a complete guide on glass morphism, including making a glass morphism design.
- Part 1. Meaning of Glass Morphism
- Part 2. Why Glass Morphism Is Popular in 2020
- Part 3. How to Make Glass Morphism Style Design with Adobe XD
- Part 4. How to Make Glass Morphism Style Design with Figma
- Part 5. The Best Prototyping Tool for You
What is Glass Morphism
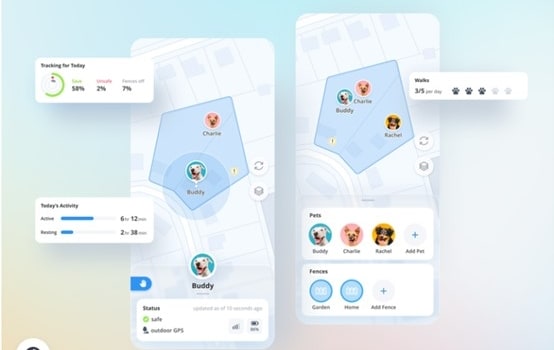
Since the introduction of blur in 2013 with iOS 7, there has been a series of improvements in the UI design style. Glass morphism is a new style driving the UI design like never before. It is now being rolled out in a plethora of designs because it is more appealing and user-friendly. This style as the name suggests, mimics glass design. This means you can stack an object in front of it so that it appears as another layer. Unlike neumorphism that mimicked plastic surfaces and appeared like one layer, glass morphism is more vertical and multi-layered. It is characterized by transparency, a layered approach where objects float in space, a mix of lively colors that highlight blurry transparency, and thin light borders on semi-transparent components/objects. That vertical arrangement ensures a see-through so that users can create hierarchy and depth of the interface. In short, these layers mimic pieces of virtual glass. A good example of glass morphism design is shown below.
Why Glass Morphism Is Popular In 2020
Although glass morphism is a relatively new UI design style, its making has been in the pipeline over the past few years. First, the concept of blur in 2013 with iOS 7 was glass morphism in its infancy. Again, Apple brought back the effect with the Mac OS Big Sur in November 2020. If you used Microsoft Windows Vista and iOS 7, then you can remember how notifications popped up with blurred items in the background. Microsoft termed it as The Acrylic effect and was used on the surface to provide depth and create visual hierarchy. All these early design ideas created a good platform for the development of glass morphism. It familiarized itself to users and would seamlessly get natural acceptance and popularity upon unleashing.
How to Make Glass morphism with Adobe XD
Follow these easy steps
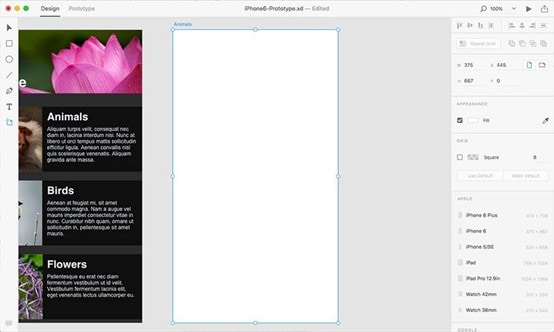
Step 1. Create Artboard
Open Adobe XD and you will access the welcome page. Here, choose the type of project you want to create and confirm to create a new project. When you have created the artboard, double-click on the name and change it to the desired name, say "Home." To edit the artboard, click it to first access the properties panel. Here, you can choose the desired fill and colors, among others. If you want to create a new artboard, go to the left window pane and hit the "Artboard" tool. A blank or a new layout will be displayed on the canvas.
Source: cloudfront
Step 2. Import Background Image
Now that you have created a blank artboard, you need to add the background image. This image will appear behind the transparent component so that we have a frosty glass look. You can download the desired background image and drag it directly to the canvas.

Source: cloudfront
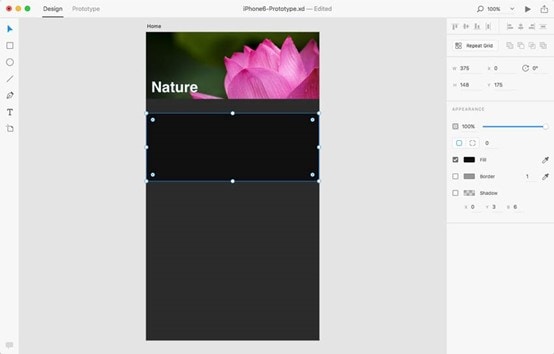
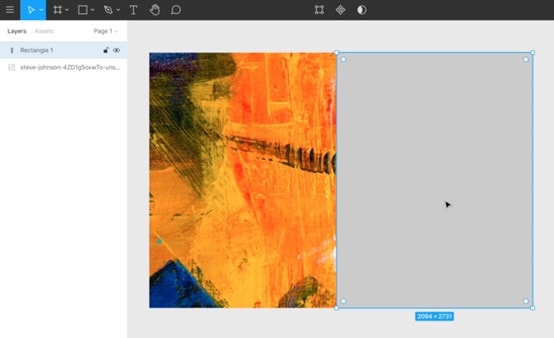
Step 3. Create Rectangular Area on top of the Background Image
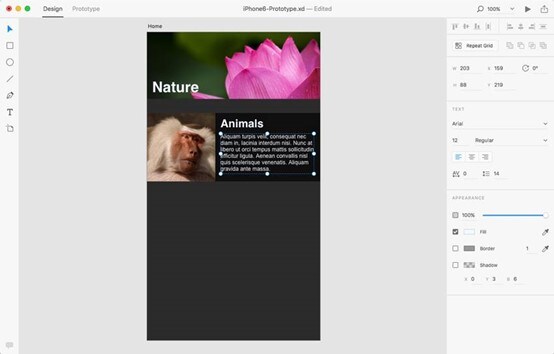
When you are done with the background image, you need to create a rectangular area or any shape that will appear on top of the background image. Now, move to the left, click the "Rectangle" tool, or drag any shape you want. Click on the artboard/background image and drag the rectangle/shape to create the desired size. You can move it to the desired point in the background. When you release the rectangle, you should see its properties on the right side of the window.
Source: cloudfront
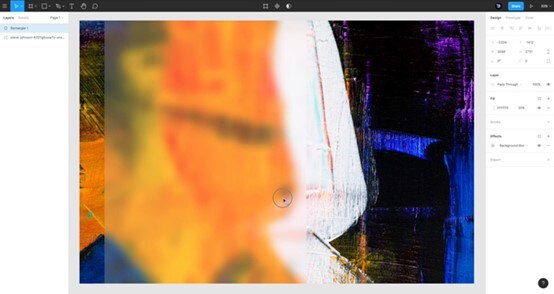
Step 4. Change Effects
Now you need to edit the object's effects to get the frosted glass look. Simply click the object and go to the properties window on its right. Here, select the "Fill" option and edit the fill color. Uncheck the "border" button to eliminate it to create sharp edges. Again on the bottom of the Properties panel, check the "background blur" box. Here, you should see three options, namely amount, brightness, and opacity. Slide to increase or decrease these features until you find a perfect glass effect on the object behind it. 4%, 20%, and 65% of amount, brightness, and opacity, respectively, can create a good glass morphism effect.
Source: cloudfront
How to Make Glass Morphism with Figma
Step 1. Add Image on the Background
Once you open Figma, you first must add something to the background. It could be an image or a text. Let's supposed you downloaded an image that you want to use. Simply drag this image to the canvas and position it as per your desire.
Source: tutsplus.com
Step 2. Add a shape on top of the background
When you have added the image or text on the background, you need to add a shape on top of it. More often, a rectangle is used. Click the rectangular shape at the toolbar. Next, create a rectangle of the desired size on top of the background image. On the right side of the window, click on the "Fill" option, and select the desired fill color. You can take white, blue, gray, or simply any fill color you like. Make sure you lower its opacity to around 20%.
Source: tutsplus.com
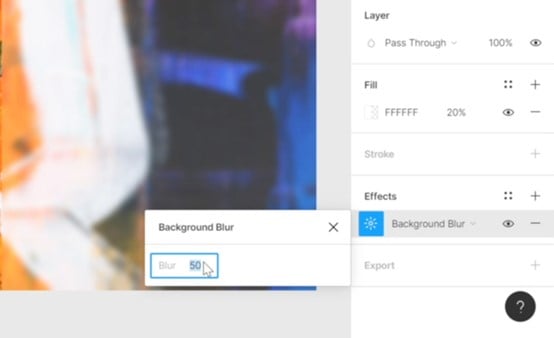
Step 3. Add Effects
Finally, you need to add suitable effects on the rectangular object to create that frosty glass look. On the properties panel, head to the "Effects" section at the bottom. Click on the "Background Blur" and then select a suitable blur value. You can choose a value like 100, and you will see the rectangular object becomes glass-like. When you move it over the object/texts, you should see them at the back as though the object is a glass.
Source: tutsplus.com
The Best Free Online Prototyping Tool
Wondershare Mockitt is the best free online prototyping tool that you can think of today. This amazing prototyping, collaboration, and design platform have everything you would want from an up to par free prototyping tool. Ranging from processing and rendering speed, ease of use, affordability, compatibility to a plethora of excellent features, Mockitt makes prototyping easier than you thought.

There are countless design resource tools such as templates, UI assets, widgets, and icons to make your design easy to create and appealing. The good thing with these resources is that you can create your library then reuse them whenever you need them. This lets you focus on the bigger aspects of the prototype and thus saves you time and energy. Simply drag and drop these components to the user-friendly editing area and edit them to create desired designs. Once you are done with the editing, you create interactions by linking objects with screens or via the program's "Event" options. Again Wondershare Mockitt gives you a platform to create interactive and animated prototypes. This way, your prototype impresses your clients/customers with ease.
Also, Mockitt is a great collaboration platform. Here, you can bring all your team members on the same page and accelerate the project design. Team members can co-edit, comment, and share feedback in real-time. It doesn't matter the kind of device you are using because your project is synced across your devices when you log in.
- With Mockitt, users can create interactive and animated prototypes.
- This program has a wide range of templates and UI assets suitable for various sizes and types of design prototypes.
- It has plenty of widgets and icons that lets you design beautiful interfaces with speed.
- This program allows users to share their prototypes with friends, team members, or target audiences. Besides, users can control the project's visibility through visibility settings.
- It supports real-time co-editing and collaboration. It has a special comment system that unifies and organizes all team communications.
- Users can test their prototypes directly on the platform.
- It has a feature that enables users to generate the project's CSS code and hand it over to developers.
