The Best Tool to Create Image Slider and Generate Code

The interactive presentation is what makes a statement these days. Everything static is boring. Therefore, web developers delight the online crowd with a sheer diversity of dynamic solutions. If your website does not have much space but you want to deliver lots of information, then javascript carousels are just irreplaceable. No one likes to read long pages. With a compact and neat structure, carousels help to create a comfortable user experience. There are many ways to create a slider. You can use Bootstrap, jQuery plugins, or simply build everything as a javascript carousel.
- Part 1:How to Create Carousel using Javascript
- Part 2:The Best Tool to Create Image Slider and Generate Code
- Part 3:Tips for Making Carousel in Javascript
How to Create Carousel using Javascript
Here is a quick tutorial on creating a javascript carousel slider.
1. When it comes to creating a javascript carousel, it is best to start with a concept. Determine why the slider is the best fit for your content, instead of a standalone image or video. With this question answered, you will have a good sense of the type of content you plan to use. Sketch out a storyboard to get an idea of how many frames you will need. Decide if your javascript carousel will jump from one image to the next, or have a continuous, panoramic effect. You can also use popular tools like Mockitt to sketch the storyboard.
2. Use HTML to define the content of the carousel. In this example we use img to add images. However, you can also choose to use div to define the carousel content.
3. Define the styling for the carousel content –
There could be other possible ways to import the jQuery image slider plugin and this varies from one plugin to another.
4. Add buttons to the carousel by adding the requisite navigation controls in HTML
5. Add the required javascript functions to add the scroll animation.
6. The good thing about this is that this technique is not limited to images, but you can use it for all types of list with different width and heights.
7. Note that you can also use reusable javascript carousel plugins to reduce the coding overhead. Bootstrap also offers various simple options to quickly create a javascript carousel.
Designers love to focus on creative ideas and experiments. Rarely do you find a designer who loves to play with HTML, CSS and javascript. However, from a designer's perspective it is also imperative to perform a seamless handoff to developers. On the other hand, it can be quite complex for a developer to manually look at a wireframe and code the javascript carousel. When specifications are manually called out, there is bound to be significant human error.
The Best Tool to Create Image Slider and Generate Code
When designing a JavaScript carousel, a single tool that helps designers to create the wireframes and to generate code eases the entire workflow. This is precisely where Wondershare Mockitt, an industry grade fully online tool comes into picture. The tool is backed by financial level security as it uses 128-bit SSL protocol for data transmission encryption. Therefore, the tool offers multi-level disaster recovery backup.

The tool provides several carousel libraries full of icons, components, screens and templates. The design community also actively contributes to this set of libraries. These libraries enable you to create a complete prototype in less than 10 minutes. Mockitt is a lightweight online tool with an intuitive interface. The simple drag and drop workflow flattens the learning curve. This makes the tool a popular choice among beginners as well as expert designers.
Here is a step-by-step guide to create javascript carousel in Mockitt –
- Visit the official website of Mockitt and sign up or sign in as appropriate.
- Create a new Project and choose a layout (say Webpages). A new canvas is launched for you.
- Head to Component → Basic Components and look at the built-in widgets. You will find a carousel widget.
- Drag out the carousel component from the built-in component (shortcut key 1). A picture placeholder automatically appears on the right setting panel. You can choose to upload from “local upload” or “material library” by hovering on it.
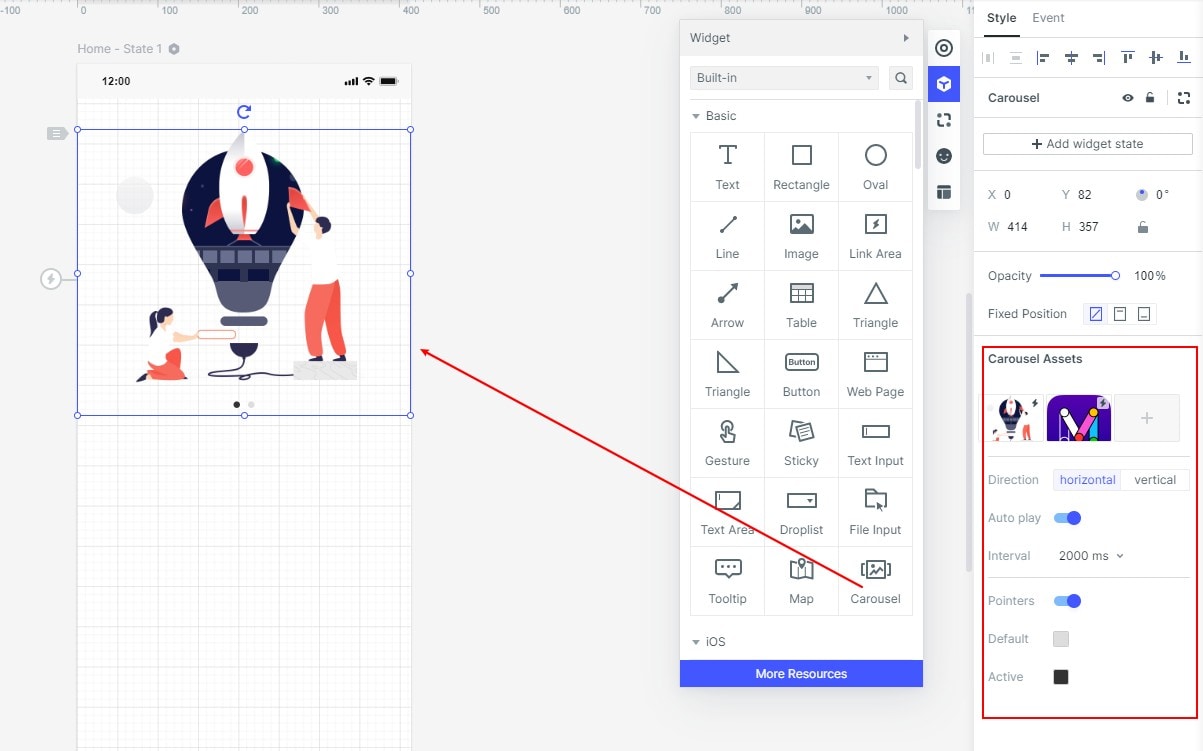
- You can adjust the order of the carousel pictures by dragging and dropping pictures directly on the thumbnail.
- You can set the carousel scroll to horizontal or vertical based on your preference and design requirement. The indicator point will automatically be assigned to the appropriate position.
- The Carousel widget also provides an option to set the carousel rotation. You can choose to set the interval between the rotations to auto rotate. You can also choose to click the carousel and mandate a click on the carousel to jump to other pages.
- The indicator point is also fully customizable. You can choose whether to display the indicator point or get rid of it. You can also color it as per your design.
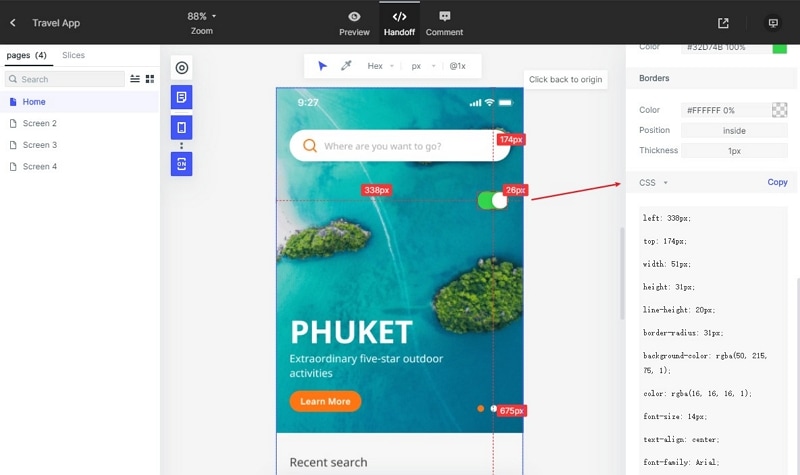
- Once your carousel design is complete, it is likely that you will need to handoff the design and associated specifications to your development team. You can use the handoff tab to grab all the specifications. The right panel will display the CSS specifications. Click on ‘Copy' and share the styling with your developers.
Tips for Making Carousel in Javascript
Javascript carousels can really uplift your website. However, there is enough debate among the design and front-end development community regarding carousels. Here are a few tips to ensure that you get your javascript carousel right -
- Ensure to spend enough time in the carousel idea, messaging and prototyping. You need to define the value you are driving with a carousel before staring to create your javascript carousel. Your best bet is to prototype the carousel using a visual design tool like Mockitt.
- Javascript plugins, libraries and frameworks can save you a lot of effort and time. Popular javascript carousel plugins like slick, glide.js, own carousel, and bootstrap carousel plugin can really simplify your carousel development.
- Reusability is certainly the key. Carousel javascript CodePen is a social development environment for front-end designers and developers. You can build and deploy a website, show off your work, build test cases to learn and debug, and find immense inspiration for your javascript carousel.
- Do not use your javascript carousel as a replacement for a video. If you need to show too many moving attributes, you are better off embedding a video using flash.
