How to Create Image Slider with JavaScript

If you want to make your website or online store more attractive and engaging, then you should consider adding an image slider. It does not only make your website more professional but allows you to showcase more content within a small space. Now the question is that how you should create an image slider? Well, JavaScript can help you do that.
The JavaScript image sliders look very elegant and work seamlessly. You can customize it as per your needs and add various features to make it look more professional. So here is a complete guide on how to create an image slider using JavaScript.
- Part 1. How to Create Image Slider using Javascript
- Part 2. The Best Tool to Create Image Slider and Generate Code
How to Create Image Slider using Javascript
JavaScript is used by many professional designers to create a simple JavaScript image slider and generate a JavaScript image slider code. However, it is a very advanced tool but with the right information, anyone could use it easily. So here is a step-by-step process that you should follow.
Step 1. First to create an automatic image slider javascript, you need to include all the images in the project path within the same folder named "images". Make sure to keep all the images of the same size, otherwise, the slider won't function properly.
Step 2. Now go to your Html document and paste this code into its body. Copy all the proper to avoid any malfunctions.
Step 3. Once you have copied this, it's time to paste the CSS in the document withinin your head. You could link a fresh .css file into the document.
/* Slideshow container */
.slideshow-container {
max-width: 1000px;
position: relative;
margin: auto;
}
/* Hide the images by default */
.mySlides {
display: none;
}
/* Next & previous buttons */
.prev, .next {
cursor: pointer;
position: absolute;
top: 50%;
width: auto;
margin-top: -22px;
padding: 16px;
color: white;
font-weight: bold;
font-size: 18px;
transition: 0.6s ease;
border-radius: 0 3px 3px 0;
}
/* Position the "next button" to the right */
.next {
right: 0;
border-radius: 3px 0 0 3px;
}
/* On hover, add a black background color with a little bit see-through */
.prev:hover, .next:hover {
background-color: rgba(0,0,0,0.8);
}
/* Caption text */
.text {
color: #f2f2f2;
font-size: 15px;
padding: 8px 12px;
position: absolute;
bottom: 8px;
width: 100%;
text-align: center;
}
/* Number text (1/3 etc) */
.numbertext {
color: #f2f2f2;
font-size: 12px;
padding: 8px 12px;
position: absolute;
top: 0;
}
/* The dots/bullets/indicators */
.dot {
cursor:pointer;
height: 15px;
width: 15px;
margin: 0 2px;
background-color: #bbb;
border-radius: 50%;
display: inline-block;
transition: background-color 0.6s ease;
}
.active, .dot:hover {
background-color: #717171;
} /* Fading animation */
.fade {
-webkit-animation-name: fade;
-webkit-animation-duration: 1.5s;
animation-name: fade;
animation-duration: 1.5s;
} @-webkit-keyframes fade {
from {opacity: .4}
to {opacity: 1}
}
@keyframes fade {
from {opacity: .4}
to {opacity: 1}
}
Step 4. Now you need to include JavaScript into your image slider to make sure it's functioning properly. At last, paste the given JavaScript code in between tag. That's it, your image slider in javascript source code is ready.
var slideIndex = 1;
showSlides(slideIndex);
// Next/previous controls
function plusSlides(n) {
showSlides(slideIndex += n);
}
// Thumbnail image controls
function currentSlide(n) {
showSlides(slideIndex = n);
}
function showSlides(n) {
var i;
var slides = document.getElementsByClassName("mySlides");
var dots = document.getElementsByClassName("dot");
if (n > slides.length) {slideIndex = 1}
if (n < 1) {slideIndex = slides.length}
for (i = 0; i < slides.length; i++) {
slides[i].style.display = "none";
}
for (i = 0; i < dots.length; i++) {
dots[i].className = dots[i].className.replace(" active", "");
}
slides[slideIndex-1].style.display = "block";
dots[slideIndex-1].className += " active";
}
The Best Tool to Create Image Slider and Generate Code
There is no denying that you can create amazing image sliders using JavaScript but if you have zero experience with Coding, then Wondershare Mockitt would be a great option for you. It is an online prototyping solution that allows you to build highly interactive prototypes within a very short time. It is loaded with lots of pre-existing designs and components that make designing very easy.

The drag and drop UI helps you execute things easily even if you have never written a single line of code. It is a cloud-based tool, which means you can work with your fellow teammates and communicate in real-time.
Mockitt has a traceable version history feature with which you could easily jump back up to 10 previous versions of the same project. It has a carousel widget that makes creating a carousel very easy and you could also utilize the handoff feature that allows you to generate a Carousel into CSS.
Here is a tutorial on how to create a carousel and generate code:
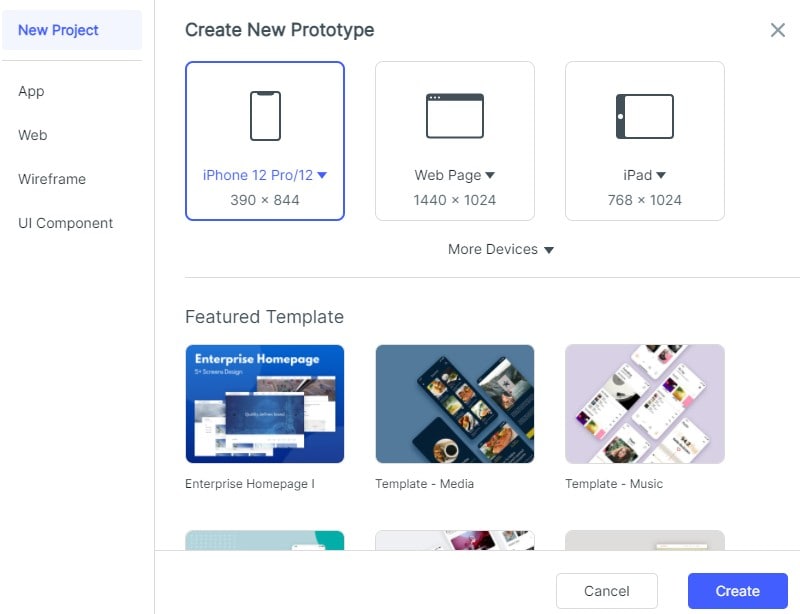
Step 1. Sign Up and Create a Project
The first thing you need to do is to create an account on the official website of Wondershare Mockitt. It's a three-step process. Simply put your email and verify it.

Once you do that, you will be redirected to the Mockitt dashboard. Click the "Create" > "Project" button and a new page will open. On this page, you will see multiple device options. Select one for which you want to create the image slider.
Step 2. Add a Carousel to Your Design
An artboard will appear on the screen and you will see a lot of tools and icons. Here you have to click on the cubical icon (built-in button). It will open a small window, which contains all the main widgets. Move the cursor down and click on the "Carousel" widget.
This will add a carousel widget on the artboard. Adjust the size of this widget as per your needs. Now the next thing you have to do is to add images into your carousal. On the right side of the screen, you will see a "Carousel Assets" section. Click on the image-like icon and it will take you to the image library. You can use the pre-existing images or add your own content.
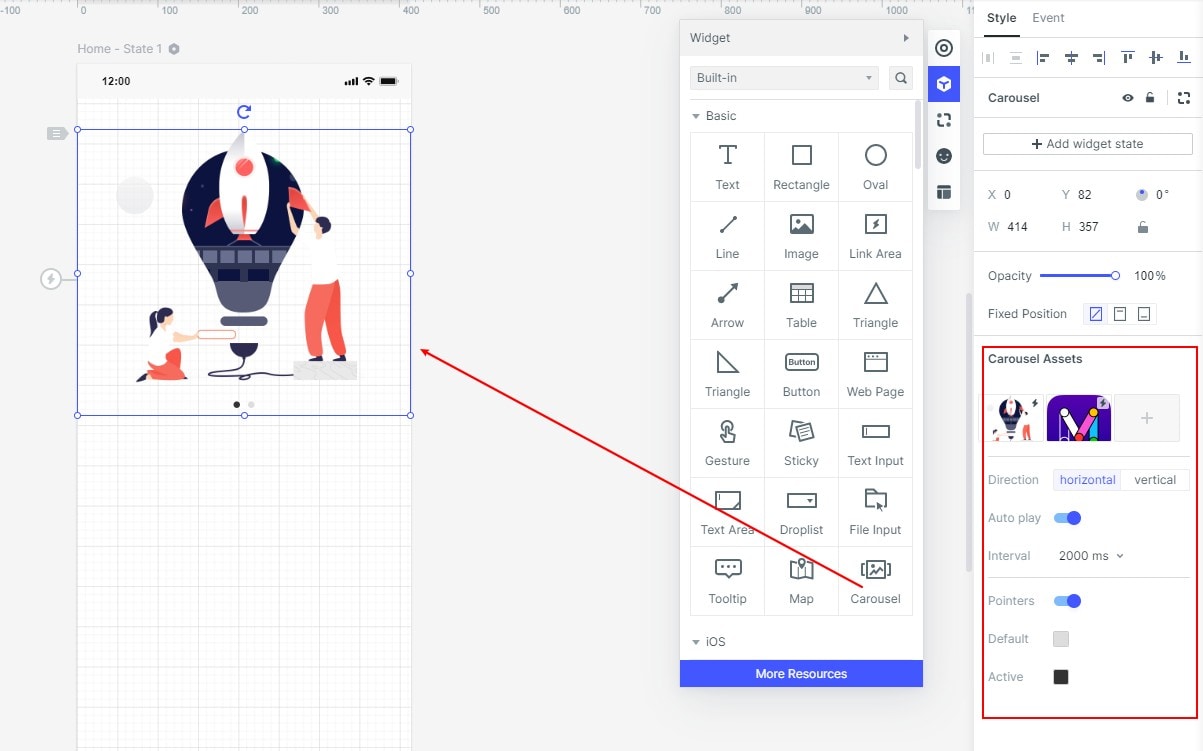
To add more than 3 images, click on the (+) icon under the 'carousel assets' section. Upload new images and if you want, you could also add texts and other features from the widgets panel.
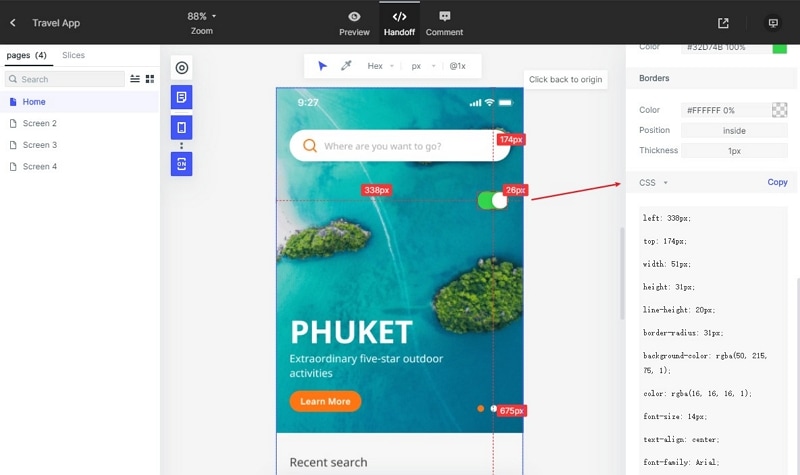
Step 3. Handover the Carousel to Developer
Once you have completed the design and want to view your creation, simply click on the "Preview" button. It will show you how your image slider will look on the device.
Now if you want to use this carousel on other platforms, then you will need the CSS. To obtain CSS, click on the "Handoff" button. Then tap the carousel and on the right side, you will see CSS. Simply press the copy button and use it wherever you want.