How to Create Carousel with jQuery

Creating a jQuery carousel is quite simple, as long as you know what a carousel is intended to accomplish and know that it fits your requirement. A carousel slider is essentially a way to display a selection of images in an efficient manner. Unlike a gallery, a carousel slider in jQuery can display a few images at a time, with controls to bring more images into view. The movement is usually a circular one that mimics the movement of a playground carousel, hence the name. This article shows you how to create a jQuery carousel from scratch, but you can also use jQuery carousel plugin to do the job.
- Part 1. How to Create Carousel with jQuery
- Part 2. The Best Tool to Create a Carousel and Generate Code
The Steps to Create a Carousel with jQuery
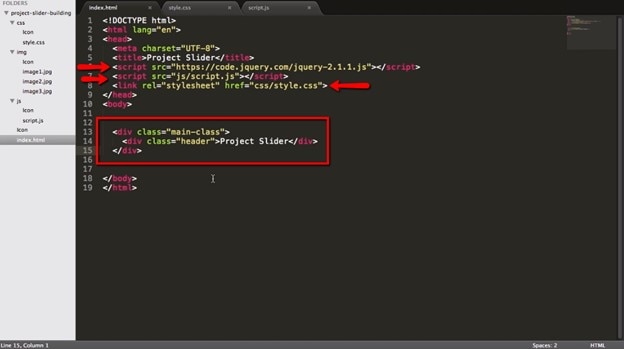
1. Import the jQuery into your HTML document.
Create a script.js file and link the HTML and the style sheet.
2. The first step after that is to create the basic HTML body, into which you can add the carousel elements.
Your code should look like the example shown in this image.
Source: IloveCoding
Note the definition of two div classes, one called main-class and another one called header.
You can add some basic styling at this point if you like, but it's not essential to the process.
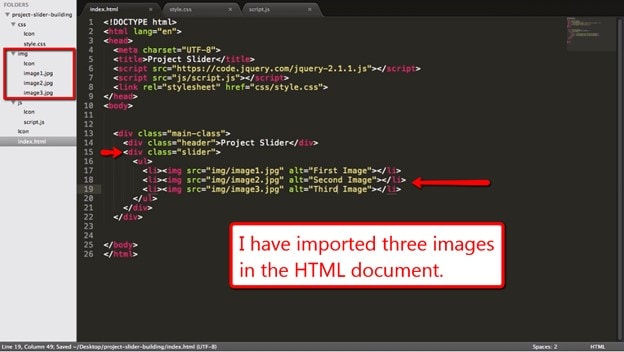
3. Create an additional div in your HTML containing the images as an ordered list, like in the image shown here:
Source: IloveCoding
4. Eliminate the bulleting and left-align the images
The bullet points will appear before the images if you load the project on your browser as it is.
To remove the bullets and float the images left, use the following:
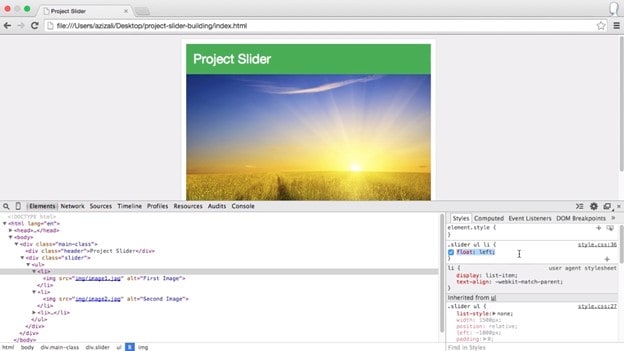
5. Load the project in the browser and open Chrome Developer Tools
The big advantage of doing this in Chrome is that you can see the changes right away.
Also, it's very simple to copy-paste the styles once you're done.
What you see in Chrome should look something like this:
Source: ILoveCoding
6. Change the image width
When you give the image width parameter as 1500px, you'll see that the three images occupy the entire width of your screen.
To change that, type the following and paste it into your style sheet file.
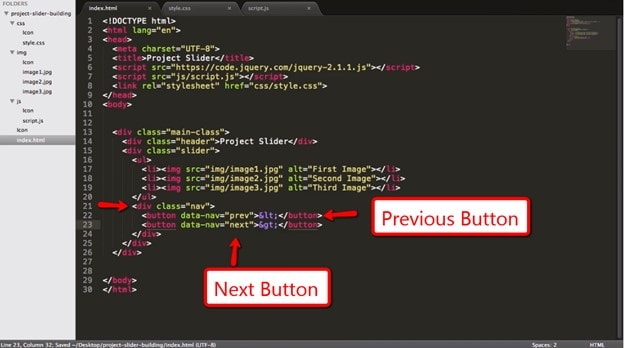
7. Add a nav class inside a new div
The purpose of this is to add the arrows that take the user to the left or to the right when scrolling through the carousel.
Source: ILoveCoding
That's the basic process of creating a carousel slider in jQuery. Of course, there's a lot more you can do in terms of customizing and beautifying your jQuery carousel or slider but this is the heart of the process.
If you're adding a carousel to your UI/UX design, then we suggest using a rapid prototyping tool.
The Best Tool to Create a Carousel and Generate Code
As a designer, if you don't want to bother with the code part, you can use Mockitt's extensive asset library to add and customize your carousel. Wondershare Mockitt is one of the most intuitive design tools available today, and it is hosted on the cloud so you can access it from any modern browser on a connected device. It comes with all the bells and whistles you need to rapidly prototype your designs and is fully loaded with all the components and other assets you might need. It also includes a hefty and growing collection of third-party resources from its enthusiastic user base. Most of all, it offers a real-time collaborative environment where team members can work together from any location they choose.

- Extensive Assets: Hundreds of libraries to choose from and components that are customizable and flexible. Even create your own custom libraries to share with your team. Components can be made dynamic so they show multiple states on a single screen, and they can be assigned a Master status similar to a Main Component in Adobe XD or any other design platform.
- Collaborative by Design: As a cloud-based application, Mockitt was designed for collaboration. Read-time review and commenting, downloads for offline viewing, annotations, feedback, etc. can all be done on the fly from anywhere as long as the user has been authorized for access. The robust security features are hardwired into the platform to make it safe for large-scale enterprise deployment but simple enough to be useful for smaller design companies and agencies.
- Fast Prototyping: Imaging prototyping a design in 10 minutes! That's what Mockitt is capable of. With each drag-and-drop linking and a host of gestures, transitions, and other effects, prototypes take minutes instead of hours. The best part is that all the code for your design assets are instantly generated on the cloud and made available to the developer when required, including style code.
- Painless Developer Handoffs: No more worrying about conflict between the design and development teams. The design team doesn't have to worry about the code part and the dev team can just come in, inspect code, leave feedback, and copy and download everything they need to kick off the development part.
Instead of creating an elaborate jQuery carousel from scratch, here's how you can use Wondershare Mockitt to add a carousel slider to your app or website design.
- Sign up or log in and create a new project in Mockitt on your browser.
- Define a device type and start adding components to the layout of your design.
- When you want to add your image carousel, just select the "Carousel" widget from the asset library and drag it into the screen.
- Customize the carousel to your specifications and add the images you'd like it to showcase.
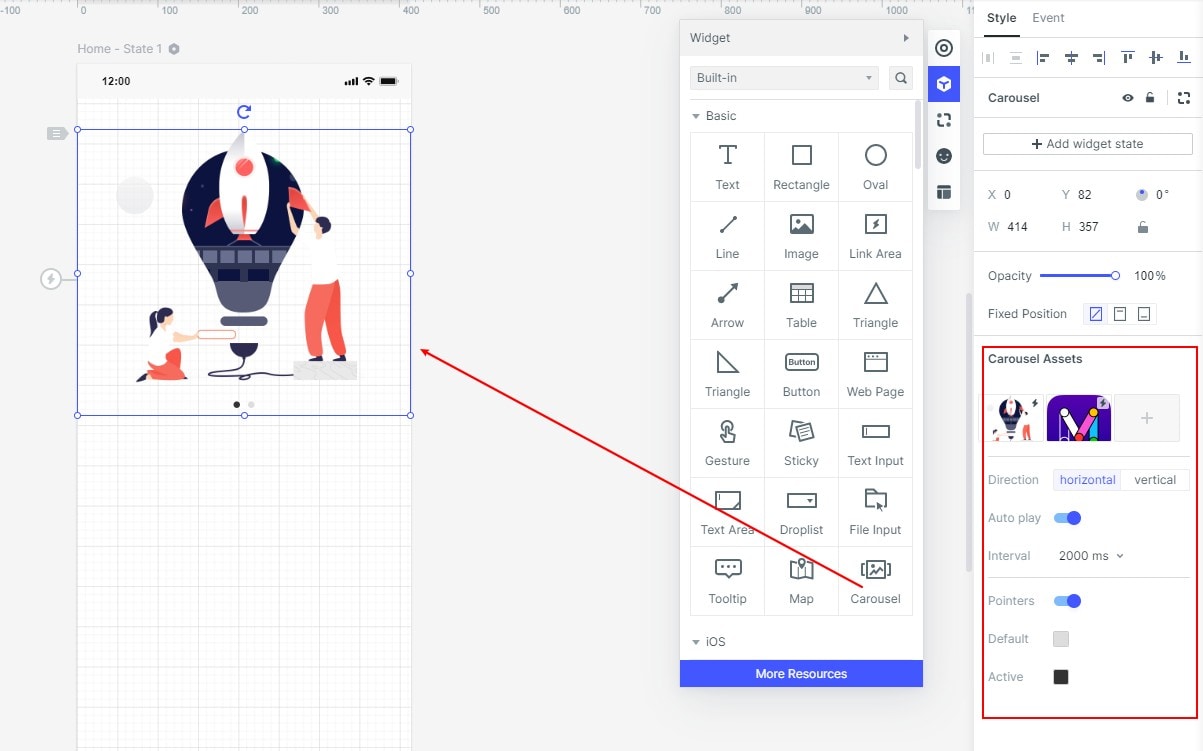
You can also set the scroll direction, the order of the images, auto-scroll/manual click, and the presence and color of indicator points.
That's it! Your carousel is ready and the code can be seen in the Inspect section of the application.
Mockitt makes designing easy and prototyping even easier. The whole process has been simplified so experienced users and even newbies can jump right in and get comfortable in minutes. A lot of effort has gone into making the software as intuitive and convenient as possible, not to mention affordable. In fact, it is one of the most cost-effective platforms today, not just because it is priced competitively but because it will enhance the speed, accuracy, and overall productivity of your design and development teams.
