How to Create a Carousel with WordPress Quickly (Step by step tutorial with pictures)
The best image slider for WordPress can fetch you more eyeballs attraction than any other usual day. The reason, you may ask? Simple. What looks good sells the best! And image carousels bring this very theory into action practically.
In today's quick read, we will go over everything you need to know about image carousel WordPress implementation. And also, how you can make your website better, design wise. Stay tuned till the end for a tutorial with images that will help you implement the design in minutes, not months! Let's get started!
- Part 1. What is WordPress Carousel
- Part 2. How to Create a Carousel using WordPress
- Part 3. How to Create a Carousel without using WordPress
- Part 4. 5 Best Carousel Plugins for WordPress in 2021
What is an Image Carousel WordPress Segment on Any Website
Let's first decode what an image carousel looks like. Or let's answer the question on what really is this tech that we speak of here. An image carousel looks like a slideshow. This slideshow can comprise more than one image. Usually, these are made of pictures, but can also contain bite-sized videos!
Image carousels are typically placed on top of the homepage/ service page. These are placed strategically to attract the attention of the viewer in a second. First things first, they see the big image, and it fills the space, so they don't necessarily get any opportunity to see anything else.
Here image carousels can be a make or break moment for your business. Let us tell you why.
The purpose of the image slider plugin WordPress is to do the following:
- Explain naturally to the viewer about your business/ services.
- Grab attention towards new launches, product discounts, and more!
- Showcase more than one service easily without creating multiple pages.
- Add an engagement driving element for your viewers to have them stay for longer. This avoids and decreases bounce rates too, which is for search engine optimization purposes. (SEO)
How to Create a Carousel using WordPress
There are many ways in which you can create a carousel using WordPress. But before we proceed to that, let's see some examples from the websites that are doing this the best! It will help us select the best format or design aspect for your website.
1 Amazon website
As a technology giant, Amazon Webstore implements carousels of images in the best way. They have made use of a slider format that showcases their on-going offers and new product launches. It is a neat yet powerful attention-grabbing format that makes the shopper anticipate the next offer to appear on the carousel.

2 AliExpress webstore
The AliExpress website is another powerful eCommerce platform using something similar to WordPress image slider widget. They make use of more than one image carousel layouts. The reason being, the anticipation of customers to always browse through something new. It is a strategy that's easy to implement by the end of the day.

Let's see quickly how you can create a carousel using WordPress.
Step 1 Install WordPress plugins:
There are many WordPress plugins available online that do the job. You will probably have to sniff through many plugins before you find the ideal one.
Step 2 Get the WordPress posts prepared in order:
Usually on categories tab, you will identify certain settings. Here featured images and excerpts are of use.
Step 3 Create posts carousel:
Using the WordPress plugin, you will next have to create the posts carousel. It's typically a guide that's easy to follow post-installation of the plugin.
Step 4 Hit publish:
And that's it! Your image slider plugin WordPress will work its magic!
How to Create Carousel without WordPress
So far we learned how to use image carousel WordPress plugins. Now, let's see how the best image sliders for WordPress are made within minutes easily!
Wondershare Mockittis a revolutionary online prototyping tool. Using it, anyone can turn their design ideas into reality. With customisable design elements and shareable design settings, Mockitt truly helps anyone make visually attractive layouts that attracts customers like a magnet on the website!

- Easy to use: Using the tool is as easy as ABC. With a drag and drop interface, you can revise your design as many times as you like!
- No coding required: With it, you don't need to write a single line of code. All integrations are supported, and come in the software.
- Available for all platforms: You can get this tool across operating systems like Web, Windows, Mac, and Ubuntu.
- Wide design library: All the icons available in the library are highly customisable. Right from icons, buttons, text, and more! All you need to do is play around with it until it resonates with your idea in mind.
- Project management: The project management makes life easy for enterprises. Superiors can assign limitations and access controls to digital collaterals with a tap.
- Hands off mode: Code sharing is rather convenient using Dev Links and slices. The design team can send designs with the developers team and even clients for reviews. The offline sharing works seamlessly too!
- Carousel Widgets : it offers an in-built Carousel Widget so that you don't have to download anything extra. You can create image sliders conveniently within the tool itself.
A short tutorial on how to create a carousel:
Mockitt surely makes it easy for anyone to design carousels for a website. For the sake of demonstration, we will jump right to the carousel building part. If you need to learn how to get started from scratch, head over to our help section.
Step 1 Use the carousel widget
First you need create a project by clicking the "Create" > "Project" button
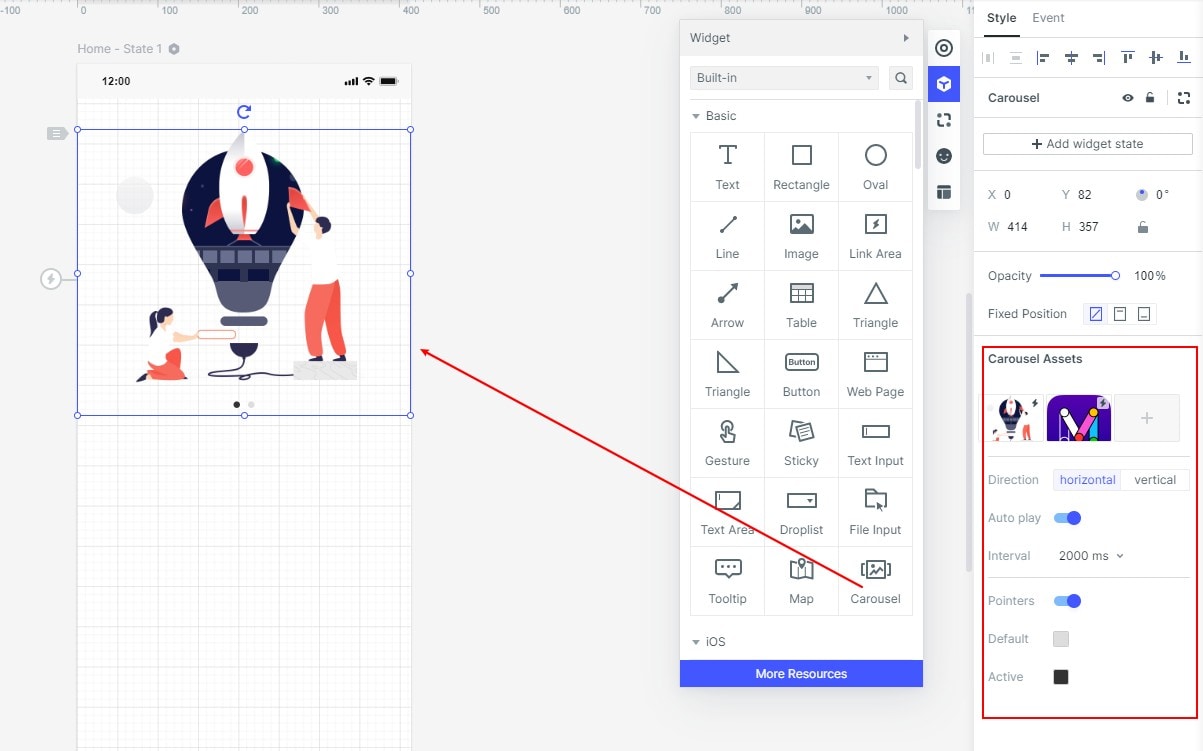
Jump to the canvas or screen you are interested to develop a carousel in. Over the widgets section, you will be able to locate the in-built "Carousel" widget. You need to click on it, as shown in the image below. It is also available by the name of basic components.

Or you can use the drag and drop action to include a carousel into your design canvas. When you hover your mouse on top of this addition, the Mockitt interface will automatically indicate two options. These are "local upload" or "material library" upload options. You can choose from any of the mentioned two.
Step 2. Deciding between horizontal and vertical scroll
Depending on the design in mind, you can easily make a selection between scroll settings. When pointed upon, Mockitt auto indicates, whichever is in action and you can also select if you'd like.
Step 3. Set rotate duration
Now you need to select the rotation duration of the images that are swiping automatically in the carousel. On the thumbnail, you will find a small lightning icon. From here, as a user you can set it to click the carousel to jump to other pages or other states.
Step 4. Adjust color indicators settings
The last steps in making a carousel on Mockitt is this one. You have the flexibility to select color indications for cursors or pointers. If you want you can also skip this step.
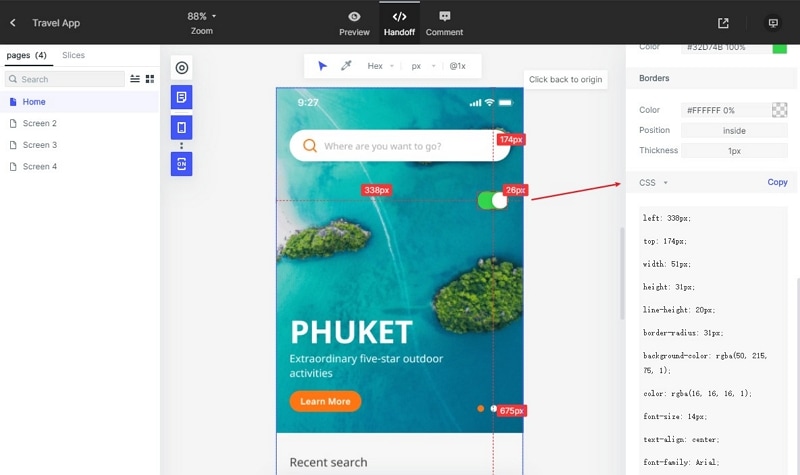
Step 5. Devs link generation using Handoff mode
You can now share your final design using a Dev Link. A cool thing about Mockitt is that you can share the design using the "Handoff" mode as shown in the image below. There is a provision to export into CSS file formats if you would prefer sharing that way. More options are available if you want an offline viewing or presentation experience.

5 Best Carousel Plugins for WordPress in 2021
Let's look at some popular carousel plugins for WordPress that you can use to implement in your website.
1. Slider Revolution
One of the best WordPress plugins available online is from Slider Revolution. Its unique selling point is its easy to use functionality, where no coding is required.
2. Kreatura Slider Plugin
Kreature Slider Puglin accounts for almost 10% of carousel images integrated online. To owe it to its success is responsive sliders, that are 3D ready as well as search engine friendly.
3. Master Slide
For beginners, Master Slide is easier to use than other plugins. It integrates well with almost all browsers like the Chrome browser, FireFox, Safari, DuckDuckGo and many more.
4. Slaido
Slaido is an easy and minimalistic plugin to install and use. It comes with a lot of premade slider styles and sets that are easy to plug and play.
5. Multimedia Responsive Carousel
As the name of this plugin suggests, you can create multimedia responsive carousels with it. It even supports YouTube videos as good as images!
A quick summary on how to create a carousel with WordPress
In the online race where many competitors are attracting visitors, it's the best move to select design elements that draws customers easily. Many websites make use of image slider carousels for this purpose. You can too make use of a WordPress slider with text and image and make your website stand out.
To begin with, you need to identify the style of your website image carousel. Next is choosing media elements like pictures, videos and styling text or other elements. You can get over this step very quickly if you use Mockitt; an industry-leading online prototyping tool! Mockitt comes with an inbuilt carousel widget, that makes work all play; and is also easy to use. You can make anything possible and truly scale your design thinking. Try the free version now!

