How to Create Web Design with Wordpress

To compete in this competitive world, you need to create a unique recognition of your business amidst your target customers. If you want to survive in this commercial market you must build a transparent relationship with your clients. Make sure to reveal the changes in your products and services in this digital platform to boost up your sales rate in no time. The WordPress website design tool provides a comfortable space for the vendors to put up their offers and discount on their sales. The WordPress website design serves as an effective channel between the sellers and buyers offering a transparent space for them to work upon.
- Part 1. How to design website with Wordpress?
- Part 2. The best Wordpress web design Alternative
- Part 3. How to create web design with Wordpress Alternative?
- Part 4. Conclusion
How to Design a Website with WordPress?
The WordPress Web design software is a convenient application to build an effective web page for your business activities. It is an open-source tool and simple user-interface with extra versatile features. You can easily promote your business through this informative WordPress platform optimally.
Now, it is time to explore how to design WordPress website professionally to boost up your business sales rate in a short span.
Step 1: First, get a domain name and purchase it, if you are going to use it for commercial purpose. Then, purchase a hosting package to serve your domain name at the cyberspace. Here, consider 'Bluehost' as the hosting package, signup using your domain name and enter the necessary information to create an account at this environment.
Step 2: In the Bluehost platform, tap 'My Sites' option in the left pane and hit 'Create Website' on the right side of the screen.
Step 3: Connect with the 'WordPress' tool using the credentials at the Bluehost environment.
Step 4: After a successful login at the WordPress page, it is time to edit the web pages one by one with the help of this innovative space.
Step 5: Structure your website by adding informative web pages on your website. Press 'Settings -> Permalinks' in the WordPress dashboard to insert extra links into your website carrying data related to 'About Us', 'Products', 'Customer services' etc.
Step 6: Set your website for public view by tapping 'Settings-> Reading' and uncheck the option 'Discourage search engine from indexing this site'.
Step 7: You can now set titles and taglines for your website by clicking 'Setting -> General' and then set 'Site Title and Tagline'. Enable or disable the comment section on your website by selecting appropriate options at 'Settings -> Discussion'.
Step 8: Now, set your desired theme for your website by tapping 'Appearance -> Themes' in the left pane and 'Add New' button at the right side of the window
Step 9: Install the new theme and customize the web pages by following the instruction wizard. To edit the home page of your website, go to 'Homepage Settings' option in the sidebar and choose 'A Static Page' radio button. Now, you must hit 'Add New Page' to set it as the home page and keep on adding pages and name it appropriately to include in your website.
After creating an outline for your website, then it is the right time to personalize the pages as per your business requirement.
Step 10: Press the pencil icon at the headline and it triggers a customizing panel at the left side of the screen. Personalize the background according to your needs using this customizing section. You can easily add content to the general website section like 'About Us, Features, Team, Ribbon, Testimonials, Contact' etc. After editing these pages hit the 'Publish' button at the right top of the screen without fail.
Step 11: Change the font sizes by tapping 'Appearance Settings -> Typography' at the WordPress environment. Select the 'Colors' tab to adjust the colours in your website. Add menus and widgets by pressing 'Appearance -> Menus' and 'Appearance -> Widgets' etc.
To add plugins, in the WordPress dashboard hit Plugins -> Add New'. To create a blog post pages in your website tap 'Posts -> Add New'. If you want a new page to appear first on the website then build it by clicking 'Pages -> Add New'.
Make use of the above-discussed guidelines to design a professional web page to aid your business activities effectively.
The Best WordPress Web Design Alternative
The best alternative for WordPress Website Design Software is Wondershare Mockitt. It is a prestigious product and aids the designers to create a professional user interface layout quickly. This prototyping tool provides an easy space for the designers to build an interactive and responsive website for your business processing. Do you want to know what is special with Mockitt prototyping tool? Then, scroll down patiently.
Excellent functionalities of Mockitt
- Realistic and impressive templates for ready to use
- Simple 'Handoff' mode to inspect and build an effective web design
- Connect and sync your work at the virtual storage space like 'Cloud' platform
- Share your work with the entire team using the 'Enterprise' feature of Mockitt
- Built-in widgets allow you to add it to your website through effortless drag and drop action.
The above features trigger you to switch over to Mockitt prototyping tool to design a professional and highly responsive website. With the help of this tool, you can easily reach out to the target audience for effective business operations.
How to Create Web Design with WordPress Alternative?
The Mockitt, an online prototyping tool is a remarkable alternative to WordPress Website Design software follows a simple procedure to design an effective website for your business activities.
Step 1: Create an account
You must create an account at its official website by entering the username and password to create a new project at its platform. After an official sign up at the Mockitt environment, you should tap the 'Create Project' option. Then, select 'Blank Project' menu and choose the website compatible device like 'Mobile, Tablets, TV, Watch' etc.
Here, for example, go for the 'Mobiles' option and in the next line tap the drop-down icon to select the Mobile's working platform such as Android or iPhones. Choose the desired platform and select the appropriate mobile model to be compatible with your website.
Step 2: Add icons and desired widgets
In the home screen, you can find the fast widgets in the left side of the screen and at the right pane, there are 'Built-in Widgets, My Widgets and Icons' listed to add comfort to your canvas by double click or drag and drop action. After adding the desired ones, you can edit its respective properties at the 'Inspector panel' at the right side of the screen.

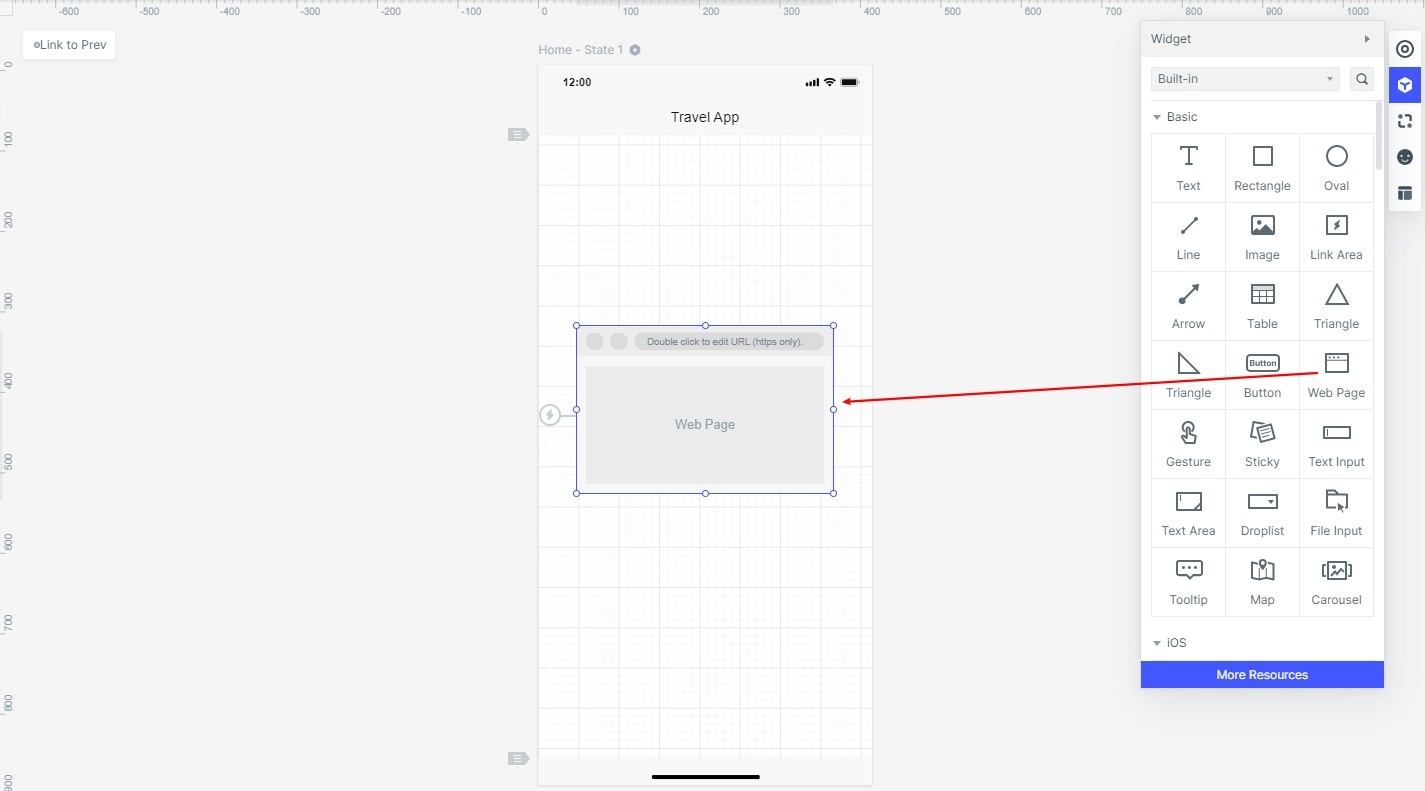
Step 3: Insert Audio files
First, identify your favourite music track at the online platform and get the right URL of the music. Open your project at the Mockitt environment and add the 'Web Page' widget into your working place. Now, you must paste the URL at the 'Web Address' field displayed at the right side of the screen. Then, save the changes and launch the project to hear the audio track in your web page.
Conclusion
Therefore, the best alternative for WordPress website design tool is the Mockitt application. The Mockitt program stands unique from the crowd of prototyping software in the digital market. Choose wisely if you want to design sophisticated website design for your needs. Create an innovative web page just by few clicks at the Mockitt app environment. Design faster and swiftly with feature-rich product Mockitt app from Wondershare. It is a highly recommended program by many professionals in the design field. To establish your business in the digital environment you need to build a compelling website for an easy reach to your target audience. The Mockitt app assures to be the best partner in designing your persuasive web pages for your business operations.
