How to Make Animation with Adobe XD

Are you at your wit's end trying to decipher how to do Adobe XD animation with ease? Yes, Adobe XD is one of the top-rated animation tools worth diving into. However, if you are a novice, you might find it challenging to navigate and create animation in Adobe XD. So if you have been suffering in silence and you are hell-bent on creating Adobe XD animation, then stop barking up the wrong tree and read through this gold mine guide. In this article, we shall give you a complete guide on how to make an animation with Adobe XD.
- Part 1: How to Create Auto-Animation with Adobe XD
- Part 2: How to Create Animation with Adobe XD Alternative
How to Create Auto-Animation with Adobe XD
Step 1. Open Adobe XD and select the "Prototype" at the top window.
Step 2. Now set the Home artboard, which shall be the starting point of your design. If your design has got multiple flows, you can set Home artboards for each of the flows.
Step 3. Now that the Home artboard is set, it is time to link various objects or artboards. Simply hit on the objects or artboards that you want to link. You should see a connecting handle with an arrow at its tip. Drag this arrow to the target artboard or object to create a connection. Repeat this process for the other objects and artboards you would like to link.
Step 4. After linking respective artboards and objects, you need to define the type of interaction. Locate and hit the "+" button on either the canvas or the Property Inspector to display the "Interaction" window. Here, you can customize interactions based on your preferences. The "Trigger" option allows you to define how you are going to trigger an animation.
A good example is the "Tap" option. Click on the "Action" drop-down menu and select the "Auto-Animate" option. Under the "Destination" tab, choose the destination artboard or object to transition the animation. The "Easing" option gives you a way to simulate the easing effects like ease out.
Step 5. Finally, choose the "preview" button and interact with your animation. You can select to preview in supported browsers.
How to Create Animation with Adobe XD Alternative
Wondershare Mockitt is a powerful design, prototyping, and collaboration tool used by droves of designers, developers, and managers across the world. The program is enriched with plenty of excellent features that turn the entire experience full of fun and fascinating. The speed, ease of use, intuitive interface, and numerous top-notch capabilities make it a suitable choice for all types and sizes of organizations. Use the assortment of templates and UI assets to create designs without starting from scratch.

- The cloud feature keeps every project synced irrespective of time and space.
- It allows users to animate and prototype their websites and apps with speed.
- It offers plenty of templates to design effectively.
- It provides several widgets and icons to create beautiful interfaces.
- Users can collaborate in real-time and co-edit the project.
Step 1. Create a New Project
Using your browser, visit Wondershare Mockitt, and log in to your account. You can select your project if you already created it or start to create a new one. To create a new project, hit the "Create" -- "Project" button, and then choose the "Blank Project" tab. Provide a suitable project name and choose the target device icon. Finally, click the "Create" tab to proceed.

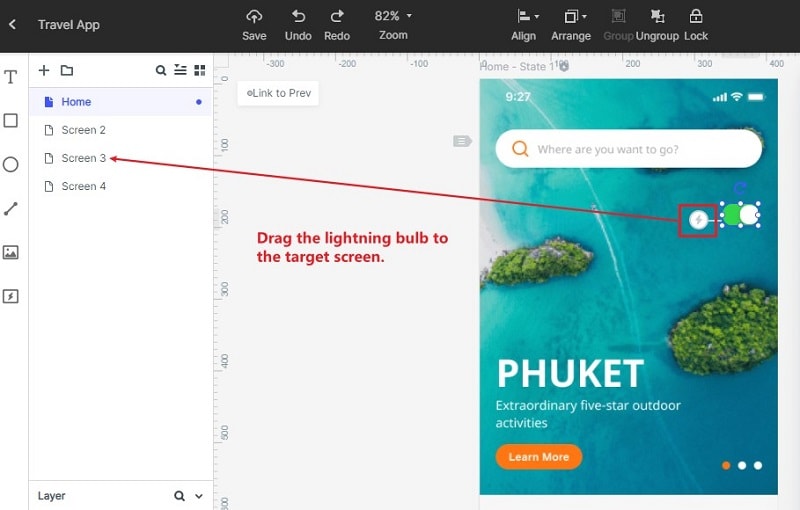
Step 2. Make Animations
Here is the way to make an animation between the widget and the screen:
Click the "Built-in" button and drag your desired widget to the canvas, then drag the lightning bulb beside the widget to the screen you want to link.
Besides, you can also click the "State" icon to display the State Panel. From this panel, select the "New State" option to create a new state for the widget. Repeat this procedure to create several states for the widget.
Step 3. Preview the Animation
To check how your prototype works, hit the "Preview" tab on the toolbar, and interact with the prototype.

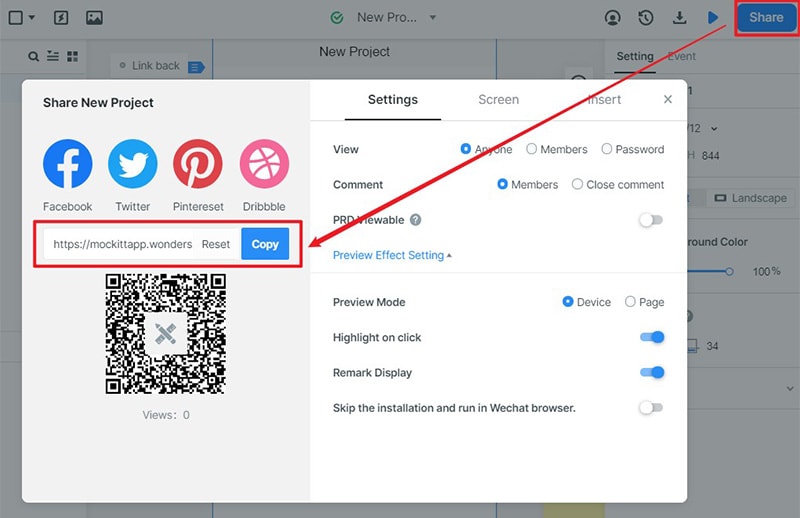
Step 4. Share Your Design
Tap the "Share" button to receive the project's QR code and the sharing link. Share these details with the people you want to share your project with so that they can access it using their devices.