How to Add Fonts in Adobe XD
Are you caught between a rock and a hard place trying to add fonts to Adobe XD? Do you want to have lots of fonts to pick from and use for texts in your project? Of course, yes. Having a variety of fonts to choose from can make your design experience amazing because you can use different fonts for different topics or roles. But how can you add Adobe XD fonts with ease? In this article, we shall walk you through a step-by-step guide on how to add fonts in Adobe XD.
- Part 1. What Fonts Do Adobe XD Support
- Part 2. How to Add Fonts in Adobe XD
- Part 3. The Best Adobe XD Alternative
What Fonts Do Adobe XD Support
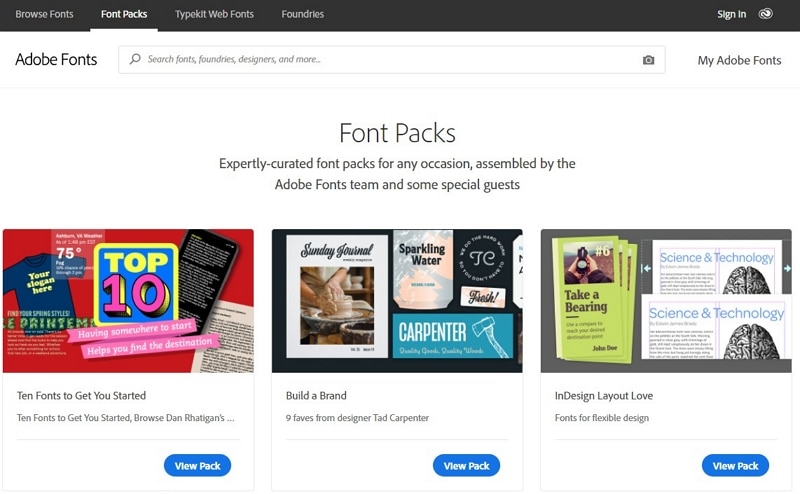
Adobe XD supports several fonts, and you can use them for your project texts. Since there are thousands of fonts supported by Adobe XD, we are going to classify them as font packs. Font packs are like family fonts and are related. Fewer deviations characterize them. Now let's see some of the font packs supported by Adobe XD.

- Build a Brand Pack - This pack consists of up to 9 different AG font types. They include Joschmi Regular, Reross Rectangle Regular, Acumin Pro Condensed Light, Shackleton Condensed Regular, Hatch Light, and CarlMax Bold, among others.
- InDesign Layout Love Pack - These fonts are suitable for flexible designs. The pack consists of 8 different Ag fonts like Omnes Pro Regular, Omnes Cond Bold, Omnes SemiCond Bold, Omnes SemiCond Regular, and Henriette Heavy, among others.
- Fonts for Change Pack - This pack is ideal for strong campaign signage. It consists of 12 fonts. Some of these fonts include Omnes Pro Bold, Omnes Cond Bold, Halyard Display Bold Italic, Halyard Micro Bold, Halyard Display Blck, and Merriweather Bold, among others.
- Productivity Infographics Pack-This font packs consist of fonts that are ideal for details in that they make your texts look sharp and non-cluttered. They are six fonts in this pack and include Source Serif Pro Regular, Source Serif Pro Bold, Source Code Pro Regular, and Halyard Text Medium, among others.
There are several of these font packs, and here is the font collection supported by Adobe XD.
How to Add Fonts in Adobe XD
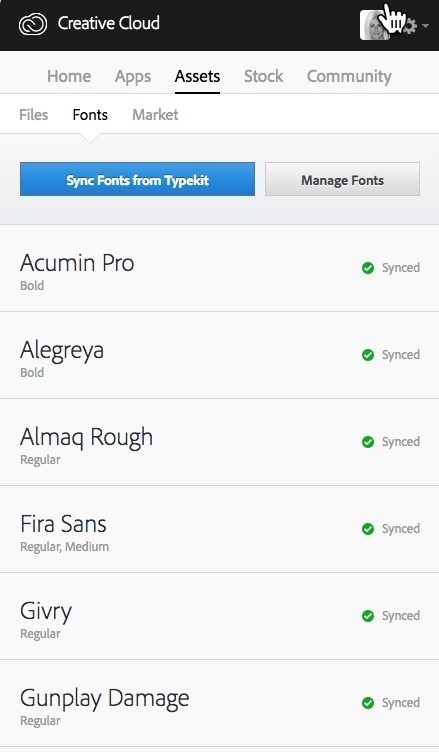
To add fonts in Adobe XD, you will use the Creative Cloud desktop app. This app lets you add thousands of fonts so that you can use them on Adobe XD.

- Step 1. Run the Creative Cloud desktop app on your device by tapping its icon. The icon is located on the taskbar in windows and the menu bar in macOS.
- Step 2. Locate and click the font's icon in the top-right corner to enter the front window. You should see the "Browse fonts" button at the bottom of this window. Click on this link to access the browser window. You will be signed in to fonts.adobe.com. If your screen looks a little different from the one described here, it might be because you are using the older versions.
- Step 3. Browse for the fonts on the font browser window. You can use the filters situated on the left sidebar to search for specific fonts or rather narrow your search results.
- Step 4. Once you have found the target font, hit the "View Family" button underneath it.
- Step 5. From the subsequent page, hit on the "Activate Fonts" drop-down icon. Now toggle the respective buttons to activate the desired font family, font weights, or font styles.
To access the activated fonts, open the Creative Cloud desktop application, and navigate to the font list within the desktop applications. You should see them in the "Active fonts" list.
Would you interested in exporting Adobe XD to Flutter? Click and learn more about How to Export Adobe XD to Flutter for Real App.
The Best Adobe XD Alternative
Wondershare Mockitt is a powerful design, prototype, animation, and collaboration platform. It has several amazing features that make it an ideal solution for all types and sizes of organizations. The interface is elegant and easy to use. Therefore, newbies can navigate without experiencing major challenges. There are several templates and UI assets. Just pick and customize a suitable template to the desired size and shape. These templates are frequently updated and are suitable for a variety of industries.

Instead of drawing icons and other objects from scratch, simply drag suitable widgets and icons from the huge collection within the program. These widgets and icons make your interface looks more appealing. You can edit and save them in the widgets library so that you can reuse them any time you need them.
With Wondershare Mockitt, you can easily turn your static screens to become interactive and also animate your prototypes or wireframes. Once you are through with your design, you can preview and share it with friends or team members.
- Wondershare Mockitt supports real-time collaboration and co-editing, which helps speeds up the iteration process.
- Users can animate their wireframes and prototypes.
- It allows users to share their prototypes and customize privacy settings.
- It offers plenty of templates and UI assets to design effectively.
- There are abundant widgets and icons that allow users to create a beautiful interface.
- The cloud feature syncs all projects and can be accessed anytime, anywhere, using a variety of devices.
Why you should switch to Mockitt
- Several functionalities - Mockitt has plenty of functionality ranging from basic to advanced. They make it easy and super-fast to create stunning prototypes. It houses plenty of functionalities, and there is no need for a third-party tool.
- Intuitive and User-friendly Interface- the program has an elegant and total no-brainer interface. This way, users can navigate through the process with ease irrespective of their level of expertise.
- Compatibility - it supports several devices and operating systems, including Windows, Mac, Linux, iOS, and Android, among others.
- Real-time collaboration - it allows team members to collaborate irrespective of their size. Members can co-edit the project and provide feedback, which helps to fine-tune the project.
- Affordability - Mockitt is, no doubt, an affordable yet effective design, and prototyping tool. It has a free version, an advanced personal version which is only $69/year, and an enterprise version which is only $99/year/member.
FAQs for Add Fonts in Adobe XD
1. How to add missing fonts in Adobe XD
You can have a look at the solutions provided by Elaine in this link "Missing Fonts" alert on XD android mobile app. – Adobe XD Feedback : Feature Requests & Bugs
2. How to import Google material icons and screens into Adobe XD?
You can Launch Adobe XD. You are welcomed by the splash page that offers different possibilities. Choose to start from a classic preset like iPhone 6/7/8; After selecting preset and creating a document, select the menu item: File> Get UI Kits> Google Material; You are redirected to the Google Material download page. Click the download link for the UI kit in Adobe XD format; Open the newly downloaded Adobe XD file. Once you have the file with the Google Material UI elements, you can efficiently import it into your design or a new file in two ways, depending on your specific needs.
3. Can I install fonts in Adobe creative XD?
XD should load all fonts you have installed on your OS. If you just installed a new font, then please restart XD in order to have access to them. Here's a link to how you can install fonts using Font Book: Mac Basics: Font Book - Apple Support.
