Wondershare Mockitt - Best Figma Alternative
Become a Figma Expert by Smart Tips
- Everything You Need to Know about Figma.
- Tutorial for Using Figma Layout, Animation, and Components
- Best and Cost-Effective Figma Alternative for Beginners

How to Create Layout Grid in Figma
Figma is a web-based prototyping tool and vector graphics editor, UX and UI design application which emphasizes on real-time collaboration. It further comes with an added feature for offline mode which is supported by desktop applications for Windows operating system and mac operating system. It mainly concerns on user interface and user experience design, but it can also be used for creating logo and typographic. The Users can very conveniently view the Figma grid prototypes on mobile devices with the help of grid Figma Mirror companion application for Android and iOS platforms. Figma bootstrap grid has various features and is efficiently user friendly. In this article, we shall learn how to add Layout Grid in Figma.
- Part 1: What is Grid in Figma
- Part 2: How to Create Layout Grid in Figma
- Part 3: The Best Figma Alternative
What is Grid in Figma
At first, we shall understand what exactly Figma responsive grid are. Basically, Layout Grids in Figma helps the users to align objects within a Frame. With the help of Layout Grids, it is easier to receive a visual structure to the designs. However, Layout Grids does not need to rely on pixel grid, which implies that they are not dependent on any specific dimension or resolution and can be played however and can also be applied to Frames.
(image source: laptrinhX)
Layout Grid helps its Figma users to reduce in decision making while fixing layouts, reduces in time which takes in defining the layout for wireframes or mock-ups, not only that Layout Grid also helps in supporting various and different layout techniques for example icons, galleries or entire page layouts and it also the users to establish consistency across multiple platforms like android, iOS and Ubuntu. Users can apply Layout Grid to any Frame but it is important to remember that Components too are Frames and similarly Layout Grids can be applied to Components too. Users can find for the Layout Grid setting in the properties Panel in Figma.
How to Create Layout Grid in Figma?
In order to apply Layout Grid, a user needs to follow the following steps:
- At first, select the Frame in the canvas or the Layers Panel where the user is prototyping.
- Then in the Properties Panel, user will see a "+" icon beside the Layout Grid.
- Automatically, a Uniform Grid will appear and applied to the Frame, it is a default move by Figma.
- Users can then click on to the Grid icon to update any of the properties from the Layout Grid settings.
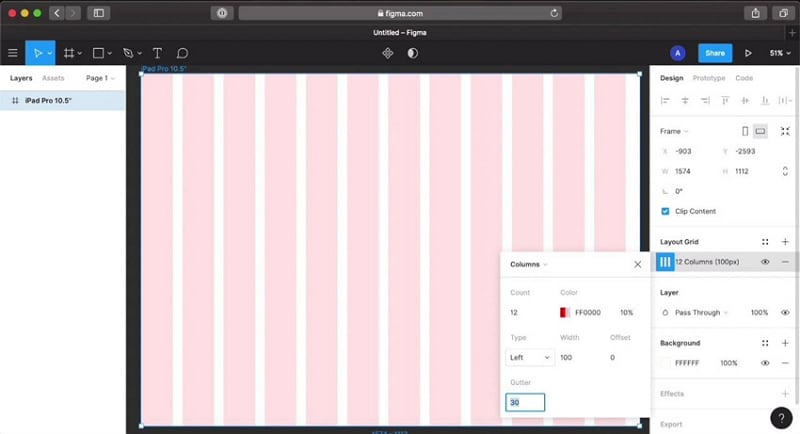
Now, Layout Grids are available in three forms as Grid, Rows and Columns in a uniform square. Users can easily define the size or the color of their choice to the grid. For Rows and Columns, user can easily define the height and width they’d prefer, and the same thing can be done margins and gutters.
Now, in order to change the Layout Grid, these are the following steps:
- Click on to the Grid icon present in the Properties Panel then click on the Grid drop down menu present in the Layout Grid Properties section.
- After this, users will be given options to choose a Grid with Columns, Grid with Rows and Uniform Grid
- Further a user can choose to customize the Layout Grid however they prefer it to be.
Uniform Grids can be chosen of any size, it will later determine the pixels each of the squares will contain. When a user clicks on the Grid icon and open the Layout Grid setting, they can also update the size field as preferred and the user can just click on the "X" sign to return to the can canvas.
Colum and Rows Grids can be applied together, it provides extra flexibility and control to the users over the layout. Users can very easily define the properties of the grid by simply understanding that "Count" determines the number of Rows and Columns in the Grid, "Gutter" determines the space which will be between each Row and Column, "Margin" determines the space between the Column or the Row from the edge, however it is only applicable to Stretch grids and lastly "Offset" determines the space between Row or Column from the Top or the Left.
The Best Figma Alternative
However, there are various prototyping and designing tool other than Figma which caters to different needs and requirements of the users. Such of these are Sketch, InVision, iDoc, UXpin, Wondershare Mockitt, etc. InVision is a powerful, web-based program, it’s a collaborative program which is only for $25 a month. It is a great choice for high dependability designing. It comes with features like InVision + Sketch and InVision + Adobe and with the help of these features’ users can create even better and efficient products. UXpin, for $44 a year, brings together everything for UX designing for designers, it also supports upload file effortlessly on Photoshop and Sketch.

However, Mockitt is an absolute game changer. It allows users to effortlessly create mockups and at the same time allows team collaboration. It has got everything, from drop down options, drag and drop to design tools which allows seamless transition between canvases. It comes with default sizes and buttons and a library where it all can be saved for future reference and it makes it very effortless to set layouts, develop transitions and editing and modification of elements that too for website based zero cost tools.
The advantages of Mockitt over Figma:
- It is a must to mention how pocket friendly this application is as compared to Figma or Sketch.
- Comes with detailed handoff which allows users to determine size, color and shape of the elements.
- Comes with a Gesture and Transition Panel which allows users to enjoy and put to use the amazing build in animation and design elements.
- Can be used on any operating system like Windows, iOS or Ubuntu and even can be used on mobile and tablets.
- It is a website based application with cloud powered solution which gives the users to access to the projects anytime.
- Last but not the least, it allows the users to share a project both offline and online.
