Steps to Download and Install macOS Monterey Beta on Your Mac
macOS Monterey, the latest desktop operating system from Apple, is now in its first developer beta. If you're a developer or even if you have an Apple Developer account, you can get the installation package. However, if you're new to the game, there are several things you should know before you install macOS Monterey beta on your device. Let's take it one step at a time.
- Part 1: 4 Things to do before Download macOS Monterey
- Part 2: How to Download and Install macOS Monterey Beta
- Part 3: The Best UI/UX Design Tool for macOS Monterey
Things You Need to Do before Download macOS Monterey
Do Not Use Your Primary Device
There a rule of thumb before downloading and installing any beta version of an operating system: NEVER do it on your primary device - the one you use for work and other important purposes. The reason is obvious; but, in case you're new to the beta scenario, you should be aware that beta versions are notoriously buggy and could compromise your entire system. The only way to retrieve your data would be to do a factory reset or attempt to roll back to an older, stable version of the OS. In this case, that might be macOS Big Sur or an older one like Catalina or Mojave. Make sure you know how to do that and download the installer for that version on a DVD or USB drive beforehand.
Is Your Device Supported by macOS Monterey?
Even before you get a developer account from Apple, you should check if your device is eligible for an upgrade to the new OS version. Apple has released a list of devices macOS Monterey 12 supports:
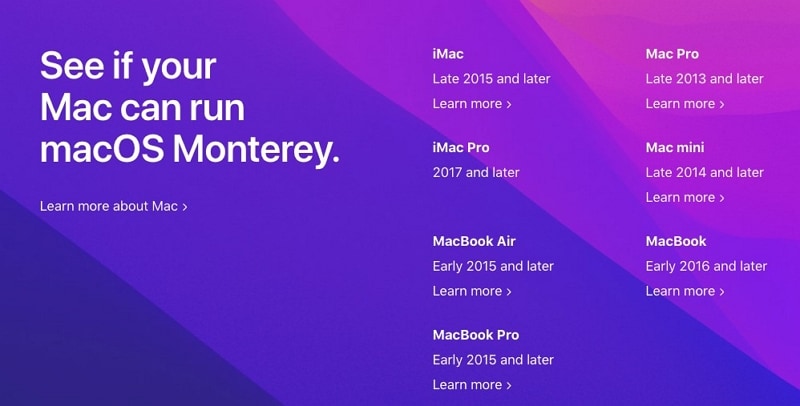
Source: Apple
If your device is listed, you're in luck. You are now one step closer to downloading and installing macOS Monterey beta 1 on your Mac device. But you're not out of the woods yet! Read on…
Sign Up for the Apple Developer Program
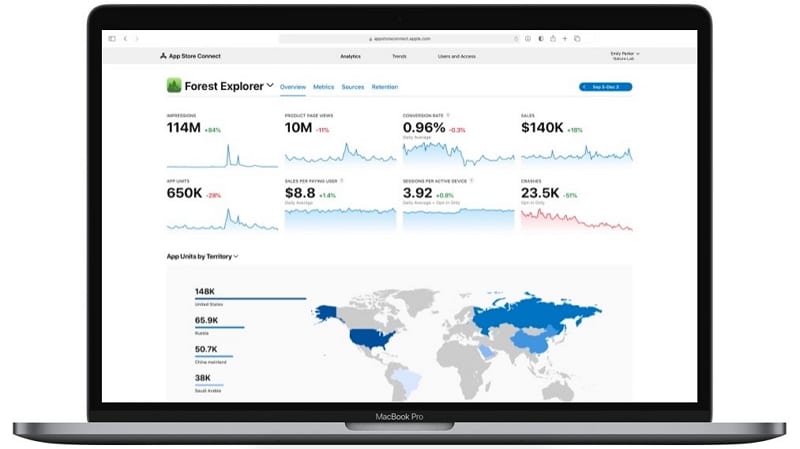
If you don't have one, you'll need to set up an account in the Apple Developer Program. There's an annual membership fee of $99 a year that gives you access to SDKs, Xcode, distribution permission for the App Store, analytics tools, support, and more.
Source: Apple
Once you sign up, you can download Xcode 13, which will give you all the other tools you need, including the macOS Monterey beta download. You can sign up for the program here, either as an individual or as an organization.
Once you've set up the account, you can proceed to the next step.
Take a Backup of your Data
Even if you're using a secondary or non-essential machine, it's important to take a backup of all the data on that system. That's because, as we said, beta versions are notorious for crashing and other issues. To be on the safe side, copy your data to an external drive using Time Machine or to a cloud service like iCloud.
Here's how to back up your data to an external drive using Time Machine:
Connect an external drive to your Mac and look for the icon on the desktop. It should automatically mount. If it doesn't, check here to see if the drive is of the supported type.
Next, under System Preferences, select Time Machine and choose Select Backup Disk.
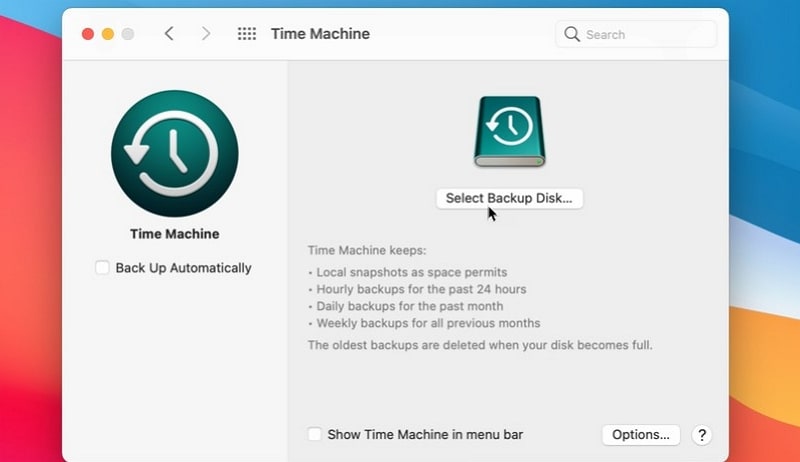
Source: PCMag
Select the external drive from the list shown in the pop-up window and click on Use Drive to initiate the backup. If you want your data to be protected, select the radio button for Encrypt Backups before clicking Use Drive.
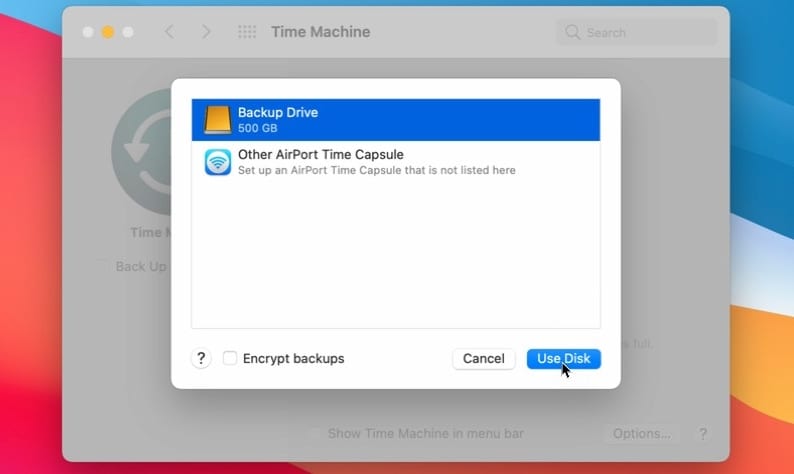
Source: PCMag
Note: In case your external drive isn't formatted for your version of macOS, you'll be taken through the process of deleting the data and reformatting it to AFPS. Other supported formatting options are Mac OS Extended format (Journalled), Mac OS Extended (Case-sensitive, Journalled), and Xsan.
If you don't have an external drive, you can also use a Shared Folder with another Mac to create a backup on that system. The process is a little more complicated but it's an essential step if you want to download macOS Monterey on the first machine.
On the second machine, i.e. the one you want to store your backup files in, go to System Preferences and select Sharing.
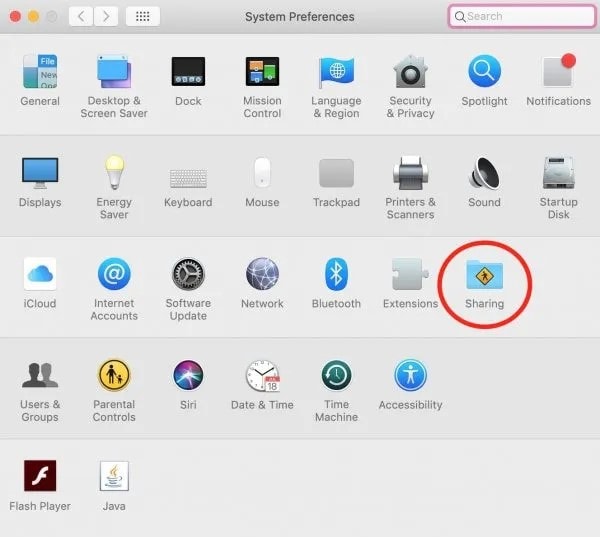
Source: Mac Observer
Check the tickbox next to File Sharing.
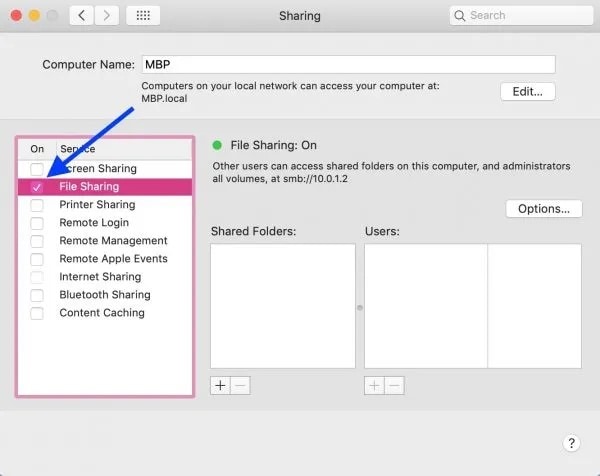
Go to the Options section and check the tickbox for "Share files and folders using SMB."
In the list view for Shared Folders, click the + symbol, choose a folder to share, and click Add.
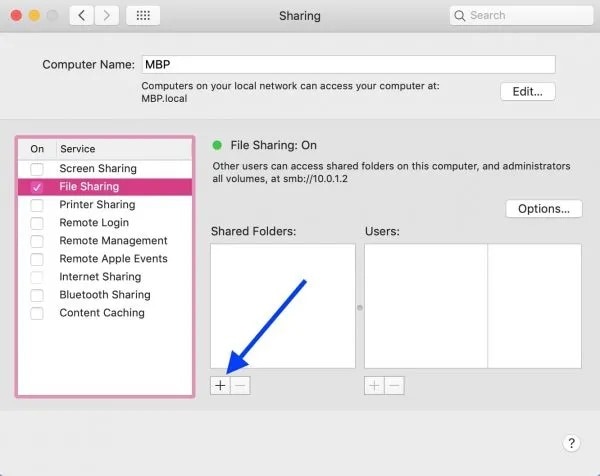
Next, either right-click or Ctrl+click to choose Advanced Options.
Look for an option called Share Over…, then find and click SMB. If you don't see the Share Over… option, you can skip over this step.
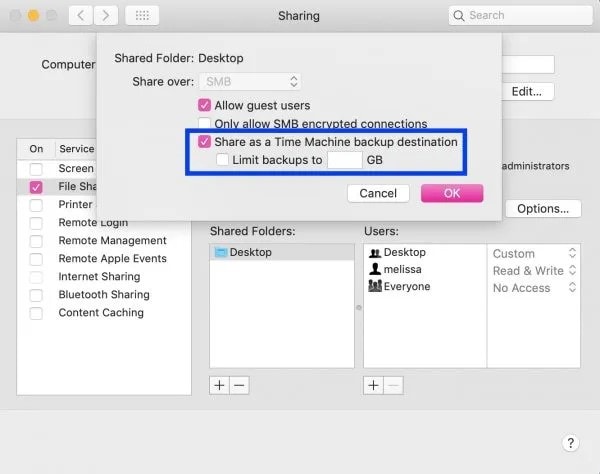
Now choose the "Share as a Time Machine backup destination" option.
Click OK or first set up a maximum size limit for the folder.
Go back to the first machine, open Finder, and look for the second machine under Network. Double-click it.
In the pop-up window, enter the login credentials for the second machine and click on Connect.
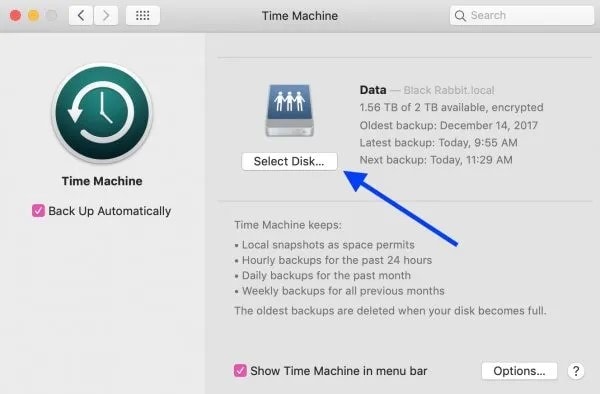
Now open Time Machine and choose Select Disk. You should be able to see the shared folder you created on the first machine. Choose that and select Use Disk
After doing the backup, you can move to the next stage and download macOS Monterey developer beta 1.
How to Download and Install macOS Monterey Beta
Sign in to your Apple Developer Account and click the icon showing two lines. It should be on the top corner on the left side of your screen.
Source: 9to5Mac
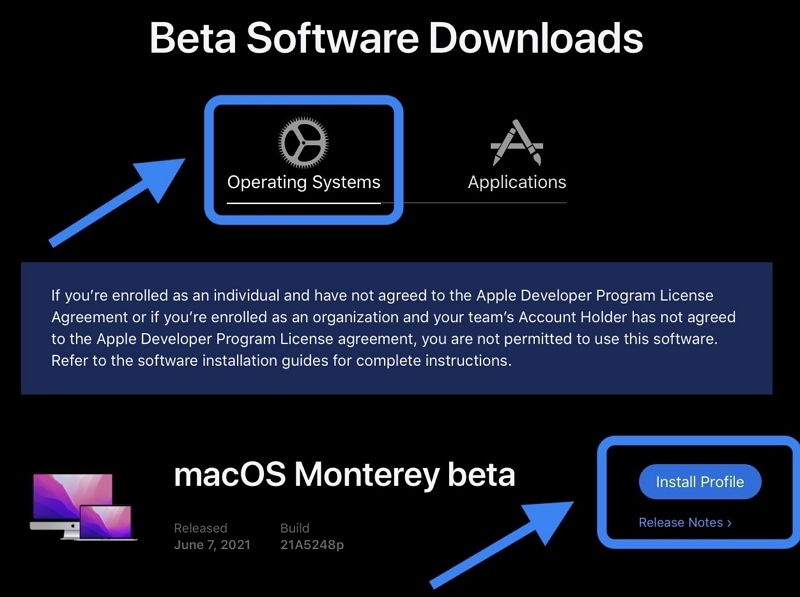
Go to the Downloads section and make sure that the Operating Systems tab is selected.
Where you see macOS Monterey beta listed, click the Install Profile button next to it.
Source: 9to5Mac
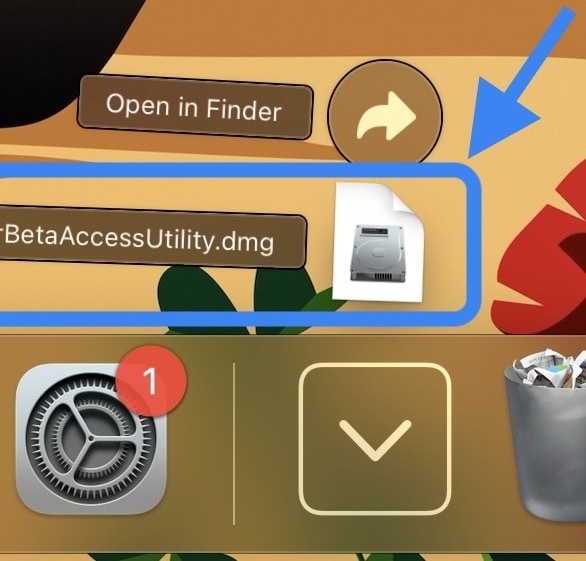
Open Finder and look for a DMG file called macOS beta Access Utility. It should be there already. Double-click the icon to mount it.
Source: 9to5Mac
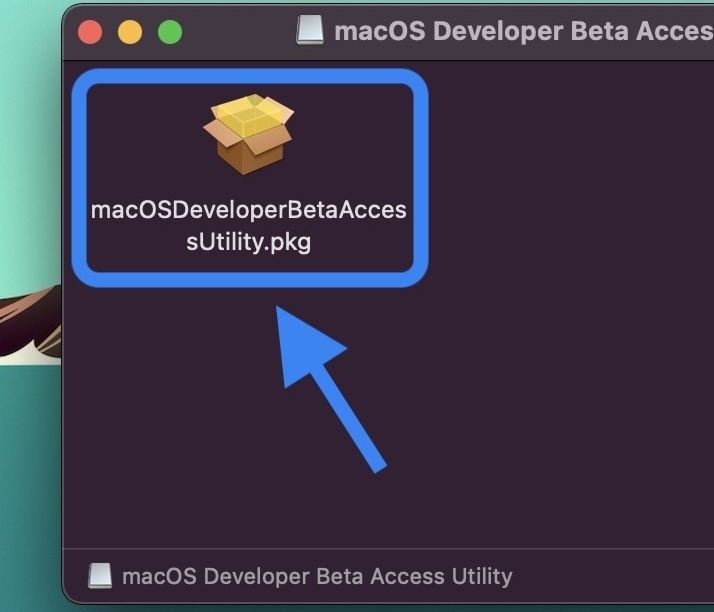
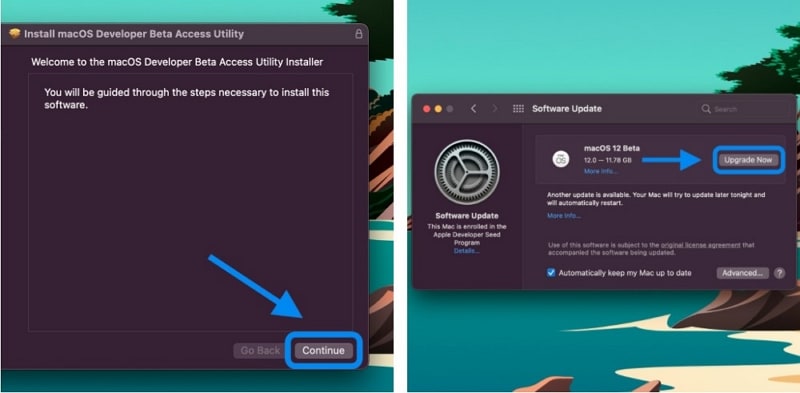
You should now be able to see a file called macOSDeveloperBetaAccessUtility.pkg - double-click that to launch the installing of the macOS Monterey beta profile on your system.
Source: 9to5Mac
In the Installer window, when you click Continue, you'll trigger the Software Update window, where you should be able to see an Upgrade Now button. Click the button and click on Continue to proceed with the installation. Follow the instructions on-screen until you reach the macOS Monterey desktop screen.
Congratulations, you are now an Apple developer testing the latest macOS Monterey!
Some Things to Know When Running macOS Monterey Developer Beta
Apple has already listed several known issues in the first beta version of the new OS. You can see that list here in the macOS Monterey 12 Beta Release Notes. There are also other forums where developers have listed issues that they've come across. For instance, you won't see Universal Control in the first developer beta of macOS Monterey. This is the feature that allows cross-device keyboard and mouse operation between a Mac and an iPad, allowing you to use both input devices on both systems without any initial set-up. Another example of the bugginess that is typical of first betas is the fact that several users have reported that VPN doesn't work; one possible workaround is to disable the new iCloud Privacy Relay options in Network Settings.
There are several such minor and major bugs that you may discover as you test macOS Monterey, and Apple's Feedback Assistant will help you report and track those issues as we move into subsequent beta versions.
One final word of advice: If you don't have any experience with beta software, especially developer beta versions, it's probably better to sign up for the Apple Beta Software Program for public testers. The program for macOS Monterey should open up in July based on the timelines we've seen for prior releases. At the very least, all the major bugs will have been fixed by then or at least recorded as known issues that are being actively investigated.
What is the Best UI/UX Design and Prototype Tool for macOS Monterey Users?
Wondershare Mockitt is a browser-based UI/UX design and prototyping application that is super-fast with the new Safari. With the additional features that macOS Monterey has brought into Apple's browser, your design experience will be like no other.
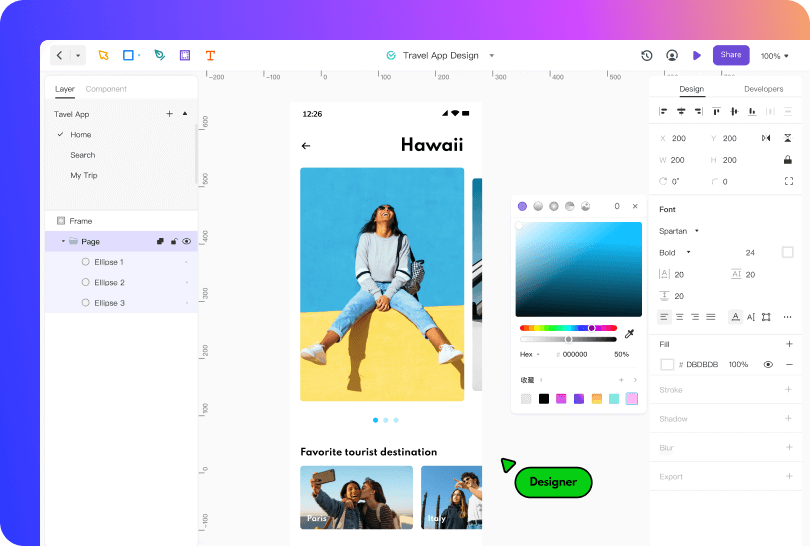
Desktop applications for design are great because they leverage the power and resources of the entire system. However, they can prevent other processes from running properly or even cause serious lag issues since they are usually resource-hungry. Cloud-based SaaS applications like Wondershare Mockitt, on the other hand, are more resource-friendly because they work between your browser and the cloud. Specifically, Mockitt is designed to leverage the speed and privacy aspects of Safari.
What Can You Do with Wondershare Mockitt?
As a comprehensive UI/UX tool, Mockitt offers various features for designers:
- A truly massive collection of components across multiple libraries for symbols, icons, widgets, UI kits, design systems, and templates.
- Customizable widgets that can be added to shared team libraries to create design system elements - Master Widgets, Create Symbol, and Shared Libraries are three great features that help you build your own design systems, style guides, etc.
- Design Tool - You can now create amazing vector drawings using Bezier paths, Boolean operations, and other advanced functions. The stunning color palette is compliant with Pantone Color of the Year 2021 and offers extras like 3D shadows, blurs, and more.
- Flowchart Tool - Create user flows to show clients and developers the logic behind your designs. Facilitate smoother communication with other major project stakeholders with this useful tool at your fingertips.
- Rapid prototyping with drag-and-drop linking and easy addition of gestures, effects, animation, transitions, etc.
- Use page states and dynamic widgets to show highly animated and intricate interactions across screens or within a single screen.
- Real-time collaboration tools - co-edit designs with other designers, let stakeholders preview your designs online or offline, etc.
- Auto-generated HTML and style code allows for easy code inspection, copying, and downloading of asset data. Smoother developer handoff.
A powerful design platform like Mockitt combined with the power of Apple's new silicon running the new macOS Monterey (releasing this fall) will be the perfect setup for any design team, and since it runs on the browser, your team can be spread out across multiple locations - across the city or across the globe!

