What is Mid Fidelity Prototype and The Usages of It

Want to Draw Mid-Fidelity Prototypes? Try This Out!
Wondershare Mockitt Prototype Designer realizes easy & rapid prototyping for iPhone, Android, Websites, and more. Drag and drop to create wireframes and prototypes. Give it a try!
There are different types of prototypes you can create for your design. With the right prototype, you can quickly determine the feel and look that your design will have. It saves you the time you would use to redo the design if you complete the work and then find that it does not have the desired look.
One of the types you can create is the mid-fidelity prototype. This is a prototype with limited functionality but has clickable parts that present the interactions and navigation possibilities of an app. Continue reading the article to learn how to create a mid-fidelity prototype.
- Part 1: What is Mid Fidelity Prototype
- Part 2: Advantages and Disadvantages of Mid Fidelity Prototype
- Part 3: When Should You Use Mid Fidelity Prototype
- Part 4: How to Create Mid Fidelity Prototype
What is Mid Fidelity Prototype
Mid fidelity prototype is a type of prototype with limited functionality but has several clickable areas presenting an application's interactions and navigation potentials. They are usually created upon user scenarios and storyboards. Through a mid-fidelity prototype, it becomes easy for you to present plots. The correct content description is generally emphasized in the prototype. A basic visual design is developed for all action steps. The mid-fi prototype works effectively for the validation of the interaction concept.
Source: Medium
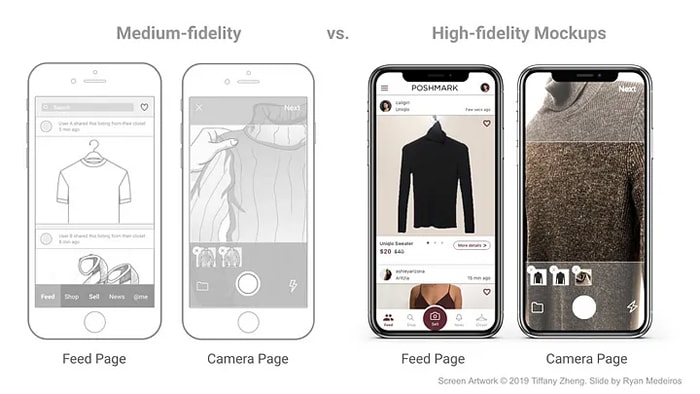
Unlike a paper prototype, it is possible to validate the understandability of interactive elements. A mid-fi prototype usually presents the mid group between low fidelity and high fidelity prototypes. The prototype usually provides some of the critical functionality and content used in the product but does not contain all of them. This means that graphics and photos are not there, or some of the high-level interactions like animation are also not present. It is more of a series of wireframes linked together to provide certain levels of interactivity.
If you wonder how to create mid-fidelity prototype with ease. Try Mockitt Prototype Designer to use pre-made templates and edit by yourself!
Advantages and Disadvantages of Mid Fidelity Prototype
Advantages of Mid Fidelity Prototype
Mid fidelity prototype allows you to go through the conceptual stage to the implementation stage fast. The prototype also gives more flexibility, exploration, and creativity during the implementation stage. With the mid-fi prototype, you do not have to create unnecessary design elements that may end up being scrapped as you develop the actual front end.
Mid fidelity prototype provides vital interactions of the final solution. This means that the prototype can be used with users for testing purposes. This makes it easy for you to gather many insights into their conduct and interactions with the software. The mid-fi prototype helps you gather insights that you can use to refine the solutions.
Disadvantages of Mid Fidelity Prototype
The greatest disadvantage of a mid-fidelity prototype comes with its limited functionality. The only thing you can do is testing what you have built. This means that you may not get a clear representation of your final solution's look and feel.
Note that it may take a longer time to create a mid-fidelity prototype, and it is also costlier. This is why it is advisable that as you make this prototype, it is good to test and eliminate problems during the early stages and assumptions using the low fidelity models. You should do this before you proceed to use the mid fid prototypes.
You May Also Wonder: Low Fidelity vs High Fidelity Wireframes and Prototypes
When Should You Use Mid Fidelity Prototype
There are several situations when you may need to make use of the mid-fidelity prototype. Like any other type of prototype you use, it is good to find out if your final design will have a look you desire to have. It also helps you understand whether the users will get the best experience you expect them to have with your final design.
You can use medium-fidelity prototype to give your target users a great sense of what the solution or part of the solution will look like. You can also use it when you have already tested and validated some of the early assumptions you have made with your design. This allows you to find out if the prospects will also validate those assumptions so that you can proceed with your design.
Mid Fidelity Prototype is a great option to refine the execution of solutions and give an opportunity to change direction and testing out options. As you do the designing, the mid-fi prototype is the medium, between low fidelity and high fidelity prototype. With it, you will know whether you are progressing in the right way or not. It helps you save time since it enables you to progress, knowing that everything is moving as expected.
How to Create Mid Fidelity Prototype
Wondershare Mockitt allows you to create highly interactive prototypes. It is a cloud-based tool, meaning you can use it on your browser with no installations required. As long as your device has an internet connection, you can use the tool effectively. It has many widgets, rich animations, gestures, and transition effects that allow you to create prototypes.

Mockitt has a user-friendly interface that makes it friendly to use for designers. You create the prototypes through the drag and drop option or dragging and dropping the elements on the design canvas. It also allows you to preview your prototype to determine if it has the feel and looks you want. Its collaborative features allow you to create a prototype as a team.
Steps on how to create mid fidelity prototype with Mockitt
Step 1: Create a Mid-Fidelity Prototype
Tap "Create" and select "Prototype". Name your mid fid prototype and choose the device you are creating the prototype. You can opt for mobile, web, watches, and others available on the platform. Set the correct canvas size of your prototype from the different sizes provided.

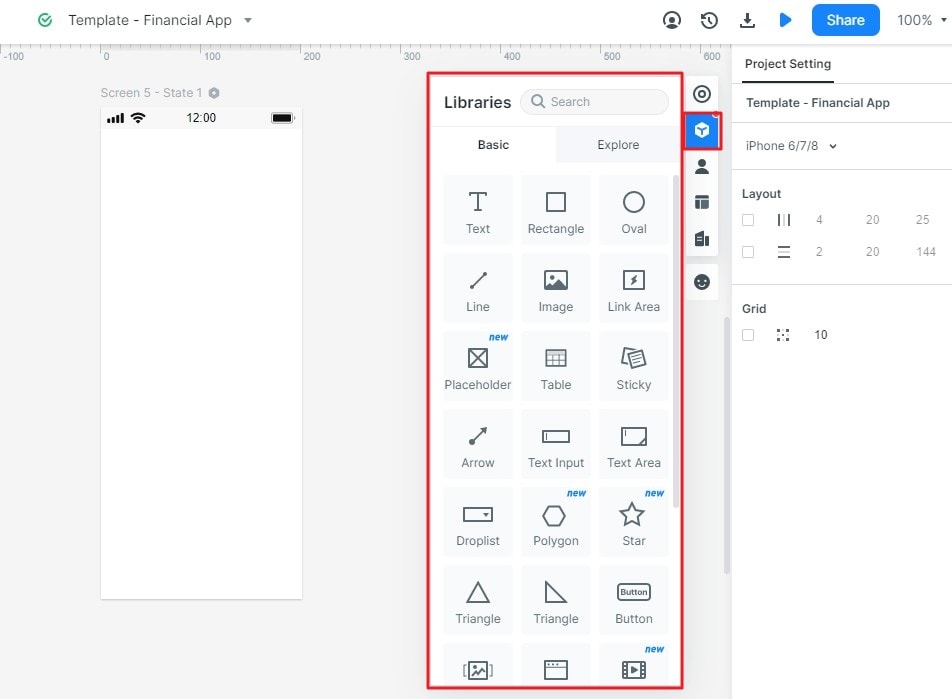
Step 2: Add Widgets to the Canvas
Go to "Built-in" library and look for widgets to apply for your mid-fidelity prototype. Drag and drop the desired widget into your canvas. Customize the widget to suit your specific prototype needs.
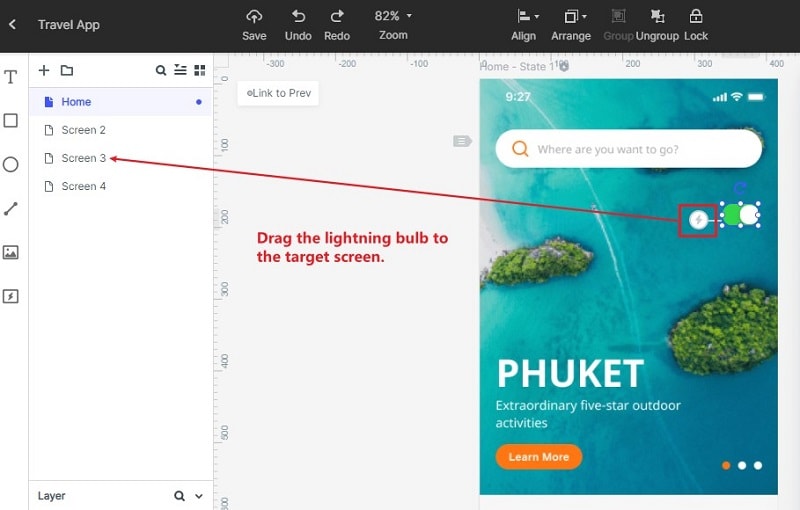
Step 3: Add Interactions to Page and Screens
Now make your mid-fidelity prototype more dynamic and interactive. Move the "Link icon" and drop it on the target screen. Establish the links and edit to trigger response effects and gestures to complete the interaction.
Step 4: Preview Your Prototype
Click "Preview" to check if your prototypes look like. You can give comments by clicking "Add notes" to give further explanations about your mid-fidelity prototype.

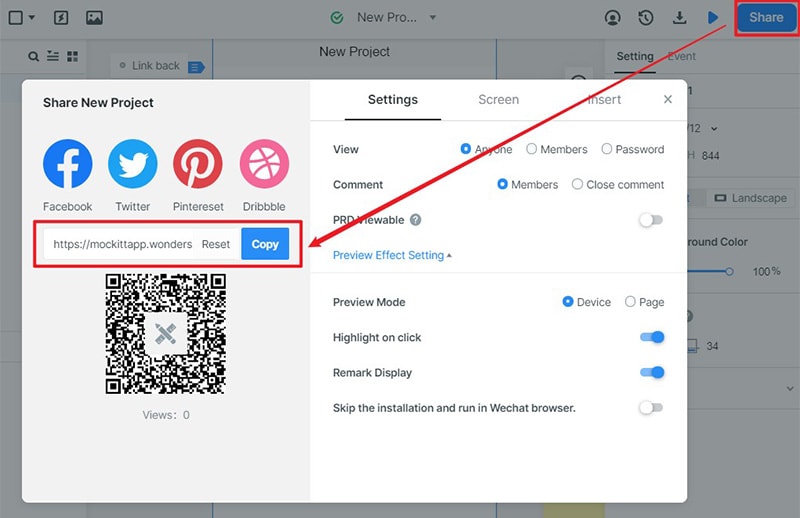
Step 5: Share Your Mid-Fidelity Prototype for Feedback and Comments
Allow others to preview your prototype by clicking "Share" to generate a QR code and URL link. This gives an opportunity for other stakeholders to preview the design and give comments for improvement.