What is Usability lab and How to Build a Skillful Usability lab

Usability lab has been in use for a length of time and there is no sign of decline especially now that technology has rapidly evolved. The advancement in camera technology, recording, screen capture apps, and integration platforms has skyrocketed the usability testing lab. However, scores still don't know what usability lab is as well as how to build it. To effectively utilize this usability testing technique, you need to have a crystal clear understanding of it. This article shall take you through a complete guide on what a usability lab is and how to build a skillful usability lab.
- Part 1. What is Usability lab?
- Part 2. How to Build a Usability lab
- Part 3. The Best Tool for Usability Design
What is Usability lab?
Before we jump into what usability lab is all about, it is important to understand its genesis. Usability lab is a usability testing (a way of finding out how users interact with your software/product. It focuses on the ease of use, learning curve, and satisfaction with your product) method.
When talking about usability lab, don't think about the chemicals and reactions in a typical chemical lab. We refer to a special room fitted with cameras and other observatory equipment where testers are monitored while they use a product/software. An observer can sit in a different room and observe how the users interact with their product. Usability lab is often a closed-door place to ensure privacy and maximum focus of the test participants. Some of the best usability lab places include conference rooms, private offices, rented space, coffee shops, company cafeterias, and hotel meeting rooms. Depending on your test's nature, it is more often good to have portable equipment to conduct a usability lab. This equipment includes a big laptop for the user, a small laptop for the facilitator, a webcam to capture users' reactions and comments, and a mouse for the user. This portable equipment can help you gather invaluable information and arrive at meaningful conclusions.
How to Build a Usability lab
A usability lab isn't just complete with the test participants and a room. There is a lot you have to do to make your Usability lab findings invaluable. As aforementioned, sometimes you are obliged to move to another room/place, and so you should have a high flexibility index. This is possible if you have portable equipment for building a complete usability lab. Nevertheless, certain things cut across all the usability labs and should be in place. The following points highlight how to build a usability lab.
1. Setting Up
Setting up a usability lab is the most crucial part of building a good usability lab. The main aim of setting it up is to have total visibility of the test participants. So you should set it up so that your visibility on the test participants is not hindered. Remember, usability labs differ in size, and therefore there is no one-fit solution for the same. Depending on your situation, you can be creative and adapt to the best solution. Some of the most important aspects to be considered in setting up a usability lab include:
2. Interface
Observing the user interface is crucial if you are to get good insights into the user's experience. To capture the user's screen, you can stream the tester's screen to another device and observe or record as per your need. With the current tech-advanced world, there are plenty of affordable tools you can leverage to convert your PC into a wireless receiver. If you are testing with mobile devices, you can use AirPlay or Google Cast for iOS and Android, respectively. You can also connect your device to a PC with the help of a USB cable then mirror displays, provided their operating systems are matching. Try to run tests on similar environments to achieve unbiased results.
3. Interaction
The interaction between the user and the interface gives you invaluable information on the usability of your product. This can be achieved by using a camera to capture the user's movements while interacting with the product. You can use any recording device provided you manage to place it correctly. You can turn off auto-focus to avoid unnecessary refocusing.
4. Expressions
By capturing the participant's facial expressions, you get to understand their emotions when using your product. Placing a camera directly in front of the participant can make him/her naturally uncomfortable. You can use small action cameras with good resolution then place them in a strategic position that ensures good capture while making the participant comfortable.
5. Synchronize
Given that you are using screen recording apps and different cameras to capture the user's expression, you need to bring them together to a common recording device. You can mirror all these inputs into a desktop so that you can observe them synced.
The Best Tool for Usability Design
Wondershare Mockitt is a powerful usability design tool that you should have as a designer, developer, or product manager. This program has plenty of features that make the way you prototype, design, and manage your team more effective than ever. Leverage the assortment of UI assets and templates to create stunning designs in less time. Also, pick from the wide range of widgets and components to make your designs more eye-catchy. The elegant and simple user-interface is an easy ride for all categories of users. Besides, Wondershare Mockitt offers a great collaboration platform. Here, you can bring all your team members on the same page, then edit, comment, and receive feedback in real-time. Being a cloud-based platform, you can access it anywhere using various devices and operating systems.

Key Features
- It supports real-time collaboration.
- Users can share projects and control whoever receives them.
- It has plenty of design resources such as UI assets, templates, and a wide range of widgets.
- It supports cloud-prototyping.
- The program supports the design of interactive and animated prototypes.
- Users can hand over projects to developers directly on the platform by generating the respective CSS code.
How to Do Usability Design with Mockitt
Step 1. Create a New Project

Visit Mockitt and log in using your details. On the interface, choose the "Personal Space" tab, then click "Create" and select "Project. From the "Create New Project" dialog box, provide the project's name and select a suitable device screen. Click "Create" to proceed.
Step 2. Add Widgets and Components
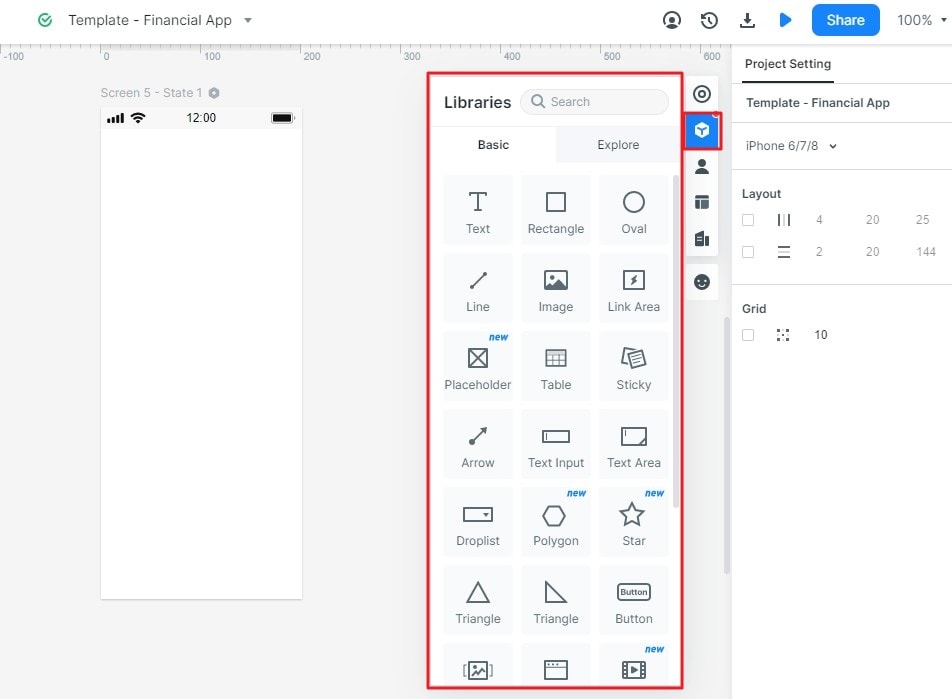
Head to the "Widget" section and choose a widget category using the drop-down arrow. Simply drag the desired widget and drop it at the canvas. You can add as many widgets as you like. To add more screens, click the "+ Add Screen" button at the top left.
Step 3. Create Interactions
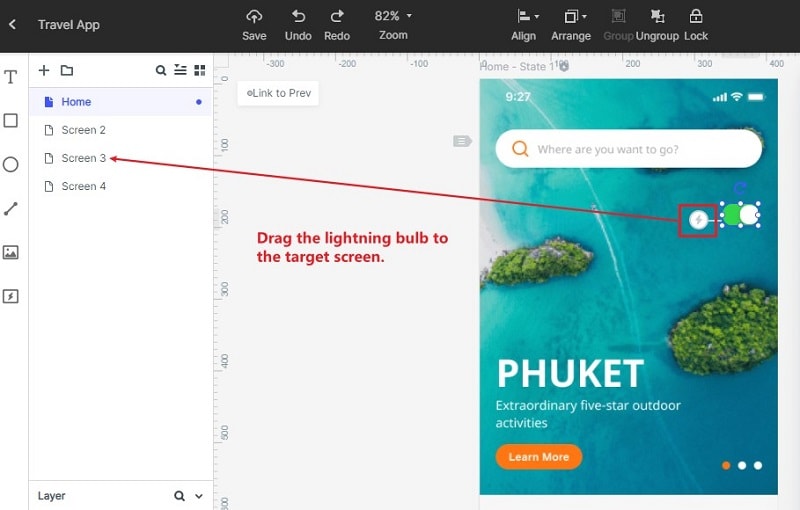
With desired widgets and screens added, it's time to link them. Click on the object you want to link to a screen and drag the arrow that appears to the destination screen. Repeat this for all the other objects and respective screens.
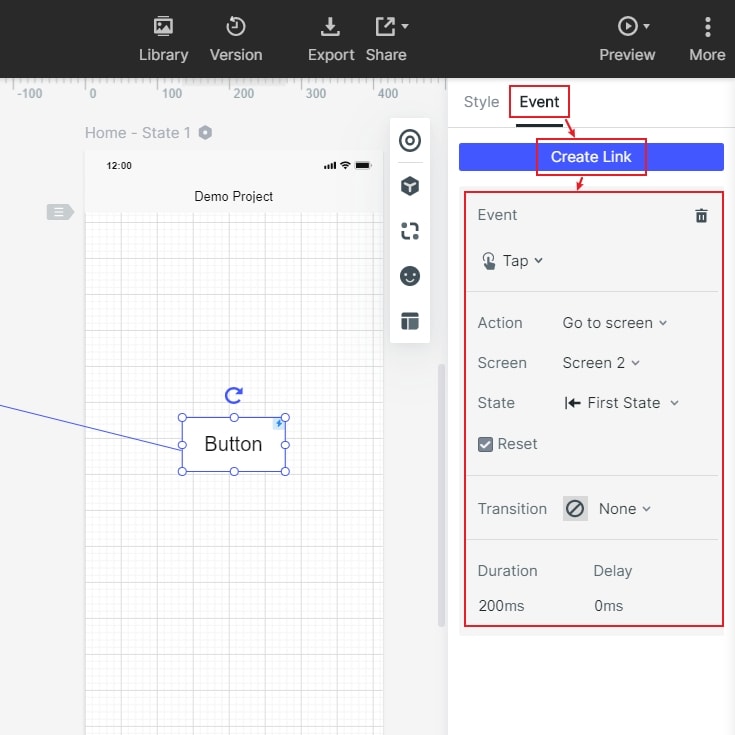
You can also click the "Event" tab and subsequently hit the "Create Link" button. Now select the target Event, Transition, and Action, among others.
Step 4. Preview the Usability Design

Now that you are through with the design click the "Preview" tab to interact with it. On the preview window, click the respective buttons and see their respective action.
Step 5. Hand Over to Developers
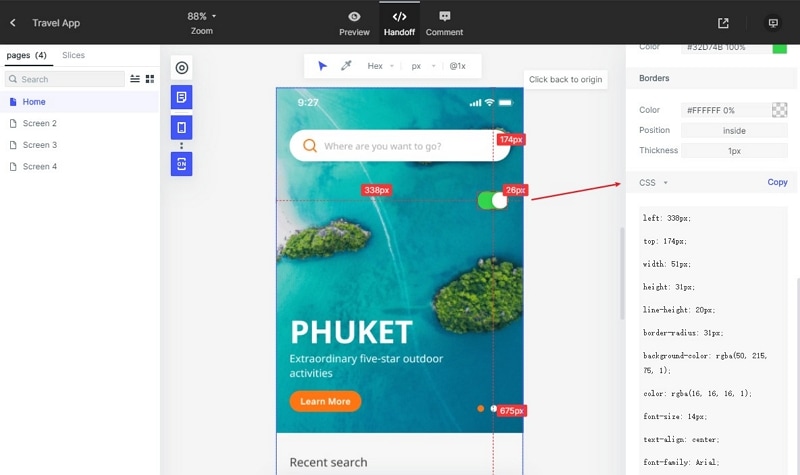
If you are satisfied with the design, hit the "Handoff" button, and copy the respective CSS code.
