How to Use Adobe XD Map Feature to Embed Google Maps

Over the last few years, Adobe XD has made tremendous progress regarding its overall features. Apart from being a vector-based designing solution, it can also help you come up with prototypes of high fidelity. For instance, users can now integrate Google Maps in Adobe XD projects pretty easily. In this post, I'm going to help you use the Adobe XD Map feature using the Google Maps plugins and would also discuss the best alternative to Adobe XD.
How to Embed Google Maps in Adobe XD with its Plugin
A while back, Adobe XD came up with a dedicated plugin for Google Maps that lets us embed maps on your designs easily. Once you have installed the Adobe XD map plugin, you can select any location of your choice. There is also an option to adjust the radius for the Adobe XD Google Map or setting up its terrain.
Since the Google Maps Adobe XD the feature is available for free, you don't have to pay anything extra for this. You can try the Adobe XD map option on its web-based or desktop application. Though, your system must be connected to an active network for the Adobe XD map plugin to work. Once you are ready, you can follow these steps to include Google Maps in Adobe XD:
Step 1: Install the Adobe XD Map plugin
By default, Adobe XD will not have the Map Generator plugin installed on your application. Therefore, to include Google Map in Adobe XD, you have to launch the application, and go to its Plugins > Discover Plugins section. Here, you can look for Map Generator and just install it on your application.
If you have already installed the Adobe XD map plugin, then you can choose to update it from here as well.
Step 2: Embed Maps in Adobe XD
After installing the Adobe XD map plugin, it is recommended to restart the application once. Now, on your Adobe XD artboard, insert a shape to the canvas where you wish to embed the Adobe XD Google Maps plugin. Once you select the area, go to the application's Plugins section, and choose the Map Generator tool that you have just installed.
Here, you first need to enter keywords regarding the name or address of the location that you wish to display. You can also zoom in/out the level of the map and even select its terrains like roadmap or satellite.
After providing all the details in the Adobe XD map plugin, just click on the “Generate Map” button. That's it! Now, the Adobe XD map would be generated on your artboard that you can further edit, expand, and customize as per your requirements.
Would you interested in the alternatives for Adobe XD Mac? Click and learn more about 5 Alternatives For Adobe XD Mac You Shall Know.
The Best Adobe XD Alternative: Wondershare Mockitt
Sometimes, working on Adobe XD can be a bit complicated as the application is not that beginner-friendly. Therefore, if you are looking for an alternative to Adobe XD, then you can try Wondershare Mockitt. It is a freely available designing solution that can run smoothly on every leading platform. The web and desktop applications of Wondershare Mockitt will let you come up with prototypes, mockups, and wireframes pretty easily with basic designing experience.

- You can select the device and the environment for which you wish to create your design.
- There is an option to readily import existing templates to further customize it.
- You can access hundreds of vectors, widgets, icons, etc. that you can just drag-and-drop to your canvas.
- There are also features to include animations, transitions, and media files in your projects easily.
- You can get a preview of your projects and even export them to formats like PDF, PNG, APK, SVG, and HTML.
To work on your next stunning design, you can follow this simple drill:
Step 1: Enter project details
At first, you can just access and login Mockitt official website. Click "Create" > "Prototype" to create a prototype, and then select a particular device on which you wish to create a prototype.

Step 2: Design your Prototype
There are different widgets and other features that you can further use to come up with all kinds of designs.
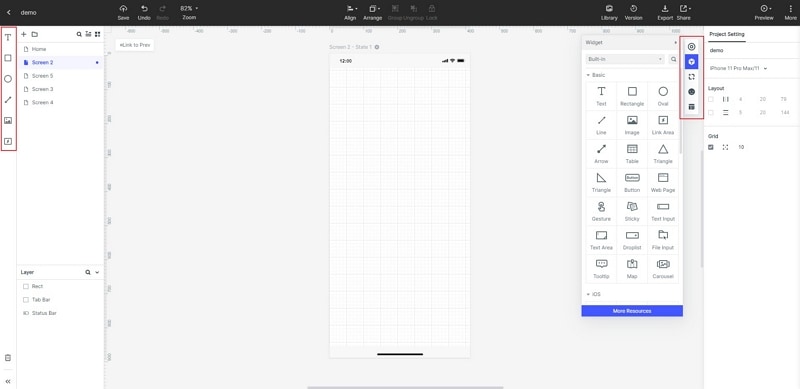
- Add and edit widgets
Once you have a working project, you can go to the sidebar and drag any widget to your canvas. You can also click on any widget to further edit it and even mark it for reuse.
- Link your screens
Once you have come up with different screens, you can go to the widgets section, and establish a link to depict the user journey.

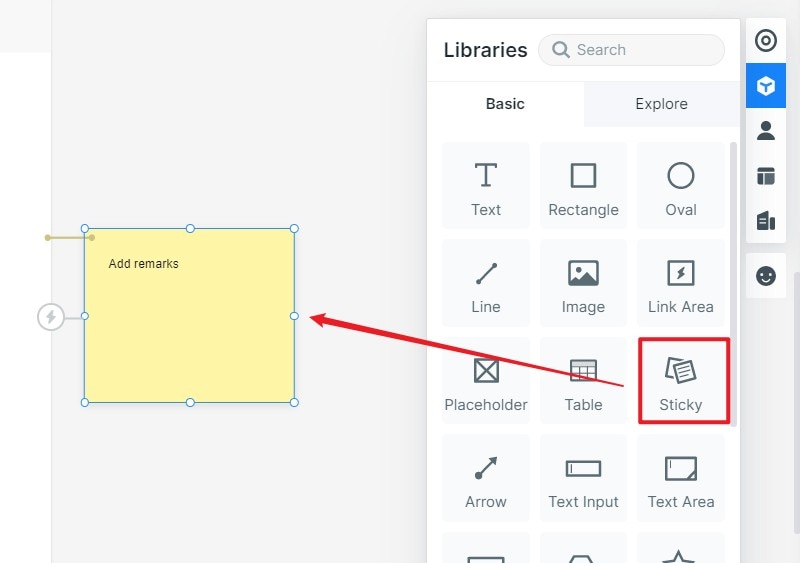
- Add notes to your designs
Just like links, you can also go to the Widgets section and select the Sticky feature to leave notes in the project for yourself or your colleagues.
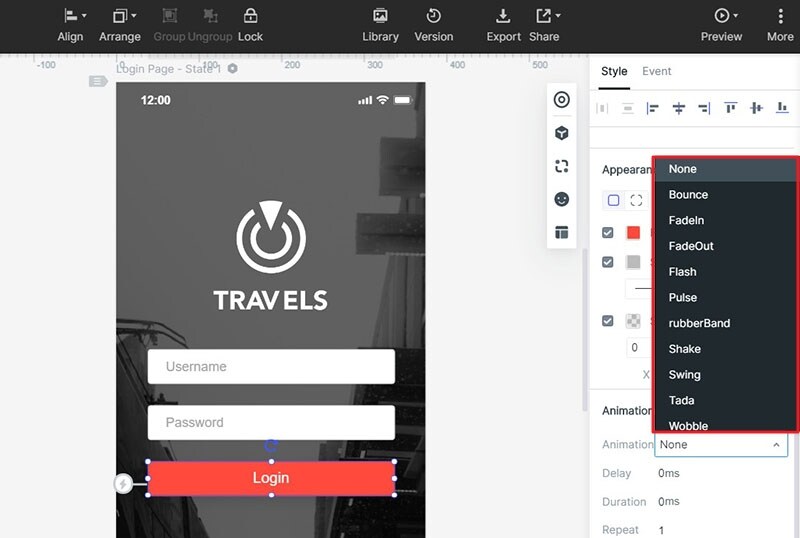
- Insert animations and transitions
Besides that, you can also access the dynamic widget feature to insert animations or transitions to your project. There are also options to insert media files or even Google Sheets to the file.
Step 3: Preview your project
On your canvas, you can also click on the "Preview" button on the top. This will let you know how your project would be rendered in real life.

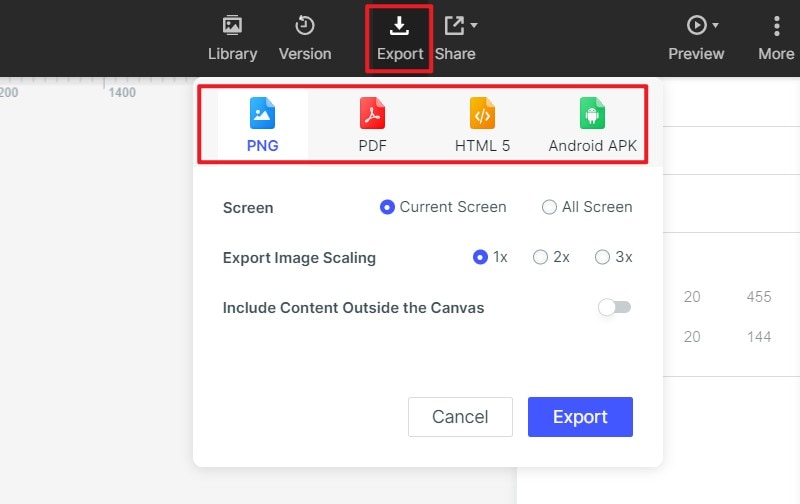
Step 4: Export or Share your project
That's it! You can now click on the "Export" icon to export your project in different formats. Also, click on the "Share" icon to generate a QR code or a link that you can easily share with others.
More about the user guide you can find here.
As you can see, it is pretty easy to use the Adobe XD map template by its users. For this, you can just install the Adobe XD map plugins on your application and insert the map on your artboard. Though, if you find Adobe XD a bit complicated, then you can just use Wondershare Mockitt and come up with all kinds of designs without putting a lot of time or resources.
