How to Downgrade macOS Big Sur

If your Mac is currently running the new macOS Big Sur beta or if you're installing the public release after the Nov. 10 event, you may still want to downgrade macOS Big 11 to Catalina or an older version. Although Big Sur promises a lot of new features and a major redesign of the UI, not all users will be happy with the new OS version. The OS may slow down your system, you might come across bugs that aren't fixed yet, and so on. So, what do you do when you want to roll back to an older macOS version? This article shows you how to downgrade macOS Big Sur to macOS Catalina.
- Part 1: Steps to Downgrade macOS Big Sur to Catalina
- Part 2: The Best Free Online Prototyping Tool for macOS Big Sur
Steps to Downgrade macOS Big Sur to Catalina
Unless you tool a full backup of your computer via Time Machine before you upgraded to macOS Big Sur, you'll need to create a macOS Catalina USB installer. This is the only way to downgrade macOS Big Sur or any version because Apple doesn't offer that feature by default. If you haven't backed your data up using Time Machine, then this is the only way to proceed to downgrade macOS 11 Big Sur. Also, it is advisable to backup your data from the Big Sur installation so you can restore it after the downgrade.
Now, follow the steps shown below to downgrade macOS 11 Big Sur to macOS 10.15.x Catalina
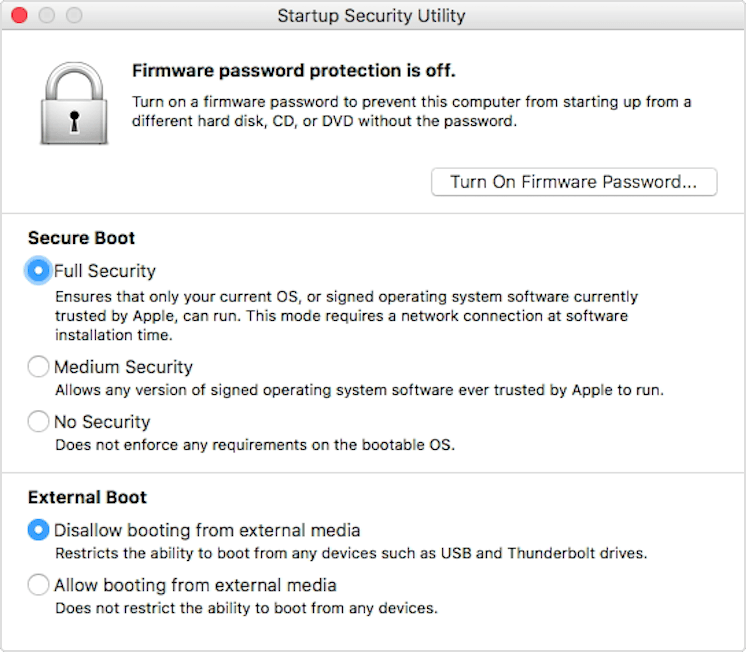
1. Set your Mac's External Boot Permission
The first thing you need to do is to change your settings to allow your Mac to boot from an external USB source.
To do this, start your Mac while holding down the Command key and the R key together until you see the Apple logo, then release both keys.
Source: apple.com
Go to Startup Security Utility and enable booting from external media.
2. Create the USB Installer for macOS Catalina
This can be done by downloading Catalina from the app store but aborting the installation when it automatically starts.
If you didn't do this before Big Sur was officially released to the public, you'll need to get a third-party download from a trusted site.
Now, format your USB drive using Disk Utility - select the drive, click Erase once, set the file system to APFS or macOS Extended, then click Erase again in the small window.
To create the installer, launch Terminal and run the following command:
sudo /Applications/Install\ macOS\
Catalina.app/Contents/Resources/createinstallmedia --volume
/Volumes/MyUSBDrive [Replace the 'MyUSBDrive' name with the actual name of the drive volume as displayed in Disk Utility or Finder]
Enter your password (not the iCloud one, the admin one you use to log in to your Mac) and type Y and Enter after that. Wait for the Terminal display to show 'Done', after which you can eject the USB drive. This is now your macOS Catalina installer.
3. Uninstall macOS Big Sur from your Local HDD or SSD
These were the preparatory steps; now comes the part where you uninstall macOS Big Sur. Prior to downgrading from macOS Big Sur to macOS Catalina, you will need to remove the existing Big Sur installation from your hard drive. The obvious reason for this is that it will cause a conflict if you have two operating systems on the same unpartitioned drive, and neither one will work. The process itself is quite simple and involves specific steps, as shown below:
Connect your computer to your local Wi-Fi and insert the USB drive containing the macOS Catalina installer file.
Restart the computer and hold down the Option key alone until you see the Startup Disk options. Here, choose the USB macOS Catalina installer you created.
Go through the installation process until you successfully downgrade macOS Big Sur to macOS Catalina.
At this point, you can restore your data from the backup you created.
If you decide to keep macOS Big Sur and download subsequent versions as they are released, you may want to think about upgrading your software. A great alternative would be to use cloud-based software that won't hog up your system resources and slow you down. However, it also has to be compatible with the operating system you're using so it can be better integrated into the OS's capabilities.
One great example of this is Wondershare Mockitt, a cloud-hosted UI/UX design and prototyping application for macOS Big Sur and other macOS versions, as well as Windows. In fact, as long as your computer is running a modern browser, you can work on practically any OS platform.
The Best Online Design and Prototyping Tool for macOS Big Sur
Wondershare Mockitt is a fully online platform for the design and prototyping of user interfaces and user experiences, or UI/UX for short. In other words, it is used to create mock-ups of real applications that can be used to evaluate things like usability, convenience, functionality, etc. before the app is actually developed. This also applies to websites, before the coding begins.

With this powerful application, you can create intricate designs and richly interactive prototypes that behave in the exact same manner that the final product is expected to. There are tons of features that make this a compelling choice over other design software that has to be installed on your Mac, thereby eating up valuable resources that can be used for other applications. Here's a quick look at the features that make Wondershare Mockitt the best design and prototyping tool for macOS Big Sur:
- Extensive Asset Library - While many design and prototyping tools require you to import third-party libraries, Wondershare Mockitt comes with a large repository of assets that include icons, symbols, widgets, and other design components. You can customize these assets and add them to a personal library that can then be shared with other collaborators.
- Powerful Prototyping Tools - Designs can quickly be prototyped using interactions such as gestures, transitions, and animation effects. Create stunningly interactive hi-fi prototypes in minutes using simple drag-and-drop linking and highly customizable actions.
- Easy Collaboration - The fact that it is an online application means it can be accessed on any computer running any operating system as long as it has a modern browser. This allows a lot of flexibility when working with others in a work-from-home environment. You don't have to worry about manual syncing with the cloud, as in the case of Adobe XD and similar design tools.
- Online Commenting and Review - The online nature of the software also allows project members to review and comment on designs and prototypes using their own accounts or with a shared link that the designer sends them. The link is secure and permission-based, which makes it ideal to share confidential prototypes.
- User-friendly UI - The UI is simplified and well-organized, making the learning curve almost flat for new users. The clean layout of functions and features makes it easier to use than most other design tools.
- Code-ready Prototypes - HTML and style code is automatically generated when creating the design and prototyping it, which makes it easy for the developer to do a code inspection before downloading all the asset information.
With macOS Big Sur compatibility being a major plus, it's definitely worth trying Wondershare Mockitt on your Mac or even your Windows running a Mac instance using VirtualBox or VMware. You can sign up for a free account that lets you work on up to 3 projects and then upgrade to an affordable paid plan once the volume of work increases.
