What to Do if Sound Not Working on macOS 11 Big Sur

If you upgraded to macOS Big Sur during the early public beta stages, you might have come across the 'sound not working on macOS 11' problem. If the problem persists even after a subsequent upgrade to another beta version or even the final release, there are some solutions that you can try. These fixes should help resolve the MacBook Pro no sound on macOS Big Sur issue; particularly, the volume not working on macOS Big Sur issue with MacBook Pro devices.
- Part 1: How to Fix the 'Sound Not Working on macOS Big Sur' Issue
- Part 2: The Best Online Prototyping Tool for macOS 11 Big Sur
How to Fix the 'Sound Not Working on macOS Big Sur' Issue
Many times, if you face a MacBook Pro speakers not working type of issue, the solution is fairly simple. Let's go through some of the more common fixes for the sound not working on macOS 11 problem.
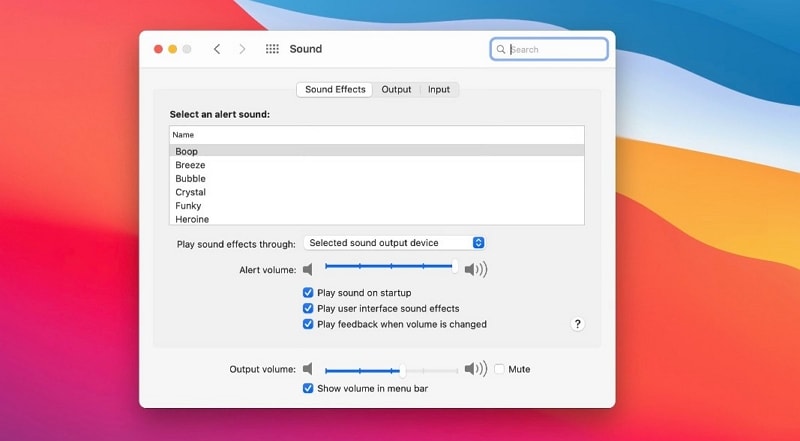
Image source: 9to5mac
Fix #1: Check the Volume Level
Mac computers tend to get a little crazy after updates, especially if you're upgrading your entire operating system version. First of all, check to see if the audio level is not set to zero. If it is, just increase it to whatever level you're comfortable with.
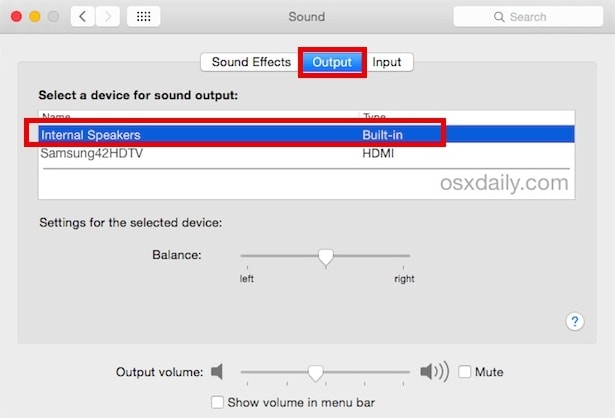
Fix #2: Check Sound Output Device in System Preferences
The next thing to check System Preferences → Sound to see if the correct output device is selected. If you have external speakers, disconnect them and set the output device to internal speakers. Also, make sure the output level isn't set to Mute. See if the sound works after these changes. You might even want to try sound on another application of you feel that your MacBook Pro speakers are not working, because we've seen that in many cases. It will then be an app issue rather than a bug in macOS Big Sur.
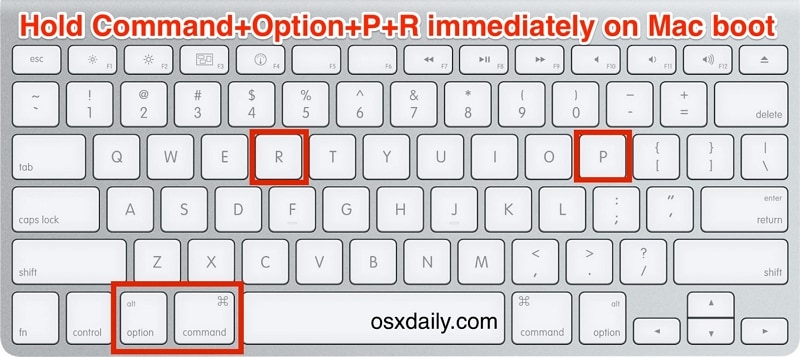
Fix #3: Reset PRAM
If you find that your sound is working but cutting on and off, it might be your PRAM or parameter random-access memory that needs to be reset. Restart your Mac and wait for the black loading screen; simultaneously hold down the Command, Option, P, and R keys on your keyboard and release them when you see the Apple logo or hear another startup sound.
Fix #4: Restart your Mac
macOS Big Sur problems, or any macOS issues, for that matter, tend to go away when you restart your machine. So try that as a final resort. Click the Apple logo on the top left and choose Restart.
Fix #5: Delete the Coureaudiod Process in Activity Monitor
If you want to get a little more technical, you can try stopping the CoreAudio process that is responsible for sound on your Mac. Open Activity Monitor and look for a process called 'coureaudiod'; double-click and Quit the process, clicking on Force Quit if prompted.
If none of these fixes work (one of them usually will), then you might want to downgrade to macOS Catalina to see if it's indeed macOS Big Sur that's causing the problem. The worst-case scenario is that you may have to take it to an authorized service center to get the problem fixed, which might be the case if it's a hardware problem and not a software one.
Would you interested in fixing the macOS 11 Big Sur issues? Click and learn more about the Top 5 macOS 11 Big Sur Issues and How to Fix Them.
The Best Online Design and Prototyping Tool for macOS Big Sur
Now, we'll introduce an extremely versatile tool for UI/UX designers that you can access online through any modern browser. Wondershare Mockitt is a powerful prototyping tool for advanced users looking to create comprehensive and fully interactive prototypes of website and app designs. The best part is that it is fully compatible with all the new features that macOS Big Sur brings to your iMac or MacBook Pro. Although the tool is intended for professional use, beginners find that the gentle learning curve also makes it the perfect tool to learn how to design and prototype for UI/UX (user interface and user experience.)

First of all, as an online tool, Wondershare Mockitt is built for collaboration. Multiple users can work on a shared design project, review it, comment on it, and download the prototype from a secure cloud location. Second, as we mentioned, it is ideal for novice users as well as advanced and experienced designers. Features such as easy developer handoff, rich asset library, and real-time preview make it the first choice for professional designs and design students alike. Here's a quick look at some of the other features you can expect to see in Wondershare Mockitt.
- Customizable Library: Aside from the vast asset library of components for the design phase, you can also create your own custom libraries and share them with colleagues. Every asset is customizable and can be assigned Master status to make it globally editable.
- Rapid Prototyping: Compared to many other UI/UX design tools like Sketch and Adobe XD, prototyping is much faster with Wondershare Mockitt. Simply drag an asset's link icon to its corresponding target page, set the gesture, add a transition or animation, and it's done. You can preview your changes in realtime using the Preview option at any time.
- Built for Collaboration: Since Mockitt is hosted online, there's no manual syncing required to see the latest version. This solves the problem of version control and other issues. In addition, your stakeholders can approve your designs right away, instead of waiting for a formal review meeting. This saves a significant amount of time from the initial mockup to the final design. Others can also review and comment online, further speeding up the process.
- Seamless Developer Handoff Process: All the required HTML and style code requirements are fulfilled by the system at the back end. That means you, as a designer, don't need to have any coding knowledge. The developer simply logs into their own account, accesses the shared project, inspects the code, and downloads all asset data and documentation. No issues! No conflict!
These are just some of the features that make Wondershare Mockitt a robust solution for UI/UX design and prototyping, but the best feature is how the product is priced. You can sign up for a 100% free account and enjoy using the platform for up to 3 projects with up to 10 screens each, and it includes being able to collaborate with another user. For most freelance designers, this is quite adequate. If they need to upgrade, the paid plans are very affordable and unlock even more capabilities.
