What is UI Prototype and How to Do UI Prototype

No one can underestimate the role of UI prototypes in designing the final UI for a website or an application. UI Prototyping is still a confusing topic for many designers and project developers. Nevertheless, it remains a crucial stage in the development of the final interface of the product. If you are also plunged into this confusion, this article is here to bury your problem for good. In this article, you shall receive a thorough guide on what a UI prototype is as well as how to do UI prototyping.
- Part 1: What is UI Prototype?
- Part 2: The Best Tool to Do UI Prototype
- Part 3: How to Do UI Prototype
What is UI Prototype?
Before digging into what exactly a UI prototype is, it is prudent to drive home the meaning of a prototype first. In simple terms, a prototype is a simulation or a mimic of the final product. For several important reasons, most products undergo the prototype phase before it is produced for mass usage. Whether the prototype process is primitive or sophisticated, it is an important process that ought not to be bypassed.
UI prototyping is the process of mocking up a UI platform for a website or application. It involves designing the various components of the user interface and testing it to see whether it works as it is desired. To get the best UI prototype experience, using the right UI prototype tool is key. A good tool offers an array of useful UI prototype features that lessens your prototyping efforts while creating a great prototype.
Would you interested in prototyping for Windows? Click and learn more about the Top 5 Free Prototyping Tools for Windows.
The Best Tool to Do UI Prototype
Wondershare Mockitt is a top-rated tool for UI prototyping owing to the immense features it has. It makes it easy and fast to create better UI prototypes. There are numerous UI assets and templates that suit various types of industries. You can choose to customize these UI assets and create stunning user interfaces.

Wondershare Mockitt also allows users to create their asset libraries to make design easier the next time these assets are required, or a new project of similar design comes. Besides prototyping, users can collaborate with team members and clients. You can collaborate in real-time with your members and co-edit the project to move it forward with speed. Make your static screens more interactive with the help of link effects like animations, gestures, transitions, and actions, among others. You can create interactive UI prototypes for various devices across several platforms without much effort. Thanks to the elegant and user-friendly interface, which makes navigation seamless.
Features
- It offers real-time collaboration and co-edit with team members or clients.
- Preview your prototype on your PC, mobile device, or offline.
- Access your prototype anywhere at any time via the cloud. It also makes everyone members of your team synced.
- Use gestures and animations to design interactive UI prototype
- Use plenty of widgets and templates to design easy.
How to Do UI Prototype
Wondershare Mockitt offers an intuitive and total no-brainer interface for UI prototyping. The following steps illustrate how to do UI prototypes online.
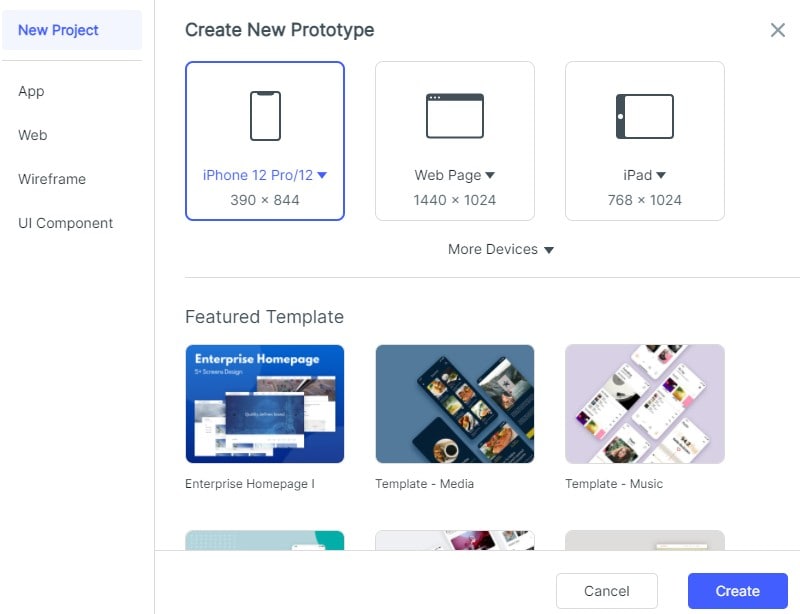
Step 1. Create a Prototype for Your UI Prototyping
Open Wondershare Mockitt and use your username and password to log in. On the main interface, click the “Create Project” button. Click “Blank Project” or “Create Project from Demos” depending on your need. Enter the project name within the “Project Name” field and then select the device you want to create the UI. Click “Create” to enter the design window.
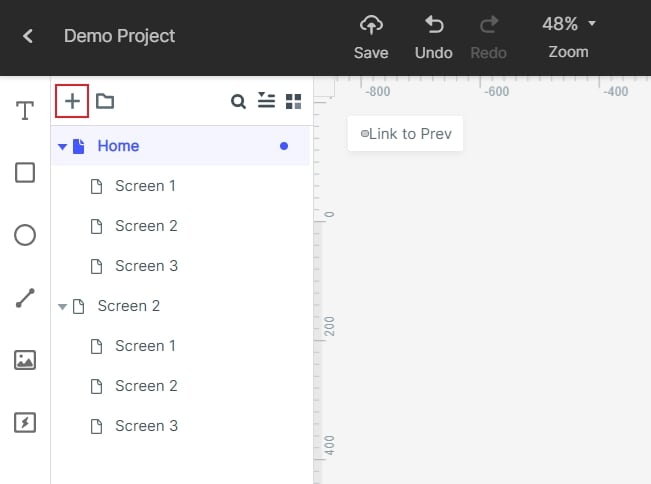
Step 2. Add a new Screen
Screens are vital in creating interactions that help in UI animation prototyping. Click the “New Screen” button and add the number of screens you want according to your project.
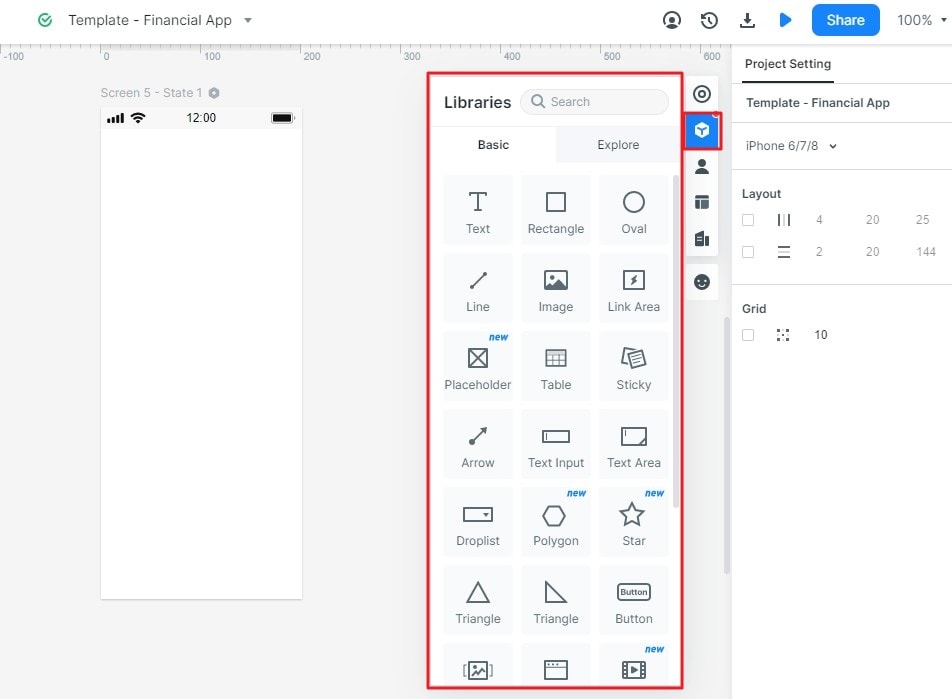
Step 3. Design your UI Prototype Project
After adding the screens, you need to add the relevant objects like buttons, text fields, and background colors, among others, to the screens. There are several widgets and UI elements you can choose from on the window. Double-click and drag the fast widgets then start drawing on the respective screens. You can also access widgets and icons from the Build-in Widgets, My Widgets, and Icons. Just double-click and drag them to the canvas. If you want to edit the widgets, double-click on the target widgets and edit from the “Inspector Panel”. Once you have edited them, you can drag them to “My Widgets” to create your library for reuse.
Step 4. Link your UI Prototype Screens
Now that you have finished designing your UI screens, the next thing is to connect these screens via clickable objects on the various screens you have created. Click on the object you want to link to another screen and drag the circular handle to that target screen. Repeat this process for all the other screens and objects you want to link.
Step 5. Preview and Share your Interactive UI prototype
After you have completed linking your objects and screens, click on the “Preview” tab to interact with your UI prototype. Click the “Share” button to get the QR code and project link to preview it on mobile.
