The In-Depth Guide To High-Fidelity Prototype

Want to Prototype with Ease? Try This Out!
Wondershare Mockitt Prototype Designer realizes easy & rapid prototyping for iPhone, Android, Websites, and more. Drag and drop to create wireframes and prototypes. Give it a try!
When it comes to UX design, a prototype is important. Prototype communicates with users before they decide on a layout. The best prototype can help you test how users interact with your product. You can get a lucrative software product only after testing those prototypes, keeping what works and improving what does not.
In this context, the high-fi prototypes apply to a product's User Interface (UI) and User Experience (UX) components based on interactions, user flow, and behavior.
So, are you curious to know more about the high-fidelity prototype? If yes, then let's get started!
- Part 1: What is the high-fidelity prototype?
- Part 2: Difference between high-fidelity and low-fidelity prototypes
- Part 3: When to use the hi-fi prototype?
- Part 4: How to create a high-fidelity prototype?
- Part 5: Best high-fidelity prototype examples
- Part 6: High-fidelity prototype FAQs
Part 1: What is the high-fidelity prototype?
Prototype
A prototype is a visual representation of the design intent. Designers can always express and demonstrate their ideas and opinions through prototyping.

Fidelity
Fidelity means how closely the prototype matches the finished product. It also refers to the amount of detail and functionality in the prototype. Fidelity has three levels- low, mid, and high. So, the designer must evaluate the prototype's fidelity.
Now you know about prototypes and fidelity. It's the right time to understand what a high-fidelity prototype is.
High Fidelity Prototype
High-Fidelity Prototype (hi-fi prototype) is a computer-based interactive depiction of the product. It is the most accurate to the final design in terms of details and functionality.
A high-fidelity prototype typically includes the design's user interface's style and visuals. This prototype is expected to work very well for capturing data on actual human performance, such as finishing a task.
Part 2: Difference between high-fidelity and low-fidelity prototypes
Low-fidelity vs. high-fidelity prototyping remains a very confusing topic for designers. A good understanding of the two allows designers to select the right fidelity and achieve successful app prototyping. So, let's see the different aspects of high-fidelity and low-fidelity prototypes now.
Content
A low-fidelity does not have all of the content. Only the most relevant elements of the actual product are added here. There is no room for specific or in-depth content about particular processes. The goal is to record those crucial contents necessary for the project's core functionality.
However, high-fidelity prototypes incorporate most, if not all, of the actual/real product's contents. The finished product will include an important portion of the contents.
Visual Design
A low-fidelity prototype only includes a small number of the final product's visual components. These include the fundamental visual hierarchy and the forms of the elements. This is because the low-fidelity prototype evaluates functionality rather than aesthetics.
On the other hand, a high-fidelity prototype is a more accurate and thorough design. The finished product presents all the interface, graphics, and spacing components. The visual feel and look are similar to the final product.
Interaction
Less interactive features can be seen in low-fidelity prototypes. Only the necessary components and materials are included, as stated earlier. But high-fidelity prototypes include almost all of the final design's visuals. So, they are very interactive.
Part 3: When to use the hi-fi prototype?
Until now, you have understood the high-fidelity prototype and how it differs from the low-fidelity prototype. Now you need to know when to use this prototype. Well, there are different scenarios in which you can use high-fidelity designs. A high-fidelity prototype can be used to create a design that will be popular with users. It must evaluate every interaction, conduct accessibility testing, and boost user happiness. In such situations, avoid taking shortcuts by using low-fidelity prototypes.
Once the design's primary functionality has been attained, you can additionally use a high-end prototype. Even when you test more complex interactions, the prototype performs well. You can use it when creating and testing more intricate interactions and features, such as data visualization. To improve interactions as you build them, create a hi-fidelity prototype.
Part 4: How to create a high-fidelity prototype?
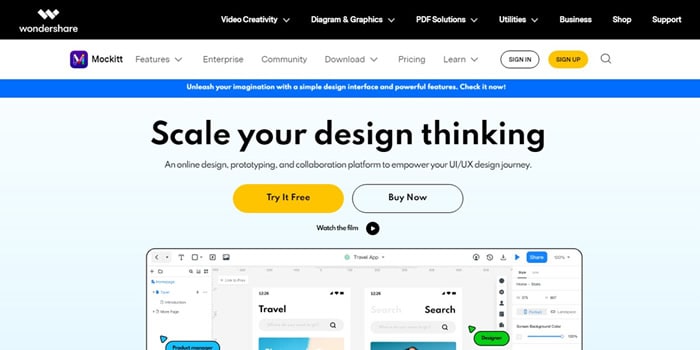
Well, many high fidelity prototype tools available on the internet today can be used to create this prototype. But, in our opinion, the perfect tool is Wondershare Mockitt. Why so? This is because this hi-fi prototype tool allows you to finish the project with pre-built components and templates.
Moreover, It is a cloud-based software. So, you can make high-fidelity prototypes on the web, a Mac, or a mobile device without installing any software. Also, it enables you to share your entire project or a single file with all the necessary parties through simple URLs.
Now, let's look at the steps to create a high-fidelity prototype with Mockitt.
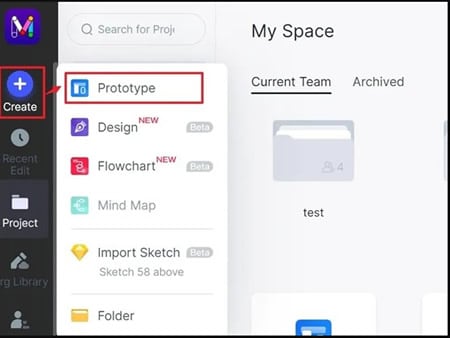
Step 1: Build a Prototype
Tap on "Create," select "Prototype," and give the name of your fidelity prototype. Then, choose the device from the options given. You can select web, watches, mobile, tablet, or others. After that, pick out the right canvas size.
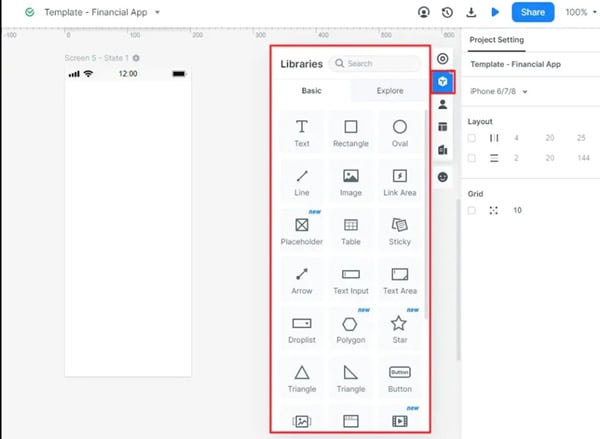
Step 2: Upload Widgets to the Canvas
To select the widgets for your high-fidelity prototype, click the "Built-in" library. The right-side toolbar contains a setting for the widgets' properties. You can modify the widget using Mockitt to meet your unique requirements.
Step 3: Add Interactions to the Screens and Pages
Screen transitions can be used to make the hi-fi prototype more interactive and dynamic. Drop the "Link" icon on the prototype by dragging it there. Then, create connections and update them. For example, gestures and reaction effects are triggered to finish the interactions. Apply the same procedure to each "Link" icon you intend to use in your design.

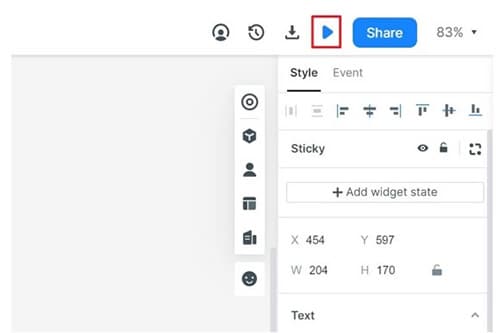
Step 4: Check Your High-Fidelity Prototype
Click "Preview" in the top right corner to see your prototype and check whether it has the desired appearance.
Now, your high-fidelity designs are ready!
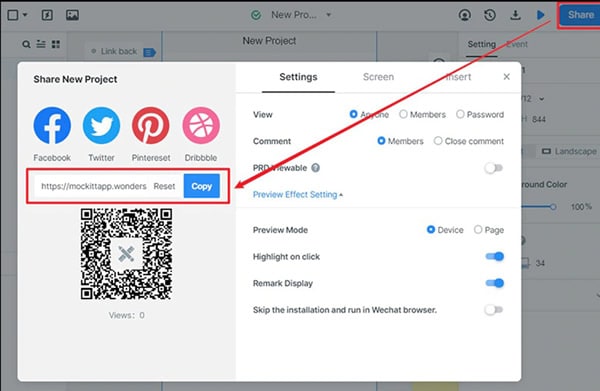
Step 5: Share Your Hi-fi Model for Comments and
To create a QR code and URL link for others to view your prototype, click "Share." They can offer feedback, enabling you to make improvements.
Part 5: Best high-fidelity prototype examples
Now, let's see the Best high-fidelity prototype examples here.
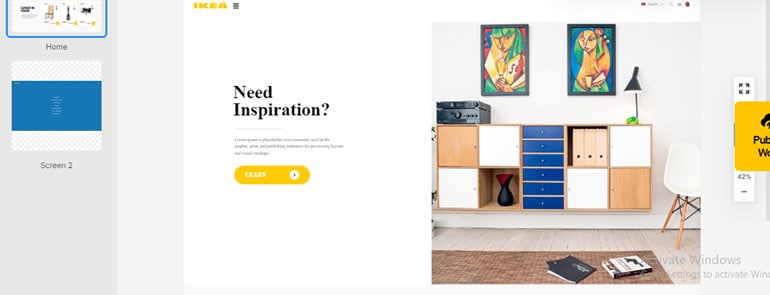
Example 1: IKEA website High-fidelity Prototype
IKEA website's high-fidelity prototype is one of the best examples of high-fidelity prototypes. Here are some steps that you need to follow to create an IKEA website high-fidelity prototype:
Step 1: Design a logo for IKEA.
Step 2: Then, design a menu page.
Step 3: Build a hover effect then.
Step 4: Create a drop-down menu for the home page.
Step 5: Create a quick bar using the widget state.
Step 6: IKEA homepage design.
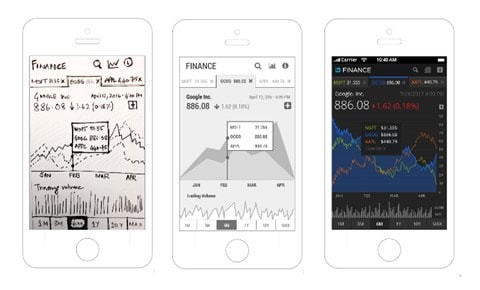
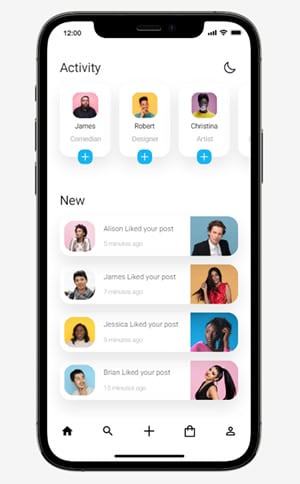
Example 2: Mobile App high-fidelity prototype
The next best hi-fi prototype example is a mobile app high-fidelity prototype. A high-fidelity mobile app prototype shows the final product's usability and design.
Here are the steps for redesigning Instagram's Activity page, which needs to be simplified and has a better user interface.
Step 1: Build the project. Then, start with the Activity page.
Step 2: Design a suggestion session and then a new session.
Step 3: Using the Layer function, reorder the cards.
Step 4: Use the built-in feature to create the tab bar and button.
Step 5: Add animation. Next, use the State function to create Dark Mode.
Example 3: Configuration Management System high-fidelity Prototype
The configuration management system assists the administrator in controlling the data more efficiently.

Part 6: High-fidelity prototype FAQs
1. Is a 3D model a high-fidelity prototype?
Yes, a 3D model is a high-fidelity prototype.
2. What are the 3 levels of prototyping fidelity?
The three levels of prototyping fidelity are as follows:
Low fidelity: This fidelity prototype has sticky notes and sketches, which is best for collaboration.
Mid-fidelity: This fidelity prototype is often known as a wireframe.
High fidelity: This fidelity prototype almost represents the final product.
3. What are the 4 main qualities of the prototype?
A prototype is only considered complete if it possesses the following qualities:
Representation: Prototyping creates a basic representation of the final product.
Precision: Better feedback and reaction come from more accurate prototypes.
Functional: A good prototype carries out the final product's basic functions.
Adaptation: A good prototype can be easily modified.
Conclusion
In this article, we have discussed everything you must know about the high-fidelity prototype. So, all you need to do now is start creating interactive prototypes with Wondershare Mockitt. This is the best prototyping tool for real-time co-editing, sending, and receiving comments. To maximize your prototyping experience, register right now!
