Everything You Need to Know about iOS Development
iOS development is a subsegment of software development that deals with iOS app development (iOS application development) or, in simple words, developing applications for the iOS ecosystem that includes iPhones and older iPads. For newer iPads, Apple has created a fork in its development philosophy with the new iPadOS 13 released in 2019 alongside iOS 13, which indicated that the two operating systems would focus on slightly different interfaces. iOS still maintains its touch-screen based origins, while iPadOS is aimed at keyboard usage and multitasking capabilities that bring it closer to the world of laptops and notebooks rather than smartphones and traditional tablets. iOS development is a specialized field that requires platform-specific tools developed and released by Apple, Inc. It also targets the official App Store, as opposed to third-party app stores that cater to jailbroken iPhones and iPads.
- Part 1. Which Language is Used in iOS Development?
- Part 2. What is iOS App Development?
- Part 3. How Do I Do iOS Development?
- Part 4. The Best Tool for iOS App Design
Which Language is Used in iOS Development
There are two popular programming languages used in iOS development - the older Objective-C and Apple's own Swift, which was launched in 2014 after several years of being in development. Over the years, Swift has become the defector iOS development language used by the majority of developers of iOS apps. That's because it is more intuitive to use Swift for all of Apple's operating systems, not just iOS. So, if you're an Apple developer iOS is as important as iPadOS, watchOS, and other related operating systems because you want your app to be cross-device-friendly. iOS development with Swift is more interactive and gives you access to rich features you can showcase in your applications.

The syntax used in Swift is probably the biggest reason this language is preferred over Objective-C. The inherent readability, easier code file maintenance, greater security, and speed of Swift apps makes it an obvious choice, especially if you're a junior iOS developer looking to compete in a highly competitive app environment like the App Store.
What is iOS App Development
In short, it is the process of conceptualizing, creating, and deploying an iOS app to the App Store. It is an intricate process that needs to be highly organized from start to finish. Every part of every phase needs to be reviewed in advance, budgeted for in terms of time and money, and resources should be planned around a fixed schedule. In addition, schedule and cost adherence must be properly monitored throughout the life cycle.

The approach to iOS development is much the same as for any software application and follows the same systems and methodologies. iOS developers often use the Agile methodology for quicker turnaround times and to give themselves more freedom over scheduling and resource allocation. Cross-functionality, pair programming, and other aspects of software development are often adopted by iOS development teams.
The whole purpose is to develop a fully functional application in the shortest time possible and at the lowest budget possible, which means project management plays a major role in how the workflows are executed. An experienced project manager, as well as a team of junior iOS developers and one or two senior iOS developers, will be required to successfully create an iOS app that eventually gets accepted into the App Store.
How Do I Do iOS Development
The process of iOS development involves 4 core phases, as outlined below:
Phase 1: Research and Analysis
This is the initial phase where you identify the purpose of the app and the problem it solves for the user. What category does it fit into? What does it do? Who will find it useful? What features should it necessarily have and what options features can it offer? These questions help define the scope of the project and ensure that it stays within the constraints of cost and time.

Phase 2: Designing and Prototyping
In this stage, the front-end interface and basic interactive functionality are designed and prototyped on a third-party platform like Wondershare Mockitt, an online UI/UX design and prototyping tool. A prototype is essentially an interactive version of the UI, which shows the project's stakeholders how the app will look and how users will interact with it.
Phase 3: iOS App Development
The development stage is the actual coding part. It involves back-end development, front-end development, and the APIs that connect the two. This is the phase where the fully functional product is created by the development team.
Phase 4: Testing, Deployment, and Maintenance
In the final phase, the iOS app in question needs to be thoroughly tested for bugs and other issues. This is a painstaking process but is critical to the success of the app in the App Store. Once this is done, the app must pass the compliance requirements defined by Apple in order to be eligible for listing on the App Store. After this stage, the app must get regular updates that include security as well as feature-based elements.
Would you interested in Swift UI? Click and learn more about What is Swift UI and Is SwiftUI Worth Learning.
The Best Tool for iOS App Design
Since the design and prototyping phase is directly related to user experience, it is a critical component of iOS development. The design not only needs to be highly appealing in a sea of similar apps on the App Store, but it has to be functionally superior to its competitor apps. As such, the interface needs to be designed with user appeal and user convenience as top priority items, and the prototype must be fully functional and hi-fi so the stakeholders know what to expect from the final product.

The best tool for iOS app design is Wondershare Mockitt, a cloud-based UI/UX design and prototyping tool that is faster, more intuitive, and more affordable than many of the top applications and platforms in this category. Here are some of its top features:
- A fully-equipped asset library with thousands of components and widgets required for iOS app development. Custom libraries can be created and shared with team members.
- Readily available iOS design systems and UI kits that contain iOS-specific components for the latest version of the OS and are constantly updated with new widgets and assets.
- Fast prototyping with drag-and-drop functionality. Simply link a component to its corresponding page state, define a trigger action, and add whatever effects, animations, and transitions you need. It's that simple!
- An extremely collaborative environment where all stakeholders get full visibility at all stages in the design and prototyping process.
- Convenient sharing of designs and prototypes with online and offline options - quick feedback loops using real-time commenting and other collaborative tools.
- Easy developer handoffs with auto-generation of backend code for all design elements.
- Affordable compared to most other premium design and prototyping platforms.
How to Create an iOS App Design and Prototype it with Mockitt
Wondershare Mockitt is a cloud-based software platform, which means you can access it on any device with a modern browser and an Internet connection. You can start with the free plan, which gives you up to 3 projects and 10 screens to design your iOS apps. You also get an asset storage capacity of 100MB to import custom components. For just $69.99 a year, you can upgrade to the Personal plan for professionals, which increases your limit to 500 screens and removes all limits from the number of projects you can save on the cloud. You also get 2GB of space as well as access to premium templates and PNG/HTML download options for your designs and prototypes. There's also a plan available for enterprise design teams.
The process to create an iOS app design is as follows:
1. Log into Wondershare Mockitt on your PC or Mac with a modern browser like Chrome.
2. Click "Create" → "Prototype" under Personal Space to start your first iOS app design, and specify the device you're designing for.

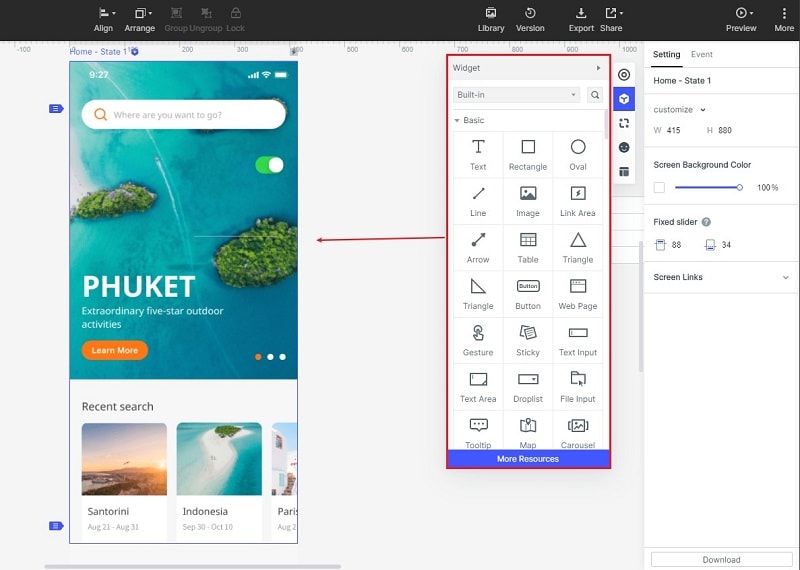
3. Start adding components and widgets from the asset library on the right or the quick widget panel on the left. Just drag and drop them into your screens. You can create multiple page states and create layouts for all of them.

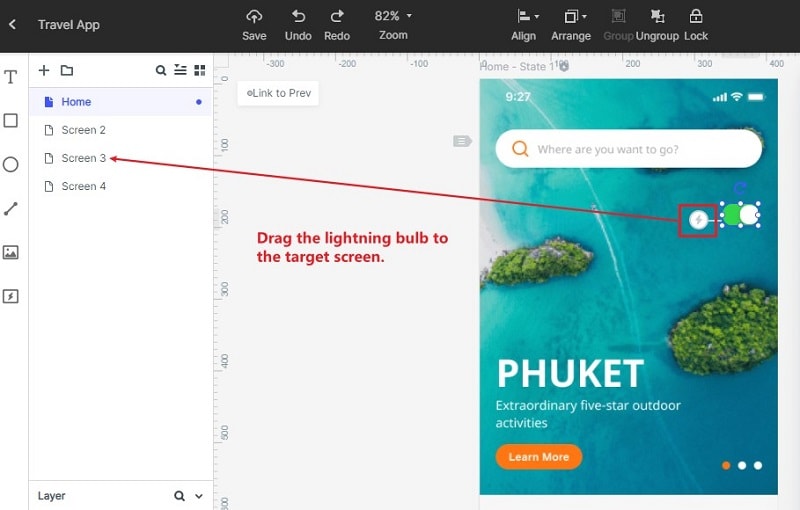
4. Next, start prototyping your design by dragging the link icon on the left side of an asset to its corresponding page state. You can also use Mockitt's Dynamic Widgets to show interactions and animation within a single page state, which is more convenient than the traditional method.

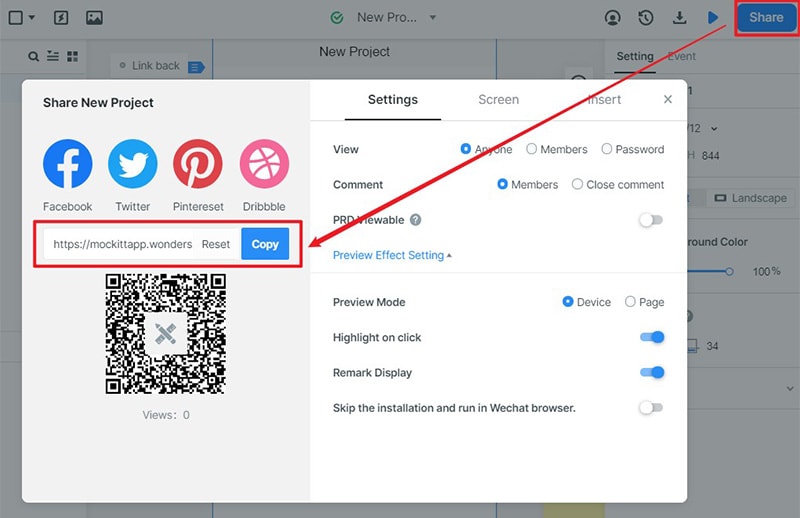
5. Once the prototype is ready, easily share it with others using the "Share" option, where you can generate a URL or QR code or download the HTML demo package for offline review. Collaborators can use their own editor logins to see the design and add live comments to request changes and so on.

6. In the final stage, the developer uses their login to inspect code and download asset data. No coding is required by the designer because everything is generated at the back end by Mockitt.
- In Closing
If you're serious about iOS development and plan to become a freelancer iOS developer, intend to work for a mobile development company or for a game creator, you will need to be proficient in all the tools mentioned in this article. You will also need to have an in-depth knowledge of how the various stages of development work so you have a better understanding of your own role as a junior iOS developer, project lead, or even a product manager. Engaging in iOS development in any role can be a highly rewarding and lucrative experience. If you're managing a design team in an iOS development company, using Mockitt will make your designers more productive and more efficient, not to mention that it will save your company a ton of money in the long run and make life easier for the core development team as well.

