How to Export Figma to PDF
Want to Change to Another Easy-to-Use UI Design Tool than Figma? Try This Out!
Use professional yet cost-effective Wondershare Mockitt UI/UX Designer to expand your creativity with a clean interface, seamless operation, and powerful features.
PDF is a great way to share your UI/UX designs with project members and other stakeholders, but many platforms don't support PDF export. In fact, the Figma export to PDF feature was only introduced a few years ago.
If you're working on Figma, you can now do a Figma PDF export easily using the steps prescribed in this article. We'll also show you a fantastic alternative that's more affordable, easier to use, and offers a rich collection of screen transitions for high-fidelity prototyping.
- Part 1. Advantages of Using PDF Exports from Figma
- Part 2. 2 Methods to Export Figma to PDF and Tips
- Part 3. How to Export to PDF with a Figma Alternative
Part 1: Advantages of Using PDF Exports from Figma
- PDF is an excellent format for sharing designs because it renders the content the same way on any device, which makes for a consistent experience.
- PDF is easily sharable via email, chat messaging, and other channels.
- PDF allows annotations and commenting to provide feedback.
- PDF can be converted to other formats for editing, or edited directly in a PDF editor.
Part 2: 2 Methods to Export from Figma to PDF
Method 1: Export Layers from Figma to PDF
The steps shown below are simple to execute. Once your prototype is ready, replicate these steps on your Figma account.
Step 1: Select the Figma layers that you want to export to PDF. This is important because you can choose specific layers if you only want to print a particular state of a transition or interaction. You can also deselect everything if you need to print all layers.

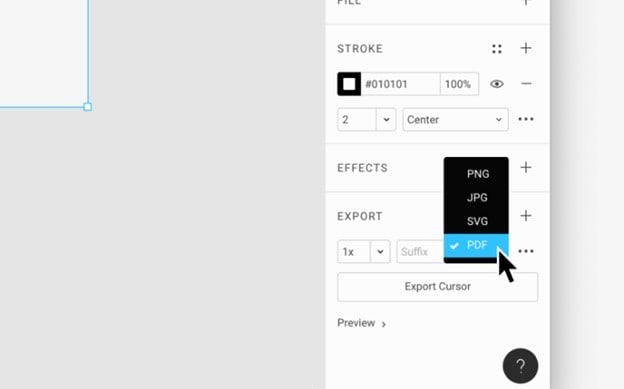
Step 2: Go to the Properties Panel on the right-side and select PDF in the Export section. You'll see it listed alongside other formats such as SVG, JPG, and PNG, which were already available before Figma added PDF as an option.
Step 3: Save the file to your desktop with an appropriate name.
Looking for a beginner-friendly yet cost-effective UI/Prototype design tool than Figma?
Wondershare Mockitt
UI/UX/Prototype Designer >>
Method 2: Export Figma Frames to PDF
You can also export a set of Figma frames as PDF if you need to. The Figma PDF export will be a single file with several pages, each of which contains a frame. The process is slightly different for this:
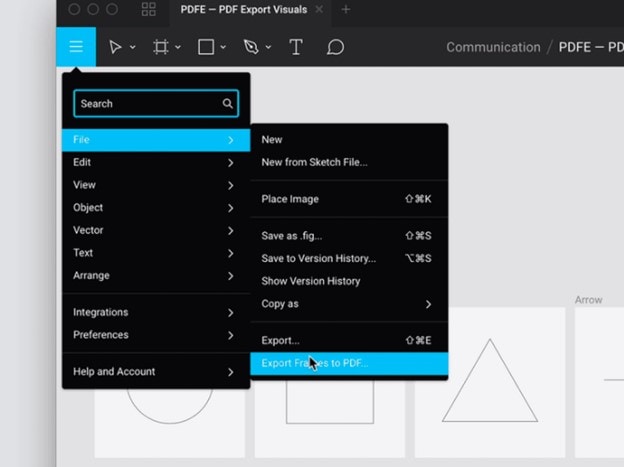
Step 1: Once you have your frames, use File → Export → Export Frames to PDF to save the PDF file.

Step 2: The system will automatically order the frames from top left to bottom right, as they appear on the Figma platform. If you need a different sequence, you must change the order in Figma before you export the frames.
Step 3: Save the PDF file with an appropriate name.
Sum Up: Using these two methods described above, you'll be able to extract your Figma design layers and frames to PDF. It might seem a little confusing at first but once you start using the feature it gets easier. Take special note of layer selection and sequence of frames prior to performing the Figma to PDF action. You can also take the help of a Figma PDF export plugin like Pitchdeck, which supports PDF and will give you the output in the form of presentation slides.
Tips for Exporting to PDF from Figma
- Make sure your images are either vector images or high-resolution raster images. This is important when printing to a full-page format.
- When printing, choose the appropriate mode in the Print settings - landscape vs. portrait. Some designs are better seen in landscape mode, especially if the aspect ratio is wider than it is tall, as in the case of 9:16.
- Secure the PDF with a password before sharing if it contains confidential information - you don't want it getting into the wrong hands! But make sure you send the password separately to all the authorized viewers for that document so they can access it.
Part 3: How to Export to PDF with a Figma Alternative
Figma is an excellent platform because of the vast third-party ecosystem around it. However, it's not the easiest platform to work on. There's one that's even better, and it is also hosted on the cloud.
Wondershare Mockitt is an intuitive and highly user-friendly online UI/UX design and prototyping platform with robust features built for collaboration within small and large teams. It comes with a large repository of assets and widgets, including resources such as UI kits, templates, and design systems for Material Design, iOS, and Web.
Additionally, it is more affordable than Figma and much easier to use if you're a beginner in the world of UI/UX design and prototyping. Moreover, the interactions, dynamic widgets, gestures, etc. provide you with ample options to make engaging and interactive prototypes.

Let's see how to export a design to PDF step-by-step:
Step 1: Complete your design by creating a new project and adding screens, into which you can drag and drop design elements to create the basic layout and additional page states for interactions.
Step 2: Rapidly prototype the design by dragging links from widgets and dropping them to their respective page states or screen states in the navigation panel on the left.
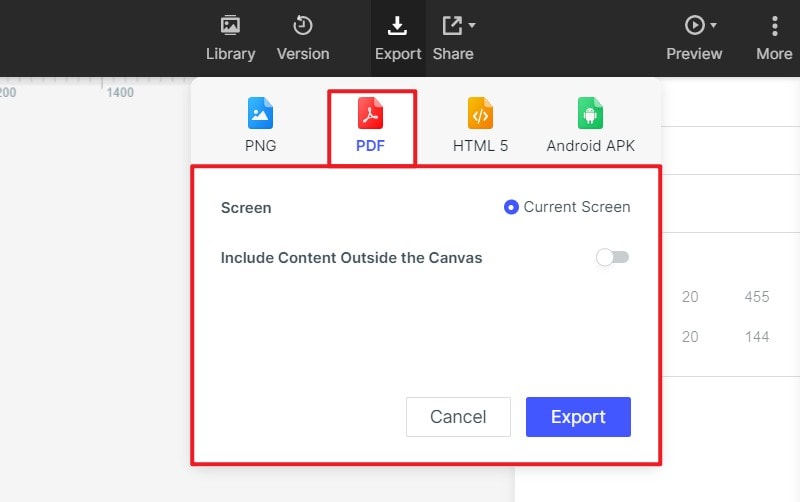
Step 3: You can now export the design as a PDF document by clicking Export, choosing PDF as your option, and then clicking Export below that. You can do this for any screen on your design, as well as include content that's outside the canvas area.

Mockitt makes it easy to share your screens via PDF, HTML5, PNG, and even as an Android APK package. You can also share your working prototype using the Share option, which allows you to generate a secure QR code or URL that can be set with specific permissions and changed at any time.
In addition, prior to generating the PDF, you can get collaborative feedback via the commenting feature, which other users can access using their own Wondershare logins or from the preview that you share with them. You can also add Sticky Notes to your design to explain certain aspects and features. Finally, all of the HTML and style code is automatically generated for all assets in real-time when you deploy them to your screens. This makes it easy for the developer handoff to go smoothly. The developer can log in to their own Mockitt account, inspect the code, and download all required asset data.

