How to Create 3D Wireframes

A 3D wireframe model is an edge or skeletal representation of a real-world object. 3D wireframe models consist of points, lines, arcs, circles, and other curves that define the edges or center lines of objects.
Some of the key advantages one can drive out of a 3D wireframe model could be listed as:
- Elementary 3D design creation for assessment and quick design iterations.
- View the created model from any viewing angle.
- Examine three-dimensional relationships in composition, including the distances, corners and checking potential interference.
- Perspective views creation.
- Automate auxiliary and orthographic views.
- Reference geometry for 3D solid, surface, and mesh modeling.
In instances where high screen frame rates are desired (like working with complex 3D models), most of the time designers use wireframe rendering techniques as it's relatively simple and quick in calculating. Specifically for instance where greater graphical detail is needed; surface textures can be added automatically after the initial rendering of the wireframe. Such practices permit designers to quickly evaluate solids or rotate the object to new desired views.
Creating 3D Wireframes may seem like a difficult task that can only be performed by experts in that section. However, with the right tool and the best guiding tutorial or article, you can also design your 3D Wireframes. To create 3D Wireframe, you will first have to draw or develop 2D Wireframe and then later on move to 3D by adding an extra dimension. By the end of this article, you will be able to differentiate 3D models from the 2D ones as well as get equipped with the skill of creating a 3D Wireframe.
- Part 1: What is 3d Wireframe and 2d Wireframe
- Part 2: How to Create 3d Wireframe
- Part 3: How to Create Wireframe with Wondershare Mockitt
What are 3D Wireframe and 2D Wireframe?
A 2D Wireframe model displays the drawn objects using curves and lines to denote the item boundaries. Some of the things visible in a 2D Wireframe include the type and weight of the boundary lines as well as Raster and OLE objects. More so, the compass is not visible even if the Compass system variable is set to 1.
On the other hand, a 3D model wireframe model also uses lines to demarcate the boundaries of the object displayed however, a 3D UCS icon is also displayed in the model. Unlike in 2D, you can view the compass in a 3D Wireframe model if the Compass system variable is set to 1. Besides, each object in the 3D wireframe will be displayed with the exact color you had applied.
2D Wireframe model displays the objects in only 2 dimensions and mainly used in designing plans, blueprints, and drawings. They describe the general layout of a site and where each item will be located, however, the depth of each object is not indicated. 2D Wireframes can be drawn on a piece of paper or even be drawn in computer software with the capability of creating models in two dimensions.
3D Wireframes contain an additional dimension hence display objects and items in 3 dimensions. This kind of Wireframes portrays more information about the entire project and also the individual items making it easier for you to have a close look at how the final product will be looking like. Unlike 2D, 3ds max wireframe can only be created in advanced computer software. The 3D Wireframes also incorporates information from aerial photogrammetry, Light Detection and Ranging as well as the Global Positioning System.
How to Create 3D Wireframe
Now with the knowledge of 2D and a 3D Wireframe model, you can differentiate as well as know the importance of each and when either of them should be used.
In this part, we will take you through a detailed step-by-step process of creating a wireframe AutoCAD.
Step 1:
Launch the program on your device and open a new blank page. The first step in drawing 3D Wireframes should be drawing sketches on varying planes. With the help of the User Coordinate System (UCS), you can make use of the different drawings or construction planes in creating your sketches.
Step 2:
You should take note that the above sketches made are in the 2D model, however, in the next step, we will show you how to move from the 2D Wireframes to 3D Wireframes.
Step 3:
Click on the Extrude Curve Function and use it to create a surface or solid shell. You can simply do this by extruding closed or open Wireframes curves to a particular distance specified by the user.
Step 4:
Tap on the Offset function in the program's interface. This incredible tool is used in creating extra surfaces from the current surfaces. Setting the Offset values determines the distance between the two surfaces and this tool can also be used in creating additional surfaces to solid geometry.
Step 5:
On the program's window, locate the Solid Split Function and click on it. The main function of this tool is to separate any solid body in the model using splitting surfaces. If you wish to separate each solid differently, then choose the specific solid body and select its splitting surface. The software will automatically draw multiple solids from the original solid body.
Step 6:
Another amazing feature that you will have to use while creating 3D Wireframes will be the Boolean Subtract tool. The functions that you will be able to access using this tool are Add, Intersect, and Subtract. The above three tools handle the intersection between the solid body and the surfaces differently.
Step 7:
The final tool to be used in creating 3D Wireframe is the Solid Fillet Function. Click on the tool from the current window to be able to create fillets for the solid bodies and the surfaces created.
Step 8:
However, you should note that the fillets will be created depending on the settings that you preset in the Data Entry Manager. The fillets will also be created based on the selected geometry in the Graphic areas.
How to Create Wireframe with Wondershare Mockitt
Wondershare Mockitt is a popular tool in the market and widely used by product designers, web, and App developers. The program has a simple and intuitive interface making it easy for you to use the tool in creating incredible products and blueprints. More so, this 3d wireframe tool can be used and accessed from various devices; Windows, macOS computers, Android as well as Apple mobile devices.

Outstanding Features
- Wondershare Mockitt supports cloud services thus enabling you to keep every project online and syncing the data.
- The design in the program is rich in build-in widgets and icons thereby allowing you to design an incredible interface effortlessly.
- Perfectly designed for group purposes and it allows you to add members and teams to the enterprise.
- The program allows you to make screen statics interactive with links to a different page or site. You can also animate and prototype websites and applications.
- Once done with your project or sketch files, you can export the image in various resolutions.
- It supports prototypes for varying devices such as Android and Apple mobile devices as well as Windows and macOS devices.
- You can also export your finished product in different file formats such as HTML, IPA, PNG, and many more others.
The following steps are on how to create a wireframe by using Wondershare Mockitt
Step 1:Create Project
Launch the Wondershare Mockitt software and enter your username and password to login in. Click on the "Create Project" button from the program's interface. Tap on the "Blank Project" button, enter the name of your project, and select the type of device you are currently using. Specify the model of the device you are using as well as the size of the project you will work on.
Alternatively, you can click on the "Create Project from Demos" to use the built-in templates.

Step 2:Add Widget
Drag the fast widget located on the left side of the window and drop them on the Canvas or you can simply double-click on the specific widget or icon to move it to the Canvas. Besides, you can move the widgets by holding on to the hotkeys and begin drawing.

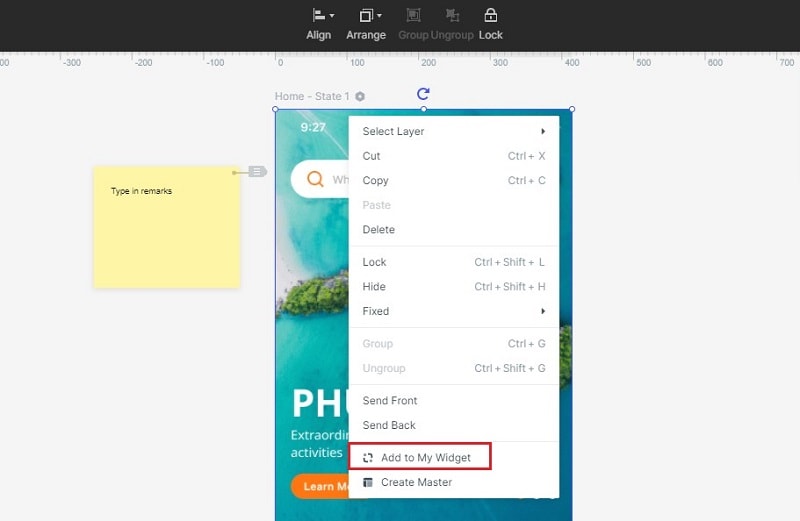
Step 3: Edit Widget or Save Them for future use
Click on any widget on the Canvas if you wish to edit it and make the changes necessary in the Inspector Panel of the Wondershare Mockitt. Drag the best widgets and drop them on the My Widget Panel to save them for future use.
Step 4: Preview and Share Your Wireframe
Click the "Preview" tab to allow you to interact with your wireframe. If you want to review on your mobile, just click "Share" to get the link and QR code, then you can preview your wireframe by the link or QR Code
Creating 3D model wireframe with Wondershare Mockitt is easy and it is the best tool for designing Wireframes or blueprints for products, web, or Applications.

