How to Create a Wireframe with Mockingbird

Every designer and web developer knows how crucial it is to create a wireframe. However, the good news is that there are some good tools like Mockingbird wireframe. The mockingbird wireframe tool is a web-based beta tool that is developed on the Cappuccino framework. With the help of a wireframe tool, such as a Mockingbird mockup, you will be able to see how the wireframe of the website or app will look like in real life. Mockingbird wireframe free tool is easy to use and operate. If you are thinking of using Mockingbird, but don’t know how to go about it, you have come to the right place.
- Part 1: How to Create Wireframe with Mockingbird
- Part 2: How to Create Wireframe with Mockingbird Alternative
- Part 3: Tips for Creating Wireframe in Mockingbird
How to Create Wireframe with Mockingbird?
Mockingbird is an efficient wireframing tool, and the good thing about this online software is that there is no need for Mockingbird wireframe free download. You don’t need to download or install any software. You can visit the website of the site and start using it as it is. However, readers may note that this software is used for creating wireframes for websites. This means you will only be able to use it for creating website wireframing and not for apps.
With the help of a wireframe, you will get to know where all the elements should be on the actual website. It always makes sense to create a wireframe before you build a site. Wireframing will help you sort out content issues, navigation issues, and place all the elements.
Step-by-step and Mockingbird wireframe tutorial on how to create a wireframe in Mockingbird:
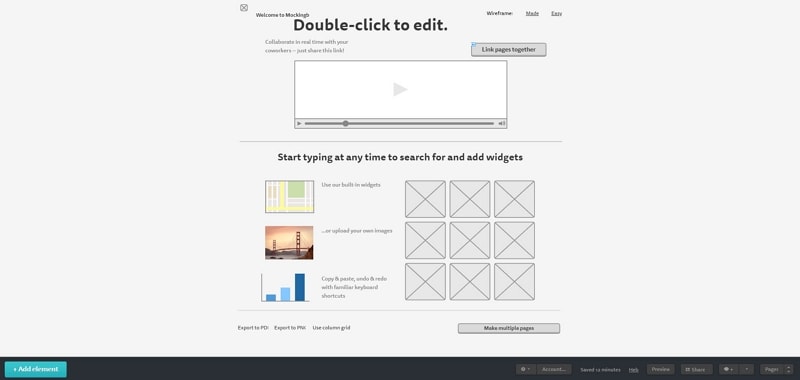
Step 1: Launch the Mockingbird Mockup Tool
The first thing that you need to do is visit the Mockingbird web application. You will see the option to try creating the wireframes for free. Do click on that. On the left, you will see all the elements that can be applied, and on top, there is a toolbar with tabs, such as, group, ungroup, forward, and more.
Step 2: Start Designing your Mockingbird Wireframe
You can use grids to make the wireframing easy for you. After that, you can add rectangle, round, image, drop-down, text, and more widgets that you can see on the left-side toolbar. Mockingbird has a lot of built-in components that will help you to create the wireframe for the website. You can change the font size of the text, too, if you wish. Icons and widgets are readily available for you to start the wireframing process.
Step 3: Preview the Mockingbird Wireframe
Once you are done with the wireframe. You can go to the photoshop app to add colors to the wireframe, and finally, you can preview the wireframe that you have created using this mockup tool. You can code the HTML later as you wish.
Step 4: Share your Mockingbird Wireframe
The last step is to share the wireframe you have created with your clients to get valuable input and feedback. The process is very simple. This tool is good for creating low-fidelity wireframing, though. Hence, if you want to create the layout of the website that you can share with your clients, this is the tool to go for.
How to Create Wireframe with Mockingbird Alternative?
In case you would like to go for an alternative, which will let you collaborate, add different tools and widgets, and more, then the best alternative is Wondershare Mockitt. Yet another online wireframing tool that is super easy to use. The best part about this tool is that it allows you to collaborate with your team or client in real-time and get instant feedback from them. Here are some of the features that you should know about.

- Design: Wondershare Mockitt allows designers and website developers to create wireframes and prototypes for free. You don’t need to install the software. You simply have to visit the website, click on create to begin the process, and that’s mostly about it.
- Interaction: Creating interactive wireframes with the assistance of this wireframing tool is super easy. It allows you to add interactive animation, which will enable you to add all the features that you would like to app or the website to have.
- Inspect and discuss: The hands-on specs that you get from Wondershare Mockitt make it easier for everyone to share and preview the wireframe that you have created. Through this, you will get real-time feedback and review from the clients instantly. Likewise, they can leave notes, or you may add notes too.
- Templates: This tool is an all-in-one prototyping and wireframing tool that comes along with plentiful templates to effectively design the wireframes. The templates can be added by using the drag and drop feature of the tool.
- Cloud: The final wireframe that you will create can be stored on the cloud to get easy access to it whenever you want to. You can share the wireframe with anyone anywhere.
Steps on how to create a wireframe with Wondershare Mockitt
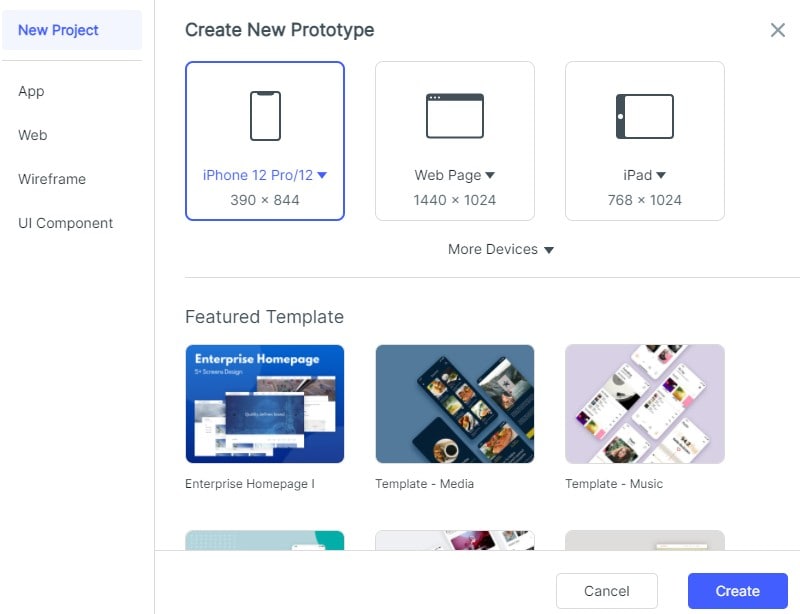
Step 1: Create a New Project
Open the website, and there you will see the option to create a new project. Because you would like to have an overview of the wireframe, click on that, and choose the right device that you wish to create the wireframe for. The options that you will have at hand are- PC, PAD, Smartphones, watch, and TV. Click on the webpage if you wish to create a wireframe for a website, else, click on the smartphone to create an app wireframe.
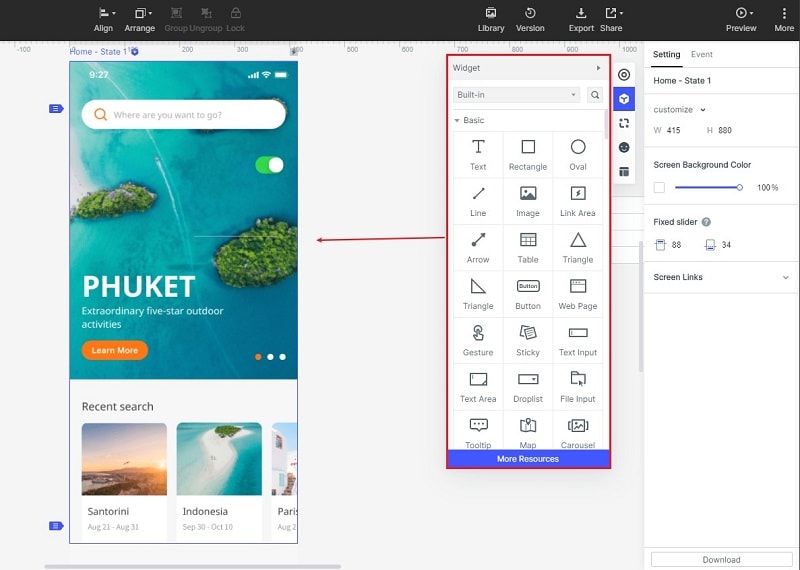
Step 2: Design the App/Website
Designing the app, or the website is super easy with Wondershare Mockitt. While designing the wireframe, you will get to see where you would like to place the elements. For example, where the text box will go, the image box should be placed, and the log should be placed.
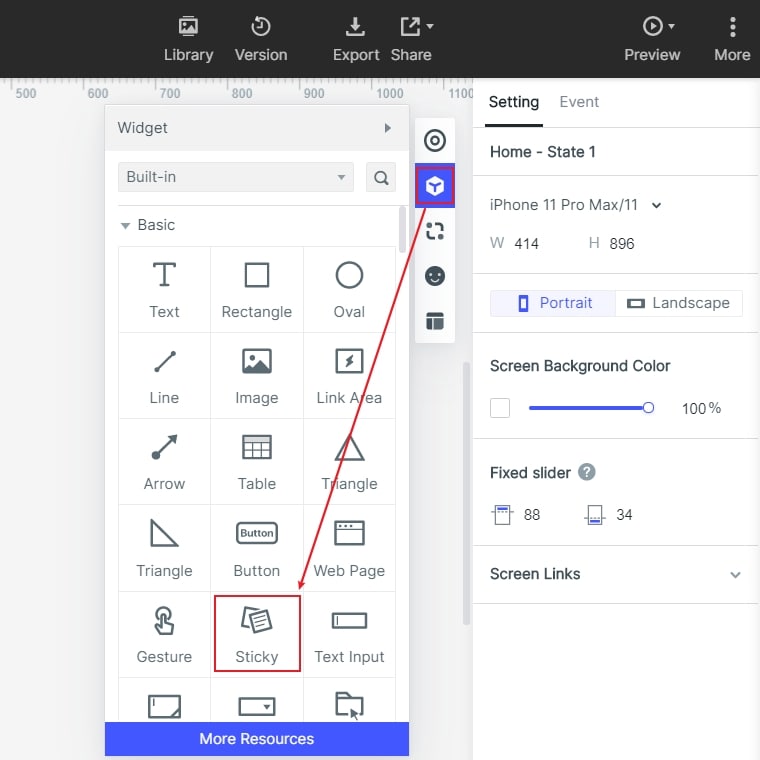
- Add widgets and icons: You will find the widgets and icons tool right beside this tool. Click on that to add as many icons and widgets that you wish to.
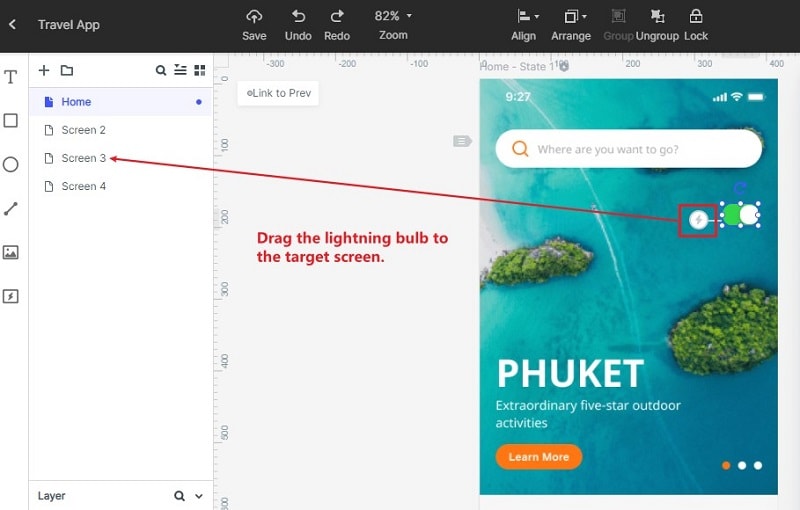
- Add links between screens: Screens have to be joined, hence add links to join different screens.
- Add notes: If you would like your client to know about the features or anything about the wireframe, you can add notes to see later.
- Create interactive animations: The tool allows you to add interactive animation for high-fidelity projects. You can add them to make the wireframe look intuitive.
Step 3: Preview the App/Prototype/Animation
Before sharing the prototype or the wireframe with your client, you will get the option to preview it. While previewing, make sure to edit all the required fields.

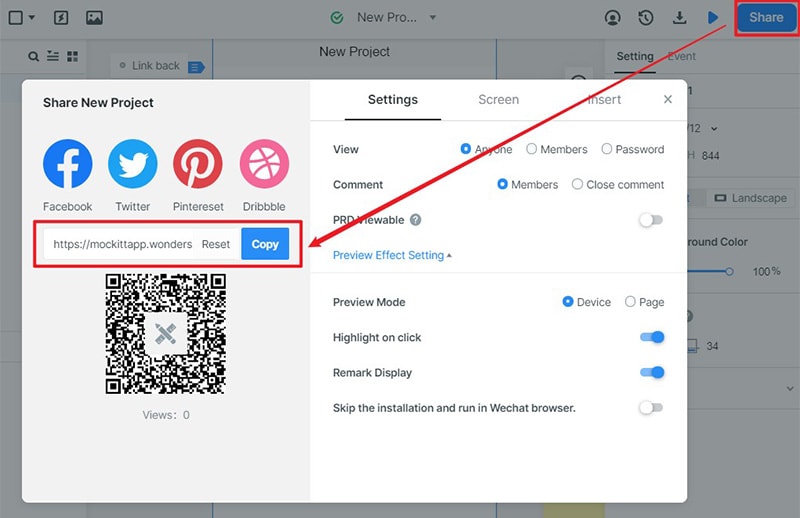
Step 4: Share the App/Prototype/Animation
Go ahead and share the wireframe with your clients to receive their valuable inputs.
Tips for Creating Wireframe in Mockingbird
- Explore the application before using it, and get to know about the different widgets, icons, and features it has to offer.
- Don’t feel scared to try different images, shapes, and texts on the wireframe. This is the process where you can try different items.
- Always create simple click-throughs.
- The wireframe should be clear and crisp. Don’t add too many features that might confuse the client.
