How to Draw a Wireframe with Easy Steps

Wireframes are essential tools in creating and designing applications. Drawing a wireframe is often the first step used by developers in designing the programs. Wireframe drawing may also be used by product designers and they can also be made interactive hence creating a blueprint of the intended product. Drawing wireframe is an easy task, however, this is dependent on the program that will be used in creating the wireframes. Many tools can be employed in creating Wireframes, but Wondershare Mockitt and OpenGL are the best 2 tools that you should first go after. The programs have a simple and intuitive interface hence ease of use.
- Part 1: Steps to Draw a Wireframe with Wondershare Mockitt
- Part 2: How to Draw Wireframe with OpenGL
Steps to Draw a Wireframe with Wondershare Mockitt
Wondershare Mockitt should be your first choice of the program if you want to draw Wireframe. This software has incredible tools and the interface is intuitive and user-friendly hence easy to use. This program is also cross-platform and can be comfortably used on Windows, macOS, Android as well as Apple devices. With this wireframe tool, you can also draw website wireframe or even animate it to make it livelier.
Some of the key features of this tool

- Wondershare Mockitt supports Cloud services thus making it easy to save as well as sync every project you are working on. You can access them anywhere and on any device.
- The program allows you to create Wireframes and Prototypes easily and freely. It has numerous widgets and icons which you can add in the interface and make it stunning.
- This wireframe drawing tool allows the addition of members hence creating a team. This feature is necessary and very essential as it will allow the collaboration of the designer, developers, and manager in creating the Wireframe.
- You can easily create interactive elements in the Wireframe with this program. You can make use of the links to make the screens interactive.
- Additionally, you can add comments on the created Wireframe pointing out changes or recommending ideas on the project.
Here's how to draw a website wireframe
Step 1:Create Project
Enter your username and password to log in to the Wondershare Mockitt program. Click on the "Create Project" tab. You can either tap on the "Blank Project" or Create Project from Demos. You should select the latter option if you intend to use the program templates in creating the Wireframe.
Type the name of your project in the text box just below the "Blank Project" tab. Select the type of device you are using; mobile, tab, or PC. Now choose the specific device you are using such as Android mobile, Windows PC, or even macOS computer.

Step 2: Drag and drop Widget to Draw a Wireframe
Click on the "Save" button after you have edit or specify the project size. Drag the fast widget on the left side of the window and drop them on the Canvas. Besides, you can double-click on the individual widget to add it to the Canvas.

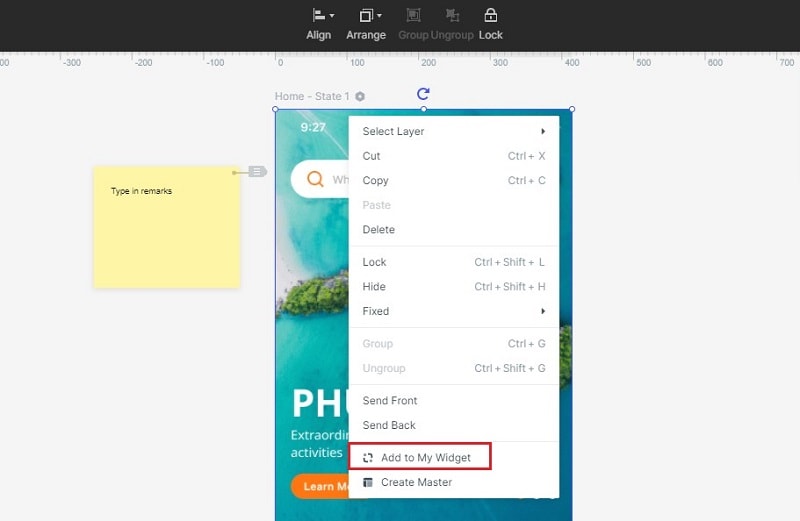
Step 3: Edit the Widget and Save for Future Use
Once in the Canvas, you can also edit the widget by clicking on it and making the necessary changes to it in the Inspector Panel.
Drag the created and designed widget to "My Widget" panel to save it for later or future use.
Step 4: Add Links Between Screen
Choose a widget and click the "New Link" button on the right side. Then Choose a gesture, action, state, and animation for your widget. To link an object to another screen, just drag the link icon to the destination screen and release it.

Step 5. Preview and Share
Finally, to preview your wireframe drawing on your PC,just click on "Preview".If you want to preview on mobile, click the "Share" button to get both the project link and QR code. Then you can preview your wireframe on your mobile by the link or OR code.

How to Draw Wireframe with OpenGL
Follow these simple steps to learn how to draw wireframe figures with OpenGL
Step 1:
Initialize and configure the GLFW settings in the OpenGL program. You will now need to create a new GLFW window with a specified height and width. If the new GLFW window fails to be created, then you can simply make it to fit the current context window or set to frame buffer size.
Step 2:
Load all the OpenGL pointer functions on the Window as this will make them available and ready to use when it's necessary.
Step 3:
The next step is to build up and then compiling the shader programs. First, you will need to compile the vertex shader, and once done, check if there are any shader compile errors. The other two shaders that you will need to compile include the Link and Fragment shaders. You should check for errors once compiled.
Step 4:
In this step, you will be required to set up the vertex data then followed by configuring the vertex attributes successfully. The new set of vertices will now be used for wireframes google drawing depending on your desires.
Step 5:
Bind the vertex array object first, followed by the preset vertex buffer, and finally configure the vertex attributes. If necessary, you can unbind the vertex array object so that other vertex array objects may not modify or edit the first one. However, this is a rare case and it shouldn't get you worried.
Step 6:
Draw the wireframe as you desire and as per the vertices you had earlier selected. This should be followed by swapping the poll IO events and buffers. Terminate and get rid of all the previous allocated GFLW resources in drawing the Wireframe.
