How to Create a Wireframe in Photoshop

For a wireframe, Photoshop is not really the best application to use, and there are many reasons for this, as we will see. Nevertheless, since the tool is almost ubiquitous for designers, most of them feel comfortable using it for nearly any purpose, including creating website and mobile application wireframes. If you're new to it, though, this article will show you the steps you'll need to execute in order to create a simple website wireframe in Photoshop.
How to Make a Wireframe in Photoshop
The first step for a wireframe in Photoshop or any other application is to have your requirements in hand. Assuming you're designing a simple website, you can start by making a template for the home page. This theme will be used throughout the site and will have some static elements as well as several interactive ones. It will also have multiple sections like the header, the menu bar, a sidebar, a photo gallery, and so on. Let's begin with that.
- Starting on a blank page, create a background for a specific set of dimensions. For example, the size of a normal web page is typically 1024 pixels wide by 768 pixels high. You can use that. Make sure the background is transparent.
- The next step is to start creating the content blocks per the requirements given by the client. First of all, put in all the content blocks that will remain the same in all pages. Now, save this as your basic template.
- Open a copy of the template file and create rectangular filled shapes for each content block, giving each one a fixed amount of opacity so it's visible against the background. Do this for all the content blocks you'll need for that page.
- Next, using the Text tool, start labeling the different content blocks to specify what they're for. You can use the terms the client gave you in the initial requirement document. Keep doing this for all the content sections. In the end, you have have a page that looks something like this:
- You can start doing this for all the inner pages as well. For the sake of consistency, remember to use your basic template with static elements as a starting point for all of them.

Note that the grayscale for different sections has been set differently. This gives some visual contrast but it's not absolutely essential. The purpose of a wireframe is to give the client a visual version of their requirements so they can sign off on the next phases like designing, prototyping, and development. The important thing is to keep it simple and understandable, and label it as clearly as possible.
As you can see, this is a very basic wireframe and it's pretty much all Photoshop is capable of, unless you're using something like a Photoshop wireframe plugin or a similar third-party utility. In reality, creating wireframes in Photoshop will result in something closer to a mockup because there aren't multiple wireframe pages that connect to each other with interactions, transitions, and other effects. This version will merely be a collection of PSD files, each representing one page of the website. As you can imagine, it won't give the client a full picture of how the website will actually work. For that, you will need a different tool that is capable of creating interactive wireframes that show the basic layout and elements as well as the process flow as the user interacts with the website or application.
For this, we'll use a robust and versatile Photoshop alternative called Wondershare Mockitt.
How to Create Wireframe with a Photoshop Alternative
Wondershare Mockitt is a comprehensive wireframe tool that takes you from wireframe to fully interactive prototype in a seamless manner. The biggest advantage over Photoshop is the ability to breathe life into your wireframe by giving it interactions, various page states, and dynamic widgets that make the design clickable and functional; in other words, just like how the real website would interact with a user.

- Extensive asset library of components that are customizable for saving and reusing later
- Wide range of gestures, animations, transitions, and effects
- Supports multiple device platforms
- Powerful collaborative environment (cloud-based and syncs automatically)
- Flexible preview modes
- Easy sharing with clients and other stakeholders
- Fully interactive prototypes can be created - clickable and animated
- Convenient handoff to developers with no coding required from the designer
Next, let's look at the specific steps for wireframing a web page using this Photoshop alternative:
Steps to Create a Wireframe without Photoshop
Unlike a Photoshop wireframe, a Mockitt wireframe can be made fully interactive. That means your client will be able to click on an element and see how the website or app will behave. In other words, it gives them a realistic experience even before the application or website has been developed. The steps are shown below:
Step 1: Create a Project for Wireframing
To begin, click on “Create New Project” and choose a device format and device name. Give your new project a name and proceed to the next step.

Step 2: Add Components to the Wireframe
Start adding content elements to create an initial layout with static elements that will remain the same on multiple page states. This first screen can be saved as a template and duplicated whenever you need to start a new artboard. It will avoid manual duplication of work.

On the homepage screen/canvas, add the components and widgets that are unique to that page, such as a video section, a list, a photo gallery, a menu bar, and so on. You can also edit the widgets in the properties panel on the right.
When you add a new screen to show a different page state, use the template so you don't have to start from scratch. Here, add the new element and link it back to the previous screen. You can easily do this by dragging the link icon to the left of the widget and dropping it on the target screen listed on the left panel. You can then edit the link to add transitions, actions, animations, and gestures.
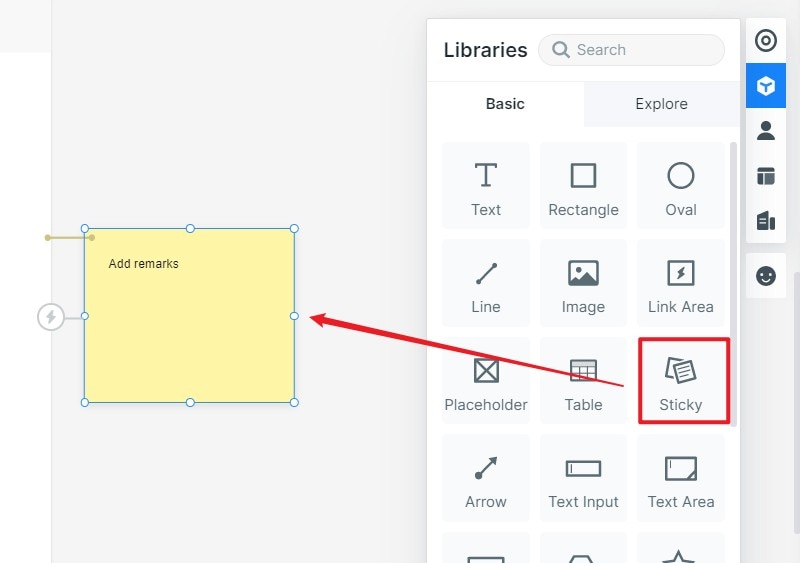
Step 3: Add Sticky Note to the Wireframe
As you create each page or screen, add the “Sticky” widget to leave notes to describe the purpose of each section. It will make the process flow easier for the client to follow.
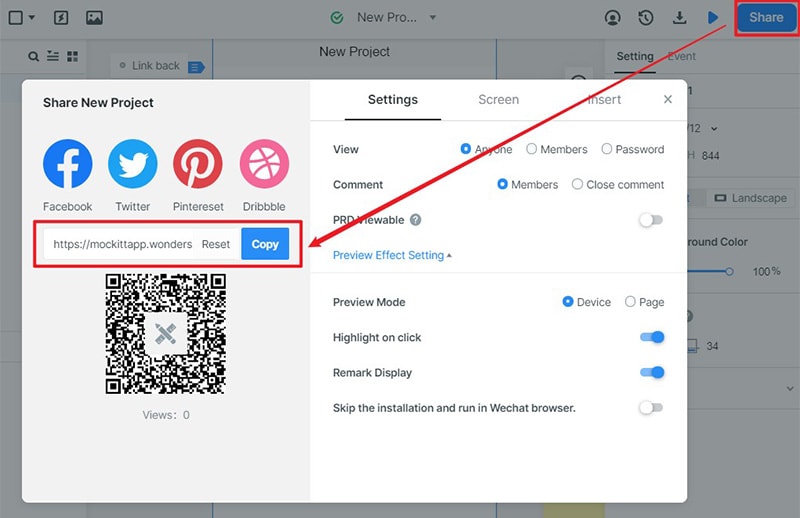
Step 4: Preview or Share the Wireframe
Once you have created a series of screens to show different pages and their multiple page states, you can click the Share button and generate a QR code or simple URL to share with others for review and feedback purposes.
And that's it! You have now created a wireframe in Wondershare Mockitt that is fully interactive and clickable. In short, a wireframe prototype.
Tips for Creating a Wireframe in Photoshop
Whether you're using Photoshop or another wireframing tool, there are certain simple principles you can follow to make your designs more efficient and save you a lot of time and effort.
- Wireframes should be as simple as possible - A complex wireframe that can barely be understood will only confuse the client, which is certainly counterproductive. The whole purpose of a wireframe is not to look good but to show how a particular app or site will function. It's like a blueprint for a building. The design comes later. So, there's no need to spend hours beautifying your wireframe; just get the functional aspects right and keep things consistent across multiple pages and page states.
- Create a custom library - Edit your widgets and shapes and save them or group them so you can use them over and over again without having to start from scratch every time. This will also bring in a high level of consistency.
- Start with the end in mind - You need to know how many artboards are required, how many states a particular interaction should have, etc. This will allow you to estimate the number of wireframe pages you'll need to create at the start. It will also help you estimate the total amount of time you'll need to allocate for the job, which might be important for billing purposes and cost projections.
We hope the content in this article has been helpful. Thousands of designers all around the world have found Wondershare Mockitt to be the most user-friendly and technically capable wireframe, design, and prototype tool they have ever used. Join us and experience the magic of Wondershare Mockitt for yourself.
