How to Create a Wireframe with Whimsical Wireframes

Whimsical emerged from a need for a fast and collaborative wireframing tool that fills the gap that a lot of applications like Sketch and Figma have left. With readily available designs, an intuitive interface, primarily left-hand shortcuts (so you can keep your hand on the mouse most of the time), chat collaboration, auto-sized buttons, quick state changes, and other features, it is one of the best tools for wireframing. However, Whimsical wireframes aren't interactive, even though they can show different page states, etc. What a whimsical prototype lacks, for example, is animation and other real-life transitions that make a prototype clickable and behave just like the final version of the app or web page. That's why, in addition to showing you how to create a simple Whimsical wireframe, we've also showcased a powerful Whimsical alternative to create a wireframe that is interactive with dynamic and clickable elements. Let's get started…
- Part 1: How to Create a Wireframe with Whimsical Wireframes
- Part 2: How to Create a Wireframe without Whimsical Wireframes
- Part 3: Tips for Creating Whimsical Wireframes
How to Create a Wireframe with Whimsical
Whimsical is specifically designed for wireframing, which means you'll have all the tools you need in a contextual manner, and you can even search for specific components instead of having to trawl through the entire library each time you want a symbol or icon. The interface is highly intuitive and you can usually get Whimsical wireframes done in much less time than it would take you in Sketch or even Figma.
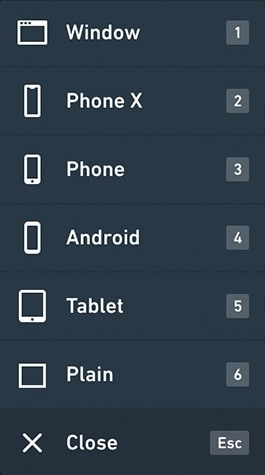
- When you open a project in Whimsical, the first thing you need to do is add a preset frame or artboard based on the device type that you're wireframing for. This is part of the toolbar panel on the left side. There are six options to choose from, including a ‘plain' option. Choose one and drag it to its relative position on the board.
- You can now start adding elements using the appropriate menu item in the same toolbar. This contains frequently used elements like text fields, buttons, separators, and so on. Again, click the one you want and drag it into the frame, position it, and resize it to the dimensions you want.

- Next is the icons, which you can add from the same toolbar. The unique feature here is that an icon can be changed once it has been placed in a frame. This allows you to add multiple instances of the same icon to make it faster and then change each one to the one you want in that position. It's also possible to do the same thing with the elements.
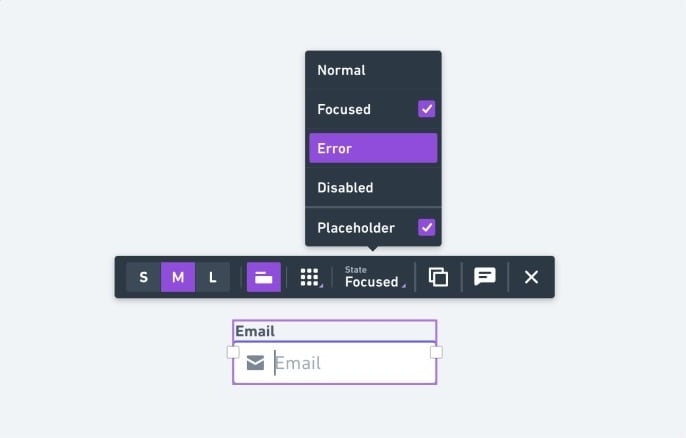
- You can also show state changes for each frame using the contextual toolbar. This allows you to switch from one state to another quickly and easily. You can do this by duplicating a frame using Ctrl+D or Cmd+D and then change the state of an icon or element in the duplicated frame.
- The next step is to use connectors to show the logic flow. This is done using the options from the left-side toolbar and can be used to show the relationship between different frames on your board.

Once you create the Whimsical wireframe, you can use the Share icon on the top right to generate a shareable link so others can review your creation. You can also download your design as a file or directly send it to a network printer.
How to Create Wireframe with a Whimsical Alternative
As mentioned earlier, these Whimsical wireframes aren't interactive and dynamic. If you want to impress your client with a functional wireframe instead of a static one, then you can use a Whimsical alternative like Wondershare Mockitt.

It is a powerful wireframing tool that will also allow you to complete the design and prototyping stages once your wireframe is approved. In fact, a lot of prototyping elements such as transitions and animation can be integrated directly into the wireframe to make it clickable and interactive so the client can really see what happens when a button is clicked or an option is selected.
Features-wise, Wondershare Mockitt offers a wide range of assets as part of its libraries, the interface is intuitive and user-friendly, the menus are easy to navigate, you have a wide choice of effects such as gestures, animation, and transitions, and there are some unique features such as dynamic widgets to breathe life into your wireframes. The platform is also highly collaborative so all stakeholders including the developer can be brought into the design phase rather than have to wait for formal reviews or the ultimate developer handoff.
Steps to Create a Wireframe with Whimsical Wireframes Alternatives
Step 1: Create a new project and assign a name. Select the device type and model you're designing the wireframe for, and create your first screen.

Step 2: To add elements and icons, use the widget sections on the left or right. Simply double-click or drag them in place. You can edit them in the comprehensive properties bar on the right side.

Step 3: In this case, connectors are interactive links that you can drag from one element (using the link icon to the left of each widget or component) and drop to a target page. The links can then be edited to add animation, gestures, transitions, or another type of effect. You can also add links by clicking the New Link option on the right side.

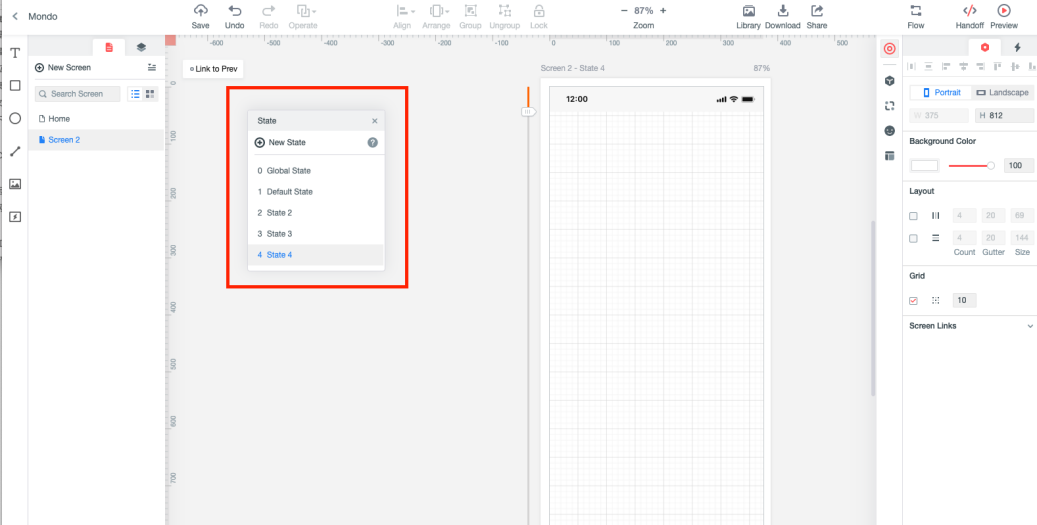
Step 4: Page states can be used to show the results of specific interactions, and the dynamic widgets feature lets you animate a particular widget within a page so the state changes within a single screen. The various states of a dynamic widget can be linked and the effects added exactly as shown in the previous step.
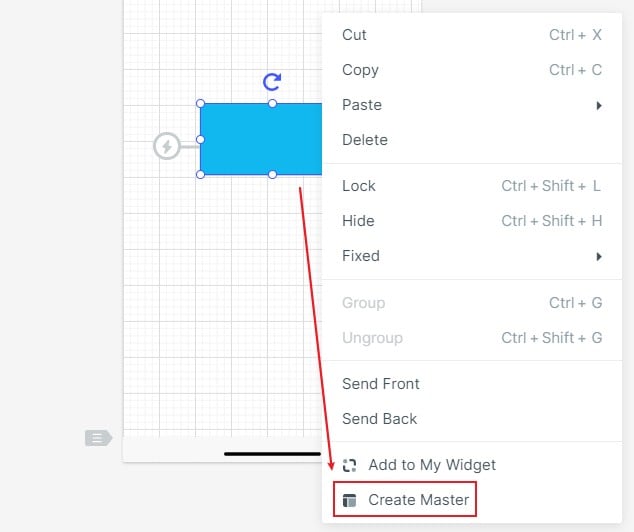
Step 5: You can also add widgets to your personal asset library or assign a Master status to a widget so editing it on one screen changed it on all the screens where you've used that widget.
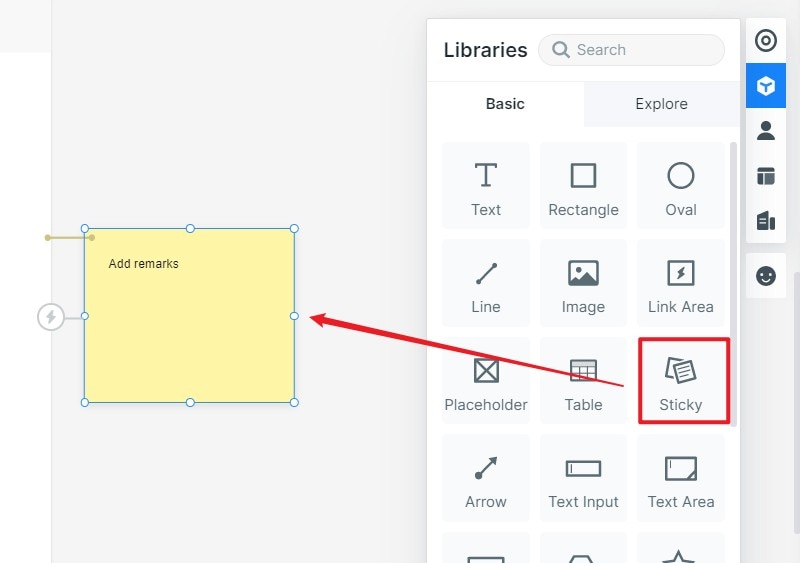
Step 6: Notes can be added using the "Sticky" widget, and your wireframe can be shared using a URL or QR code so other stakeholders can comment and provide feedback.
The process of creating Wondershare Mockitt wireframes is simple, as you can see, but the end result is a stunning and life-life wireframe that can mimic the functions of a real product like a web page or a mobile app. In short, it's a great Whimsical alternative to consider using for all your wireframing, designing, and prototyping needs. If you work regularly with Sketch, you can also import your Sketch files and fetch slices to automatically create multi-zoom slice files.
Tips for Creating Whimsical Wireframes
No matter what wireframing tool you use, whether it's Whimsical or a Whimsical alternative like Wondershare Mockitt, there are certain best practices you can follow to work faster and more efficiently. For example:
- Plan ahead - Before you start adding elements, you can create multiple frames based on how many pages and states you need to show in the final wireframe.
- Do your homework - Get familiar with the element, icon, and connector options so you can work faster when deadlines are tight.
- Keep it simple - Whimsical forcibly restricts working on minute details so your wireframes can be created faster, so follow that cue and don't waste time picking the right color or fine-tuning your icon attributes. The idea of a wireframe is to show functionality and form, not esthetics or design elegance. Remember that at all times.
We hope the processes and tips above help you make the right decision when it comes to using a wireframing tool. Whimsical is certainly a great application for simple wireframes designed quickly, but if you want something more comprehensive and client-friendly, we suggest trying out Wondershare Mockitt.
