How to Create Wireframe with Balsamiq

The concept of Wireframe is very popular and common especially for product designers. It is mainly used to show a preview of how the final product will be appearing. It is also widely used by web and mobile apps developers. In the Wireframe design, they will indicate the tools and the functionality of the final product. In this guide, we will introduce 2 ways that can be used to create a Wireframe effortlessly; using the Balsamiq tool as well as the Wondershare Mockitt program. You will also be privileged to learn the top and best tips and tricks when creating Balsamiq wireframe.
How to Create Wireframe with Balsamiq
To learn how to create wireframe balsamiq, you can follow these steps:
Step 1: Open the Wireframe Tools Balsamiq
Launch the Balsamiq program on your device and simply dragging the Browser UI Control and dropping it on the Canvas.
Step 2: Add Control Element to Your Balsamiq Wireframe
Some of the Controls that you will also need to add to the Canvas tool are Title, Image, and Text. Click on the "Title Control" button if you desire to change the size of the text in the Balsamiq Wireframes and use the Property Inspector to edit the size of the font.
Begin typing the word "Lorem" in the placeholder text box in the Text Control section and the term "Lorem Ipsum" will be generated immediately. You then ought to create as well as align the image page controls in the best order. To perform this you will be adding the little dots that are below an image that is showing a rotating content.
Step 3: Drag and Drop the Icon Control
Drag and drop the Icon Control to the Canvas and tap on the Open Icon Library. Select the icon that you desire, choose the Circle icon, and tap on the XS option as the size. You should add 3 more icons on the right side of the Circle icon. With the help of the guidelines, place the new icons next to each other.
Draw a boundary enclosing the four Circle icons to group them. Now, to align the Image Control with the grouped Circle icon, select both of them and click on the Align Center button located in the Property Inspector.
Step 4: Add the Tabs Bar Control
Insert the pager controls to the Balsamiq UI Wireframe with the help of the navigation keys in the keyboard. Add the Tabs Bar control and locate it at the bottom of the Balsamiq Wireframe. Make use of the Selection property to display the Overview tab and resize the Tabs Bar control to fit in the pager.
Step 5: Drag and Drop the Chart
Insert the Label and Text then finally, drag and drop the Chart: Column control to the empty area in the Tabs Bar. The Balsamiq Wireframe is now created and you can effortlessly export it as an image.
The Pros and Cons of Wireframe Tool - Balsamiq
Pros
- Simple and intuitive interface and the toolbar simplify the working process.
- You can easily convert the design to a PDF file
- The tool integrates easily and perfectly well on browsing tools.
Cons
- Some of the objects in the canvas are difficult to edit.
How to Create Wireframe with Balsamiq Alternative
Some numerous apps and wireframe tools like Balsamiq and lots more that can used to create wireframe, however, Wondershare Mockitt is the best alternative. This balsamiq ui wireframe alternative tool is an amazing and incredible tool and one that you should go for when you need to create alternative Balsamiq wireframe examples.

Key Features
- This program supports prototyping for various platforms such as Apple and Android devices.
- Designed for group works and designs since it has a commenting section.
- This wireframe tools balsamiq alternative tool allows the user to export images of various resolutions.
- This tool is richly featured with design widgets and icons to facilitate a smooth and seamless creation of Wireframe.
Steps to Create Wireframe with Balsamiq UI Wireframe Alternative Tool
Step 1: Create a Project
First, you need to login on the Wondershare Mockitt program then tap on the Create Project button. On the next window, you can click on the Blank Project tab and choose the device type you are using. Alternatively, you can tap on the Create Project from the Demos option. However, in both options, you should enter the Project name in the Text box above the device types.
Specify the device you are using and set or edit the project size then click on the Save button to enable the changes made.

Step 2: Add Widgets
You will now need to add the fast widgets on the left side of the window to the Canvas. You can perform this by; dragging and dropping the widgets to Canvas, double-clicking on the desired widget, or by pressing on the hotkeys and begin drawing.
To edit a widget, you just need to click on the widget and make changes to its properties in the Inspector Panel. If you are pleased with a well-designed widget, then you can save it for future use by dragging the Widget to My Widget panel.

Step 3: Add Links Between Screens
Once the widgets and icons have been added, you can add the link for you screen. Click on one widget in your screen, after that getting options on your screen select "New Link" in the link panel given on the right side. After doing that you can set the gesture, target screen or state, animation, and action for the widget.

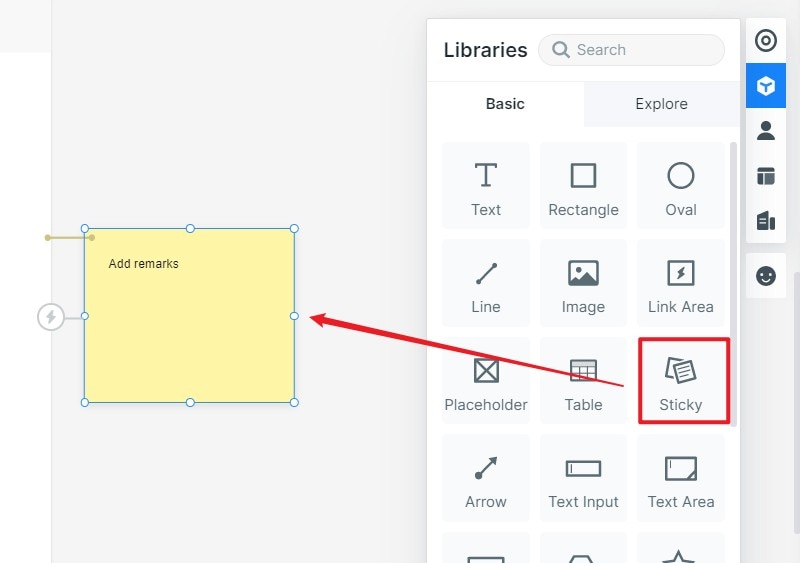
Step 4: Add Notes to Your Wireframe Design
Click on the Sticky tab in the Build-in Widget library to add notes to your Wireframe design.
Step 5: Preview and Share Your Wireframe Design
Just click "Preview" on the top toolbar. Adjust the settings such as Page Scroll, Highlight on click, Sticky, and Shell.
Click on the "Share" button, to get a QR code and link. Share it with others to review or test.

Tips on How to Create Wireframe with Balsamiq
- You should crystal clear on your objectives for creating the Wireframe. This will save you much of your time.
- It is recommended that before begin creating your Wireframe, you should first sketch all the ideas on a piece of paper. This will help you develop better and more options hence coming up with multiple solutions and identify new opportunities.
- Being consistent is a major key in creating a Balsamiq Wireframe. The labels, buttons, and tab should be consistent on each screen and this can be achieved by creating reusable styles and symbols.
- Using colors can be a great and tactful way of creating a Wireframe. Adding colors to the design makes the Balsamiq Wireframe appealing as well as helps the view to easily capture the essential elements.
- You should include annotations when creating your Balsamiq ui Wireframe. When presenting your Wireframe, you should begin by introducing the annotation as this will make the audience understand your Wireframe design more easily.
